
Baking bread at home should be a rewarding experience—golden crust, soft interior, the aroma of fresh yeast filling the kitchen. But when your dough refuses to rise, it can feel like a personal betrayal. You followed the recipe, measured carefully, kneaded with care, yet the result is flat, dense, or worse—no rise at all. The issue often lies in one critical component: yeast.
Yeast is a living organism, and like any living thing, it has specific needs to thrive. When those needs aren’t met, fermentation stalls, and your bread fails before it even reaches the oven. Understanding why dough doesn’t rise—and how to rescue sluggish or inactive yeast—is essential for consistent success in home baking.
Understanding Yeast: The Engine of Bread Rise
Yeast, specifically *Saccharomyces cerevisiae*, consumes sugars in flour and produces carbon dioxide and alcohol as byproducts. The gas gets trapped in the gluten network, causing the dough to expand. This biological process is what gives bread its airy texture.
However, several factors can disrupt this process. Yeast may be dead, dormant, or operating under suboptimal conditions. Before assuming your recipe is flawed, consider the health and environment of your yeast.
Freshness matters. Active dry yeast and instant yeast typically have a shelf life of 6–12 months if stored properly. Expired yeast loses potency. Even within the expiration window, exposure to heat, moisture, or air can degrade performance.
“Yeast is alive. Treat it with care, test it when in doubt, and give it the right conditions—it will reward you with perfect rise.” — Dr. Helen Park, Food Microbiologist & Baking Science Researcher
Common Reasons Why Bread Dough Fails to Rise
Dough that won’t rise is rarely due to a single cause. More often, it’s a combination of overlooked details. Here are the most frequent culprits:
- Dead or expired yeast: Using old or improperly stored yeast kills activity before mixing begins.
- Water temperature too hot or too cold: Water above 140°F (60°C) kills yeast; below 95°F (35°C) slows activation significantly.
- Inactive starter (in sourdough): A weak or unfed sourdough culture lacks sufficient microbial strength to leaven dough.
- Insufficient sugar or food source: Yeast needs carbohydrates to produce gas. Low-sugar recipes or poor-quality flour may limit fermentation.
- Cold environment: Dough rises best between 75°F and 85°F (24–29°C). Drafty kitchens or winter temperatures slow or halt fermentation.
- Too much salt added early: Salt inhibits yeast activity. If mixed directly with yeast without buffer, it can suppress growth.
- Over-flouring or dry dough: Excess flour creates a stiff matrix that restricts expansion.
- Expired or low-protein flour: Weak gluten development prevents gas retention, leading to collapse or no rise.
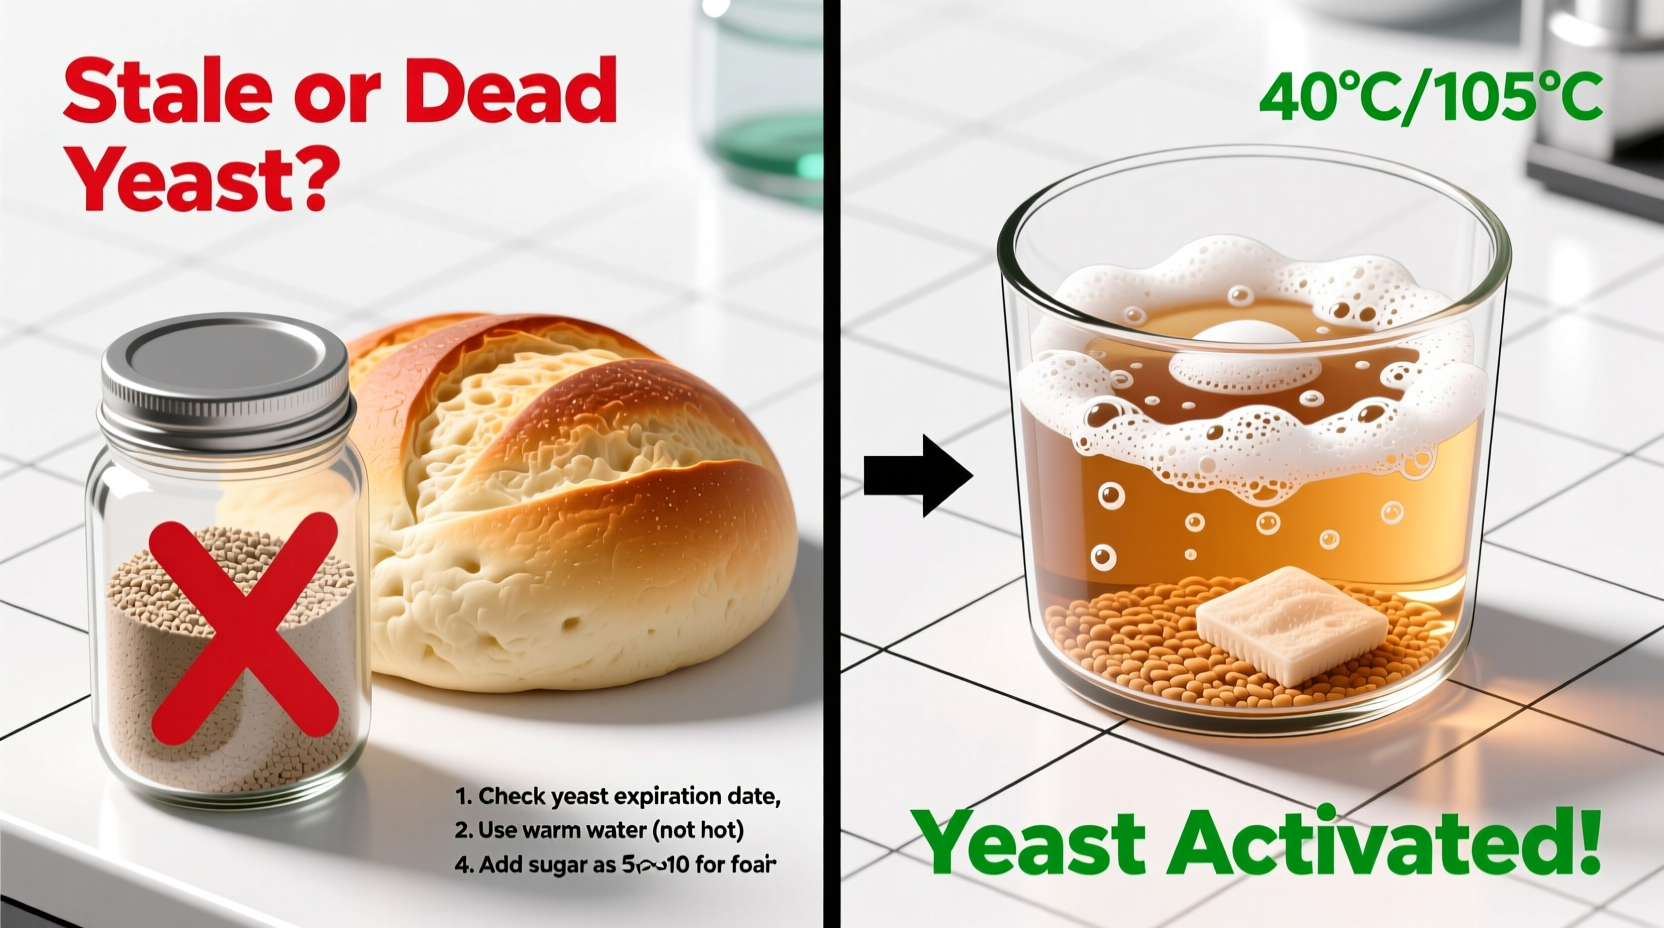
How to Properly Activate Stubborn Yeast
When yeast seems unresponsive, don’t discard it immediately. Many times, it’s merely dormant and can be revived with proper activation.
Step-by-Step Guide to Activating Yeast
- Gather Supplies: Use ¼ cup warm water (105–110°F / 40–43°C), 1 teaspoon sugar, and 2¼ teaspoons (one packet) of yeast.
- Mix Ingredients: Combine water, sugar, and yeast in a small bowl. Stir gently to dissolve.
- Wait and Observe: Let sit undisturbed for 5–10 minutes. Healthy yeast will foam vigorously, doubling in volume.
- Evaluate Results:
- If foamy and fragrant: yeast is active—proceed with recipe.
- If minimal bubbles or no change: yeast is dead or weak. Discard and use a fresh batch.
- Adjust if Needed: If only partial activation occurs, increase yeast quantity by 50% or extend bulk fermentation time.
This method, known as “proofing,” is especially crucial for active dry yeast. Instant yeast can often be mixed directly into flour, but proofing it first adds a safety net when results matter.
Reviving Old Yeast: Is It Possible?
While dead yeast cannot be resurrected, marginally active yeast may still contribute to fermentation. Try increasing the amount by 1.5x or combining with a fresh packet. However, relying on weak yeast risks inconsistent rise and off-flavors.
For long-term reliability, store yeast in an airtight container in the freezer. Cold, dry conditions preserve viability for up to two years.
Troubleshooting Environment and Technique
Even with healthy yeast, external conditions can sabotage rise. Home bakers often underestimate the impact of ambient temperature and humidity.
| Factor | Optimal Condition | Problem if Not Met |
|---|---|---|
| Water Temperature | 105–110°F (40–43°C) | Hot water kills yeast; cold water slows activation |
| Ambient Temperature | 75–85°F (24–29°C) | Cool rooms double or triple rise time |
| Humidity | Moderate (40–60%) | Dry air forms skin on dough, restricting expansion |
| Salt Contact | Separated from yeast during mixing | Direct contact inhibits yeast metabolism |
| Rising Vessel | Oiled, covered bowl | Sticking or drying halts fermentation |
To create a warm proofing environment, place the bowl in an oven with the light on (not heated), near a radiator, or on top of the refrigerator—areas naturally warmer than room temperature. Alternatively, fill a sink with warm water and place the bowl inside, replacing water as it cools.
Real Example: Sarah’s Failed Sourdough Loaf
Sarah, an enthusiastic home baker in Vermont, struggled for weeks with dense sourdough loaves. Her starter bubbled daily, she followed online recipes precisely, yet her dough never rose properly in the basket.
After reviewing her process, she discovered three issues: First, her kitchen averaged 64°F (18°C) overnight—too cold for proper fermentation. Second, she fed her starter with chlorinated tap water, which inhibited microbial activity. Third, she used whole wheat flour exclusively, which absorbs more water and creates tighter gluten.
She adjusted: switched to filtered water, increased feeding frequency, moved the dough to a proofing box set at 78°F (26°C), and incorporated 50% bread flour. On her next bake, the loaf rose beautifully and opened with a satisfying crackle in the oven.
Sarah’s case illustrates that multiple subtle factors can combine to prevent rise. Addressing each systematically led to breakthrough results.
Checklist: Ensure Your Dough Will Rise
Before starting your next bake, run through this checklist to maximize success:
- ✅ Check yeast expiration date and storage conditions
- ✅ Proof yeast in warm water with sugar (especially active dry)
- ✅ Use a thermometer to confirm water is 105–110°F
- ✅ Mix salt separately or add after initial yeast activation
- ✅ Use high-protein bread flour for better gluten development
- ✅ Maintain a warm, draft-free rising environment (75–85°F)
- ✅ Cover dough to prevent drying out
- ✅ Allow adequate time—don’t rush fermentation
- ✅ Perform the “poke test”: gently press dough; if it springs back slowly, it’s ready
- ✅ For sourdough: ensure starter is peaking in activity (4–8 hours after feeding)
Frequently Asked Questions
Can I use honey or maple syrup instead of sugar to activate yeast?
Yes. Yeast feeds on simple sugars, and natural sweeteners like honey, maple syrup, or agave work well. Use 1 teaspoon dissolved in warm water. Note: raw honey contains antimicrobial properties, so avoid if yeast appears weak.
Why did my dough rise in the first proof but collapse during shaping?
This usually indicates over-proofing during the first rise. The gluten structure weakened, and gas escaped during handling. Reduce bulk fermentation time or lower the temperature. Also, handle shaped dough gently to preserve air pockets.
Is there a way to speed up rising without killing the yeast?
Yes. Place the covered bowl in a slightly warmed oven (turned off) with a pan of hot water on the rack below. The steam and warmth accelerate fermentation safely. Avoid exceeding 90°F (32°C).
Conclusion: Take Control of Your Rise
Bread dough that won’t rise is frustrating, but rarely unsolvable. By treating yeast as the living ingredient it is—and providing the right temperature, food, and environment—you gain control over one of baking’s most fundamental processes. Whether reviving a sluggish packet of yeast or optimizing your kitchen climate, small adjustments yield dramatic improvements.
Don’t accept flat loaves as inevitable. Test your yeast, monitor your conditions, and trust observable signs over strict timers. Every failed rise is a lesson in patience and precision. With these strategies, you’ll turn uncertainty into consistency—one perfectly risen loaf at a time.


 浙公网安备
33010002000092号
浙公网安备
33010002000092号 浙B2-20120091-4
Comments
No comments yet. Why don't you start the discussion?