
Baking bread at home should be a rewarding experience—golden crust, soft interior, that warm aroma filling the kitchen. But too often, bakers pull open the oven only to find a dense, flat loaf that never rose. It’s frustrating, especially when you’ve followed the recipe exactly. The truth is, bread failure rarely comes down to one mistake. More often, it's a combination of overlooked details involving yeast health, temperature control, ingredient quality, and technique.
The good news? Most rising problems are preventable—and fixable. With a clear understanding of how yeast works and what conditions it needs to thrive, you can diagnose issues quickly and get back to baking beautiful, airy loaves in no time.
Understanding Yeast: The Engine Behind Rising Bread
Yeast is a living microorganism that consumes sugars in flour and produces carbon dioxide gas and alcohol as byproducts—a process known as fermentation. This gas gets trapped in the gluten network of the dough, causing it to expand and rise. Without active, healthy yeast, there’s no gas production, and therefore no lift.
There are several types of commercial yeast used in home baking:
- Active Dry Yeast: Requires rehydration in warm water before use. Granules are larger and less perishable than fresh yeast.
- Instant (Rapid-Rise) Yeast: Can be mixed directly into dry ingredients. Works faster and doesn’t need proofing.
- Fresh (Cake) Yeast: Moist block form, highly perishable. Less common in supermarkets but prized by artisan bakers.
Each type behaves slightly differently, but all require three key elements to activate: warmth, moisture, and food (sugar or starch).
“Yeast isn’t just an ingredient—it’s a partner in baking. Treat it right, and it will deliver light, flavorful bread consistently.” — Dr. Lena Torres, Food Microbiologist & Baking Science Researcher
Common Reasons Why Bread Doesn’t Rise (And How to Fix Them)
1. Dead or Inactive Yeast
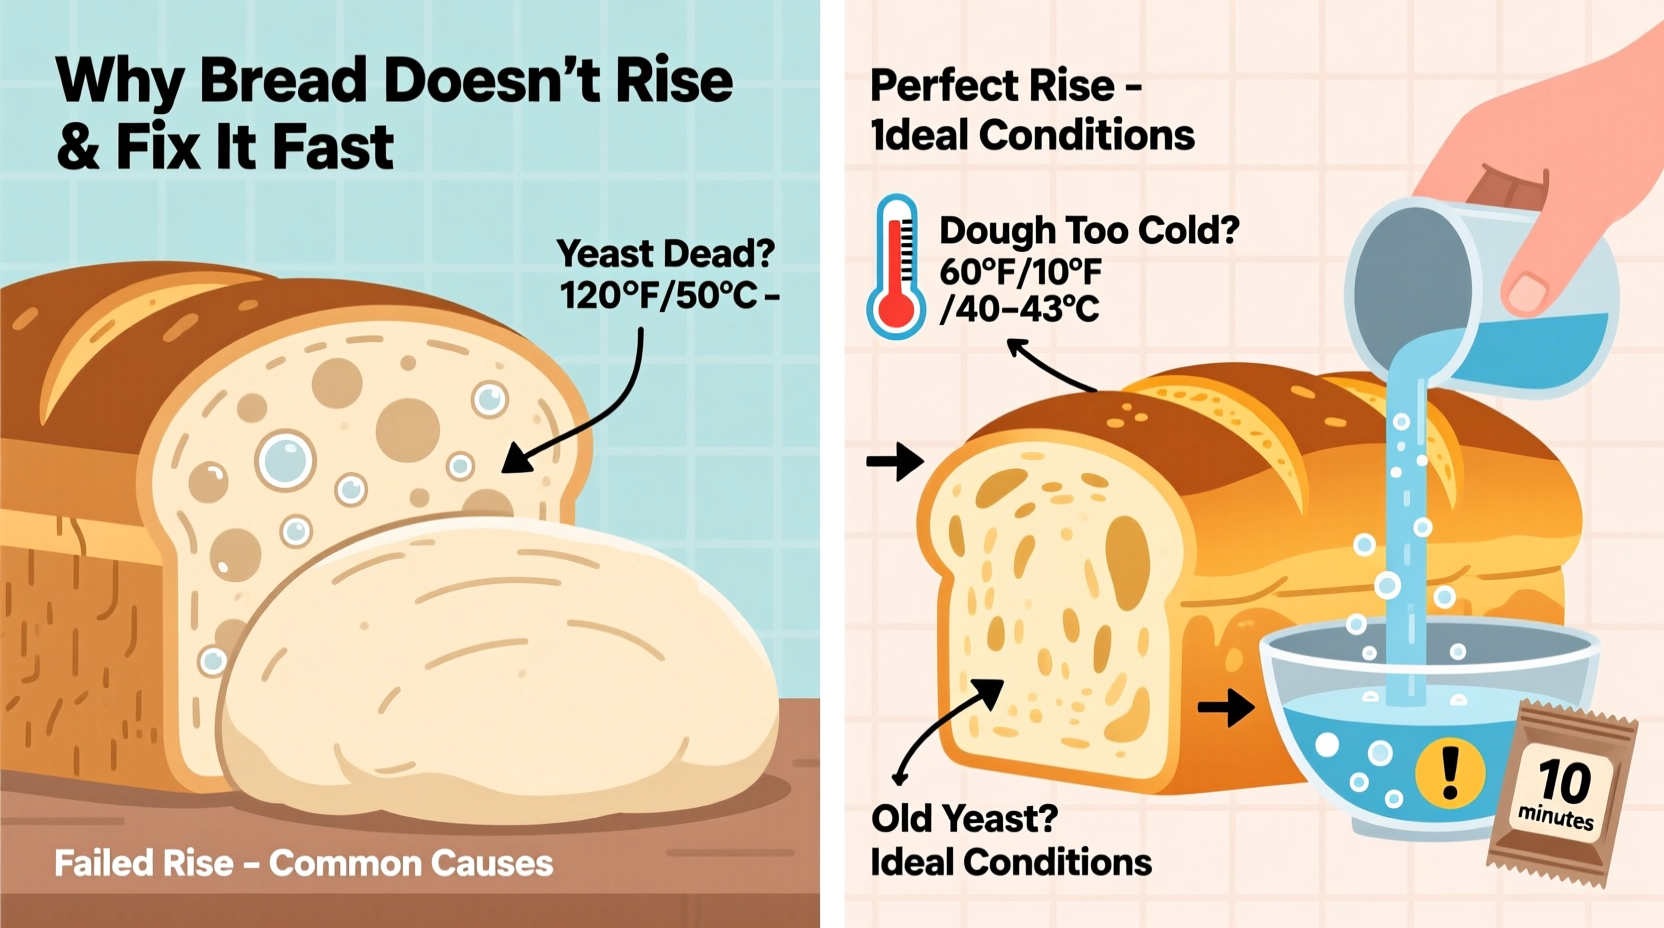
This is the most frequent culprit. If your yeast is dead, nothing else matters—the dough won’t rise. Yeast dies when exposed to water above 130°F (54°C), stored improperly, or past its expiration date.
2. Incorrect Water Temperature
Water that’s too hot kills yeast; too cold won’t activate it. The ideal range for activating active dry yeast is 105–110°F (40–43°C). Instant yeast is more forgiving but still performs best in this range.
Don’t rely on touch alone. Use a thermometer or let tap water run for 30 seconds until lukewarm if you don’t have one.
3. Poor Flour Quality or Wrong Type
Flour provides both food (starch) and structure (gluten) for rising bread. Using low-protein flours like cake flour results in weak gluten development, leading to collapse. On the other hand, old or bleached flour may lack nutrients needed for yeast activity.
Stick to bread flour for most recipes—it has 12–14% protein, ideal for strong gluten formation. All-purpose flour works in a pinch but may yield slightly denser results.
4. Cold Environment
Yeast slows dramatically below 70°F (21°C). A chilly kitchen or drafty spot can stall fermentation completely. Dough left near windows, air conditioners, or outside doors often fails to rise.
To fix this, create a warm proofing environment: place the bowl in a turned-off oven with a pan of hot water on the rack below, or use a microwave-safe cup of boiling water placed beside the dough.
5. Too Much Salt or Sugar
Salt controls yeast activity and strengthens gluten, but too much (more than 2% of flour weight) can inhibit or kill yeast. Similarly, high sugar content (as in sweet doughs) increases osmotic pressure, dehydrating yeast cells unless osmotolerant yeast is used.
If making rich, sweet breads, consider using instant osmotolerant yeast, designed specifically for high-sugar environments.
Troubleshooting Checklist: Diagnose Your Dough Fast
When your bread doesn’t rise, go through this checklist to pinpoint the issue quickly:
- ✅ Did you check the yeast expiration date?
- ✅ Did you proof the yeast in warm water with sugar? Was there foam after 10 minutes?
- ✅ Was the liquid temperature between 105–110°F?
- ✅ Is your kitchen warmer than 68°F?
- ✅ Are you using bread flour or all-purpose?
- ✅ Did you add salt directly onto undiluted yeast?
- ✅ Is your dough covered and in a draft-free area?
- ✅ Have you waited long enough? Some doughs take 2+ hours to rise in cool conditions.
Step-by-Step Guide to Reviving a Failed Dough
If your dough hasn’t risen after the expected time, don’t give up. Follow these steps to potentially save it:
- Check the Environment: Move the bowl to a warmer spot—ideally 75–80°F (24–27°C). Avoid direct heat sources like radiators.
- Test the Yeast Activity: Pinch off a small piece of dough, shape it into a ball, and place it in a cup of warm water. If it floats after 10–15 minutes, yeast is active and rising just needs more time.
- Feed the Dough: Mix 1/4 tsp sugar and 1/2 tsp fresh yeast with 1 tbsp warm water. Stir into the dough gently to reactivate fermentation.
- Retighten the Gluten: Turn the dough out, knead briefly (1–2 minutes), then reshape and return to the bowl. This redistributes yeast and rebuilds structure.
- Wait Patiently: Give it another 60–90 minutes. Don’t open the oven or move the bowl frequently—that breaks momentum.
If there’s still no rise after these steps, the yeast is likely dead. Use the dough for flatbreads or discard and start fresh with verified ingredients.
Do’s and Don’ts of Yeast Handling
| Do’s | Don’ts |
|---|---|
| Store yeast in the freezer for long-term freshness | Leave yeast at room temperature for months |
| Proof active dry yeast before use | Mix salt directly with yeast without dilution |
| Use filtered or bottled water if tap water is chlorinated | Use boiling water to speed up activation |
| Cover dough with a damp cloth or plastic wrap | Let dough dry out during proofing |
| Knead until smooth and elastic for proper gas retention | Under-knead or over-knead (until tearing easily) |
Real Example: Sarah’s Sourdough Struggle
Sarah had been trying to bake sourdough for months. Her starter bubbled nicely, she followed online recipes to the letter, yet her loaves remained stubbornly dense. She assumed her starter was weak and considered giving up.
After reviewing her process, she realized two issues: first, her kitchen averaged 64°F at night, slowing fermentation. Second, she was refrigerating her starter without feeding it adequately beforehand, weakening its strength.
She began keeping the starter on the counter with daily feeds, wrapped her rising dough in a heated blanket set to low, and preheated her Dutch oven thoroughly. On her next attempt, the loaf rose beautifully and cracked open with a satisfying crunch. The change wasn’t in the recipe—it was in environmental control and starter care.
How to Store and Extend Yeast Shelf Life
Yeast is perishable. Even unopened packages degrade over time, especially in humid or warm environments.
- Dry Yeast: Transfer to an airtight container and store in the refrigerator for up to 4 months, or the freezer for up to a year. Let it come to room temperature before using to avoid condensation.
- Fresh Yeast: Wrap tightly in foil or plastic and refrigerate for up to 2 weeks. For longer storage, crumble and freeze in portions.
Always label containers with purchase or opening dates. Never assume old yeast is usable—test it first.
Frequently Asked Questions
Can I substitute instant yeast for active dry yeast?
Yes, but adjust accordingly. Use 25% less instant yeast than active dry. For example, if a recipe calls for 2¼ tsp active dry, use 1¾ tsp instant. Also, skip proofing—mix instant yeast directly into dry ingredients.
Why did my dough rise but collapse when I baked it?
This usually means over-proofing. When dough proofs too long, the gluten structure weakens and can’t hold gas during oven spring. Press the dough lightly with a fingertip: if the indentation springs back slowly and leaves a slight dent, it’s ready. If it stays indented, it’s over-proofed.
My house is cold. How can I make bread rise in winter?
Create a DIY proofing box: place a heating pad on low under the bowl, use a seedling mat, or turn on the oven light (not the heat) and place the dough inside with a pan of hot water. Alternatively, let dough rise slowly overnight in the fridge, then bring to room temperature before shaping and final proof.
Final Tips for Reliable Bread Rising
Consistency in bread baking comes from attention to detail. Small variables compound: water temperature, flour freshness, ambient humidity, and even mixing time affect yeast performance.
- Invest in a digital thermometer to verify water and room temperatures.
- Weigh ingredients with a kitchen scale—volume measurements vary too much.
- Keep a baking journal noting room temp, rise times, and outcomes to identify patterns.
- Use high-quality, unbleached bread flour with consistent protein levels.
Conclusion: Rise Above the Failures
Bread that won’t rise is a common setback, not a permanent flaw in your skills. Every failed loaf teaches something valuable about temperature, timing, or technique. By understanding yeast biology and respecting its needs, you gain control over the entire process.
Start small: proof your yeast every time, monitor your kitchen climate, and keep your ingredients fresh. These habits transform inconsistent results into reliable success. Whether you're baking weekly or just starting out, mastery begins with patience and precision.


 浙公网安备
33010002000092号
浙公网安备
33010002000092号 浙B2-20120091-4
Comments
No comments yet. Why don't you start the discussion?