
It’s a familiar frustration: your phone charges slower than usual, disconnects randomly, or refuses to charge at all. You check the cable, the power source—everything seems fine—until you peer into the charging port and see a layer of lint, dust, and grime clogging the tiny metal contacts. How did it get so dirty so quickly? And more importantly, how do you clean it safely and effectively?
The truth is, your charger port is one of the most vulnerable parts of your device. Located at the bottom edge of your phone, it's constantly exposed to pockets, bags, and surfaces full of debris. Over time, this buildup interferes with electrical connections, leading to poor performance and even hardware damage. But with the right knowledge and tools, you can keep your port clean and your device running smoothly.
Why Your Charger Port Gets Dirty So Fast
Your phone spends most of its life in environments that are far from sterile. Whether it’s nestled in your jeans pocket, tossed into a backpack, or placed on a dusty desk, the charging port acts like a magnet for particulate matter. Here’s why dirt accumulates so rapidly:
- Pocket lint: Fabric fibers from clothing, especially cotton, shed continuously. Every time you place your phone in your pocket, microscopic lint particles are pushed into the port.
- Environmental dust: Dust particles float in the air and settle on surfaces—including your phone. The recessed design of the port traps these particles over time.
- Hand oils and sweat: Touching the port area transfers skin oils and moisture, which attract and bind dust, creating a sticky residue.
- Frequent plugging/unplugging: Each insertion of the charging cable can push debris deeper into the port, compacting it against the contact pins.
- Low placement: Most phones have the port at the bottom, making it prone to collecting debris when placed face-up on tables or floors.
How Dirt Affects Charging Performance
It’s not just about appearance. A dirty charging port directly impacts functionality. The metal contacts inside the port must make a solid connection with the charging cable for electricity to flow. When obstructed by lint or corrosion, that connection weakens or breaks entirely.
Common symptoms of a dirty port include:
- Intermittent charging (cable needs constant repositioning)
- Slow charging despite using a fast charger
- “Accessory not supported” or “moisture detected” warnings (false positives due to debris)
- Complete failure to charge
- Overheating during charging due to resistance from poor contact
“Even a small amount of lint can act as an insulator, disrupting the electrical bridge between the cable and the port.” — Dr. Alan Reyes, Electronics Engineer & Mobile Hardware Analyst
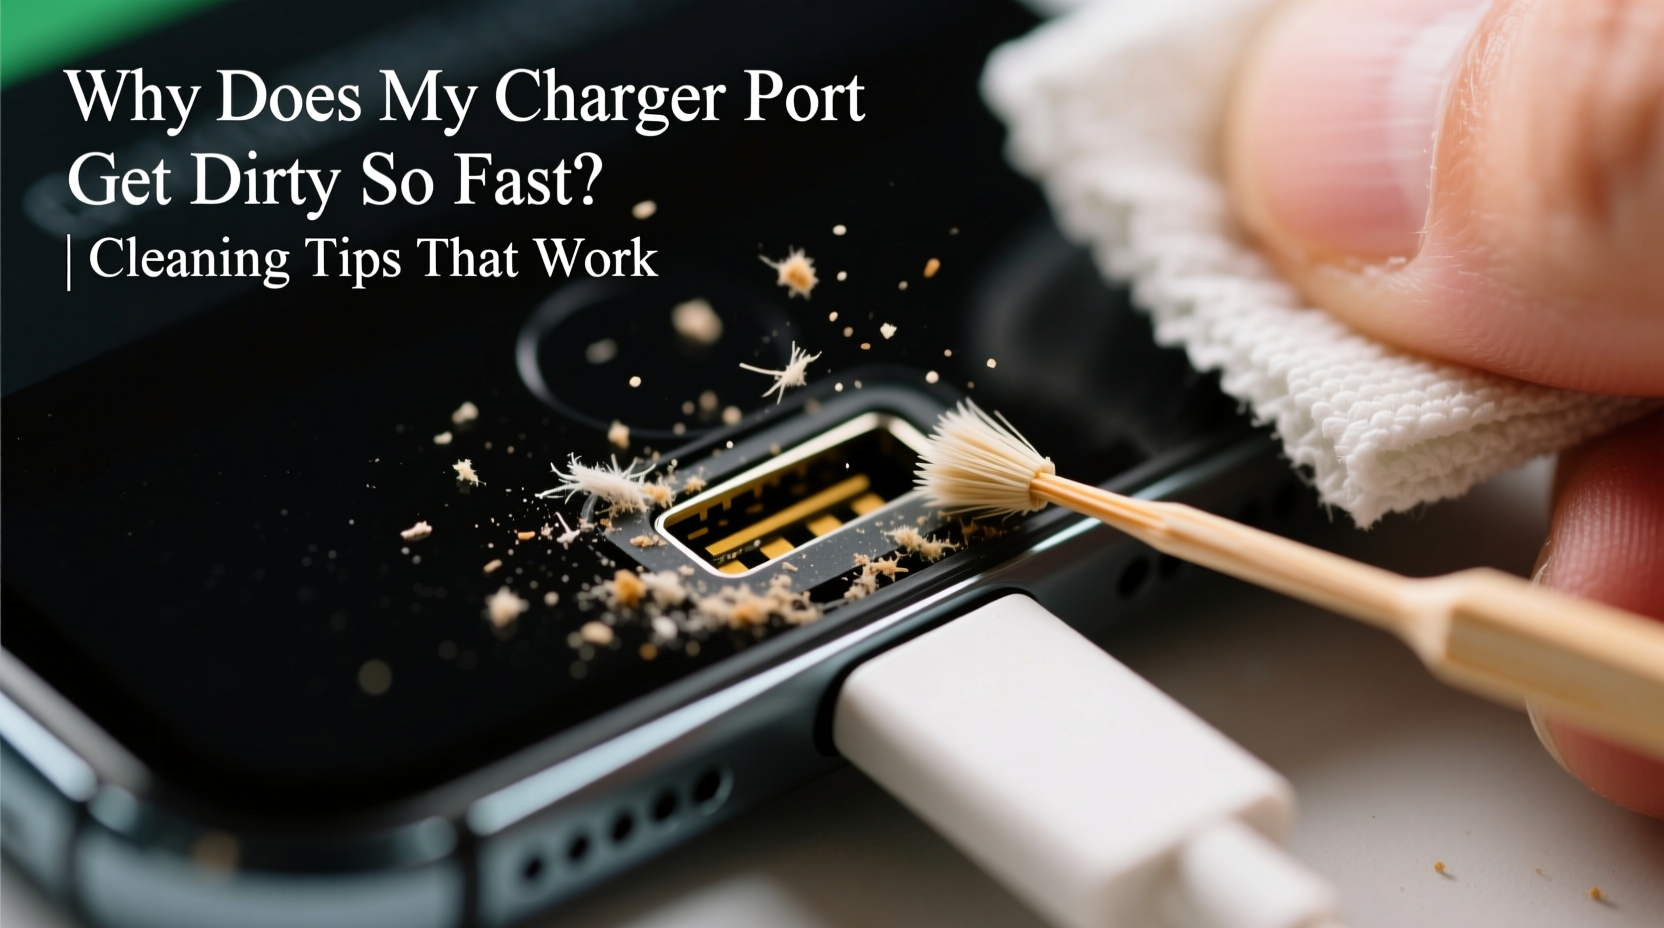
Safe and Effective Cleaning Methods: Step-by-Step Guide
Cleaning your charger port doesn’t require professional tools or expensive kits. However, it does demand caution. The components inside are delicate, and improper methods can cause permanent damage. Follow this step-by-step guide to clean your port safely and effectively.
- Power off your device: Always turn off your phone before cleaning. This prevents short circuits and protects internal circuitry.
- Gather the right tools: Use only non-conductive, soft instruments. Recommended items include:
- Plastic or wooden toothpick (not metal)
- Soft-bristled brush (like a clean toothbrush or artist’s brush)
- Compressed air (canned air, used gently)
- Magnifying glass or flashlight (to inspect the port)
- Inspect the port: Shine a light into the port. Look for visible lint, discoloration, or debris lodged between the contacts.
- Loosen debris with a toothpick: Gently scrape along the edges of the port. Use light pressure and avoid poking downward into the center where the pins are located. Work in one direction to push debris out, not deeper in.
- Brush out loosened particles: Use the soft brush to sweep away dislodged lint. Brush horizontally across the opening, never straight down.
- Use compressed air: Hold the can upright and use short bursts to blow out remaining dust. Do not shake the can or tilt it, as liquid propellant can spray into the port.
- Final inspection: Recheck the port. If debris remains, repeat the process. Never force anything.
- Test the connection: Plug in your charger and verify stable charging. Monitor for consistent behavior over several hours.
What NOT to Do: Common Mistakes That Cause Damage
Many people unknowingly worsen the problem by using unsafe cleaning techniques. These practices may seem effective but can lead to costly repairs.
| Don’t | Why It’s Harmful | Safer Alternative |
|---|---|---|
| Use metal objects (pins, paperclips) | Can scratch contacts or cause short circuits | Plastic or wooden toothpick |
| Blow with your mouth | Moisture and saliva introduce corrosion risk | Compressed air |
| Apply liquids (alcohol, water) | Liquids can seep into internal components | Dry brushing and air |
| Insert sharp or rigid tools | May bend or break internal pins | Gentle scraping with soft tools |
| Ignore recurring issues | Buildup leads to permanent contact wear | Regular preventive cleaning |
Real-Life Example: Sarah’s Slow-Charging Phone
Sarah, a busy marketing manager, noticed her iPhone was taking twice as long to charge. She tried multiple cables and outlets, but the issue persisted. Frustrated, she nearly bought a new phone—until a colleague suggested checking the charging port.
Under a flashlight, Sarah saw a thick clump of blue fabric lint—likely from her denim jeans—wedged deep inside. Using a plastic toothpick and a small brush, she carefully removed the debris. After a quick blast of compressed air, she plugged in the charger. The lightning bolt appeared immediately, and her phone began charging at normal speed.
This simple fix saved her hundreds of dollars and extended her device’s lifespan. Sarah now cleans her port monthly and keeps a mini cleaning kit in her desk drawer.
Prevention Checklist: Keep Your Port Cleaner Longer
Cleaning is essential, but preventing buildup is even better. Use this checklist to minimize future dirt accumulation:
- ✅ Wash hands regularly to reduce oil transfer to your phone
- ✅ Avoid placing your phone in pockets with loose fabric or tissues
- ✅ Use a protective case with raised edges to shield the port
- ✅ Store your phone in a dedicated pouch or compartment away from loose materials
- ✅ Clean your bag or pocket occasionally to remove accumulated lint
- ✅ Invest in a magnetic dust plug for the charging port when not in use
- ✅ Charge your phone before the battery drops below 20% to reduce cable insertion frequency
FAQ: Common Questions About Charger Port Cleaning
Can I use rubbing alcohol to clean the charging port?
No. While isopropyl alcohol evaporates quickly, applying it directly risks liquid seeping into internal components, which can corrode circuits or damage adhesives. Stick to dry methods unless under professional supervision.
How often should I clean my charger port?
Every 4 to 6 weeks for average users. If you frequently carry your phone in pockets, work in dusty environments, or notice charging issues, clean it every 2–3 weeks.
Is it safe to use a vacuum cleaner?
Generally no. Household vacuums generate static electricity and strong suction that can damage sensitive electronics. If you must, use a micro-vacuum designed for electronics with anti-static features—but compressed air is safer and more effective.
When to Seek Professional Help
While most cleaning can be done at home, some situations require expert attention. Visit a certified repair technician if:
- You see visible corrosion (green or white crusty residue)
- The port feels loose or wobbly when inserting a cable
- Debris is deeply embedded and won’t come out with gentle tools
- You’ve attempted cleaning and charging issues persist
- Your phone displays persistent moisture alerts despite being dry
Professionals use specialized tools like micro-suction devices, precision brushes, and inspection cameras to clean ports without causing damage. They can also test connectivity and replace the port if necessary.
“About 30% of ‘faulty phone’ cases we see are actually just dirty ports. A five-minute cleaning restores function in most instances.” — TechCare Repair Labs, Annual Service Report 2023
Conclusion: Take Control of Your Device’s Longevity
Your charger port may be small, but its impact on your phone’s performance is significant. Regular dirt buildup isn’t inevitable—it’s manageable with smart habits and proper care. By understanding why your port gets dirty so fast and applying safe, effective cleaning techniques, you protect both your device’s functionality and your investment.
Don’t wait until charging fails completely. Make port cleaning part of your routine, just like updating software or backing up data. A few minutes every month can prevent months of frustration later.


 浙公网安备
33010002000092号
浙公网安备
33010002000092号 浙B2-20120091-4
Comments
No comments yet. Why don't you start the discussion?