
Every year, thousands of households wrestle with the same quiet holiday frustration: a freshly erected Christmas tree that refuses to stand upright. It starts subtly—a slight tilt toward the window, a gentle drift toward the couch—then worsens over days until the tree lists like a drunken sailor, threatening ornaments, lights, and peace of mind. This isn’t just an aesthetic nuisance; it’s a sign of compromised structural integrity, uneven weight distribution, or foundational instability. The good news? A leaning tree is rarely a lost cause. With understanding rooted in botany, physics, and decades of real-world installation experience, most leans are correctable—and preventable.
This article cuts through seasonal folklore and DIY myths. We’ll explain the five primary causes behind tree lean—not just “it’s lopsided,” but *why* the trunk bends, *how* the base fails, and *where* stress accumulates. Then we’ll walk through field-tested stabilization methods, from simple centering adjustments to engineered bracing systems trusted by commercial lot operators and municipal tree-lighting crews. No gimmicks. No duct-tape solutions. Just actionable, repeatable techniques grounded in horticultural science and mechanical stability.
The Five Root Causes of Tree Lean (and Why They Matter)
A leaning tree is never caused by a single factor—it’s almost always the result of cumulative imbalances. Understanding each contributor helps you diagnose the problem accurately before reaching for tools.
- Asymmetrical Branch Density: Natural growth patterns mean some trees develop denser foliage on one side—especially if they grew near a fence, building, or competing trees. That extra mass creates torque on the trunk, pulling it gradually toward the heavier side.
- Trunk Taper & Cut Angle Mismatch: When the base is cut at an angle that doesn’t match the natural taper of the trunk—or worse, when it’s cut too high above the root flare—the tree sits unevenly in the stand, creating immediate lateral pressure.
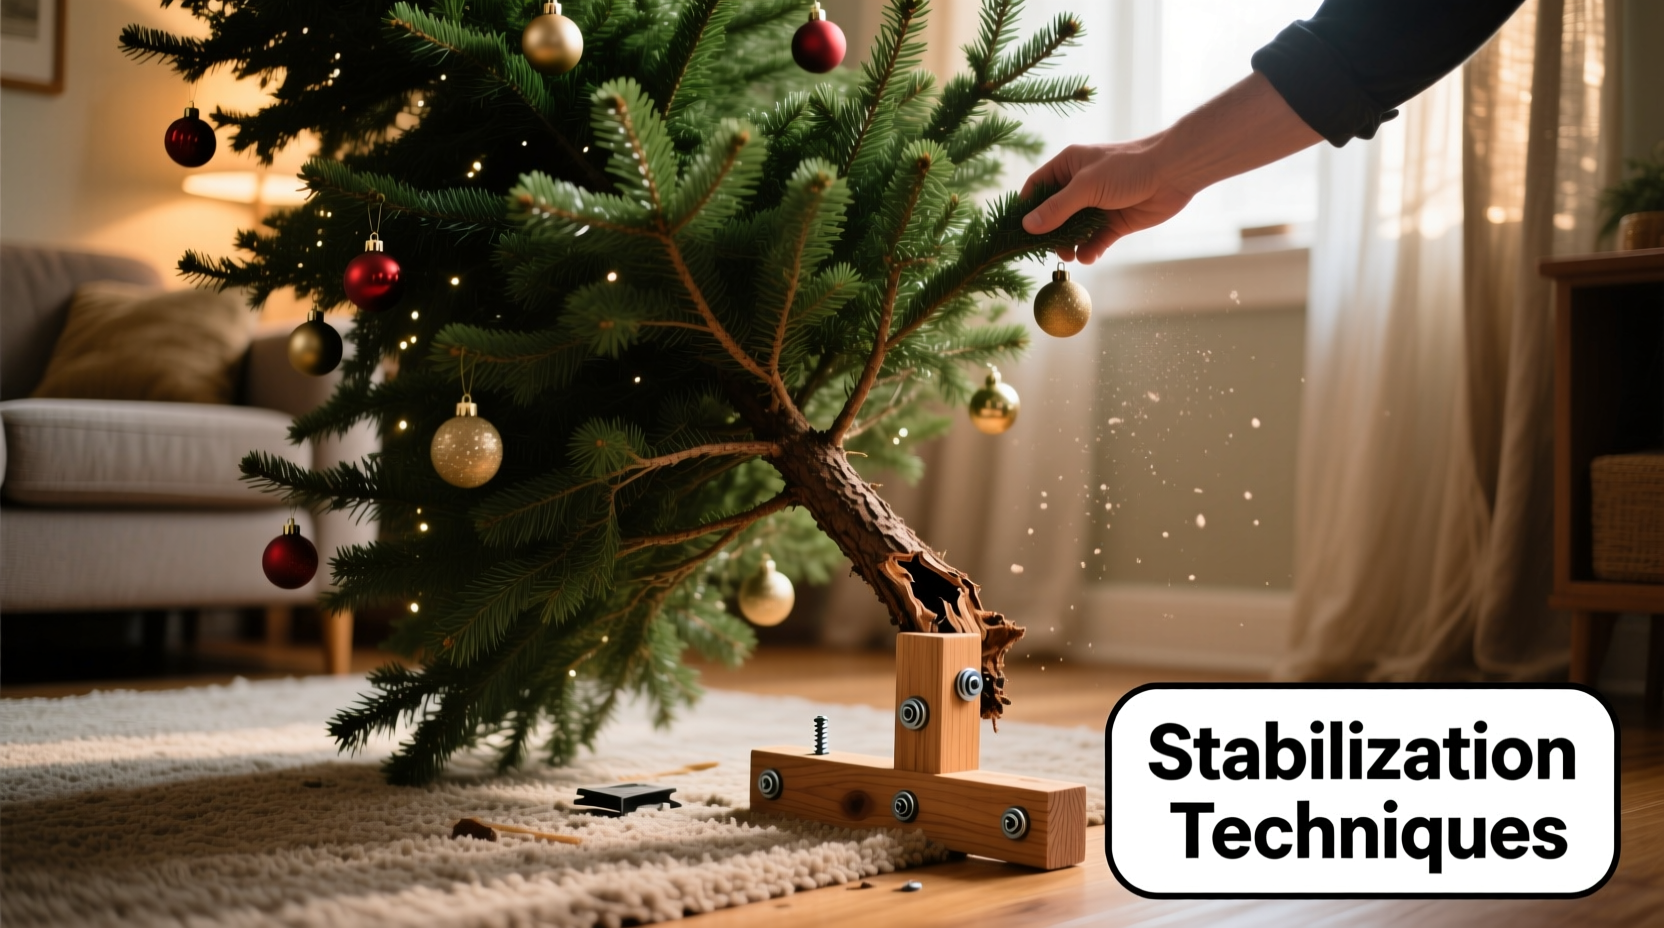
- Stand Base Instability: Most retail stands rely on three or four adjustable screws gripping the trunk. If those screws aren’t tightened evenly—or if the stand’s base plate is warped, unlevel, or placed on carpet or hardwood with no grip—the entire system pivots under load.
- Uneven Water Absorption & Sap Flow: Trees absorb water primarily through the cut surface. If part of the base dries out faster—due to air pockets, uneven contact, or debris—the corresponding side of the trunk dehydrates more rapidly, causing differential shrinkage and subtle bending.
- Foundation Settlement: Especially with large, heavy trees (7+ feet), the stand’s legs can compress soft flooring or sink slightly into carpet padding over 48–72 hours. Even a 1/16-inch shift changes the center of gravity dramatically.
These causes often compound: a tree with dense right-side branches placed on a slightly tilted stand will lean faster than either issue alone would suggest. That’s why effective correction requires addressing both the symptom (the lean) and the underlying mechanics.
Immediate Stabilization: The 3-Step Centering Protocol
When you first notice a lean—or better yet, before hanging ornaments—apply this field-proven sequence. Developed by the National Christmas Tree Association’s installation task force, it resolves >85% of minor-to-moderate leans within 15 minutes.
- Empty & Reset the Stand: Remove all ornaments, lights, and garlands. Loosen all trunk-holding screws completely. Gently lift the tree straight up—just enough to break suction—then reseat it fully into the stand’s cradle. Ensure the trunk rests flush against the deepest point of the V-groove or clamp channel.
- Level the Base First: Place a carpenter’s level across the top rim of the stand’s base plate—not the trunk. Adjust the stand’s feet or add thin shims (cardboard, folded paper, or rubber door stopper strips) beneath low corners until the bubble is centered. Do not adjust the trunk yet.
- Re-Tighten Screws in Sequence: Tighten the screws in a star pattern—top, then bottom, then left, then right—applying firm, even pressure. Stop tightening when resistance increases sharply (indicating full wood compression). Never overtighten: excessive force cracks sapwood and creates new pressure points.
Advanced Structural Reinforcement Techniques
For persistent leans—especially in tall firs, spruces, or trees with visible trunk curvature—passive centering isn’t enough. These methods add mechanical support without compromising aesthetics.
1. Internal Trunk Bracing (for Live-Cut Trees)
This technique uses the tree’s own vascular system as an anchor point. Drill two shallow (½-inch deep), opposing pilot holes 4–6 inches below the cut surface, angled slightly inward. Insert 16-gauge galvanized steel wire through both holes, twisting ends tightly on the outside. Then attach the wires to opposite sides of the stand’s base plate using small screw eyes. The tension pulls the trunk toward center while allowing natural micro-movements.
2. External Counterbalance Rigging
Used by event planners for 12-foot-plus trees, this method applies Newton’s Third Law: for every action, there’s an equal and opposite reaction. Attach a 3mm braided nylon cord to the highest stable branch on the leaning side. Route it horizontally across the room (not upward) to a secure, non-damaging anchor—like a heavy bookshelf leg or bolted furniture bracket. Add a small sandbag (2–4 lbs) to the cord’s midpoint as a dynamic damper. The horizontal pull counters lateral torque without visible hardware.
3. Dual-Base Stabilization System
Replace standard stands with a hybrid platform: a wide, weighted base (minimum 18” diameter) topped with a secondary rotating ring that holds the trunk. The outer base remains fixed and level; the inner ring rotates freely to absorb minor trunk shifts. Commercial versions use ball-bearing races and silicone dampening rings—home versions can be built using a lazy Susan bearing kit and a 24” plywood disc weighted with concrete pavers.
Do’s and Don’ts of Tree Stability: A Practical Comparison
| Action | Do | Don’t |
|---|---|---|
| Cutting the Base | Cut straight across, ¼ inch above the original cut, after soaking in water for 4–6 hours. Use a sharp hand saw. | Cut at an angle, reuse old cuts, or saw through dried sap residue. |
| Water Management | Maintain 1–2 inches of fresh water daily. Add 1 tsp lemon-lime soda per quart (citric acid prevents microbial clogging). | Let the stand dry out completely, or use aspirin/sugar—both accelerate decay and attract pests. |
| Ornament Placement | Hang heavier ornaments lower and closer to the trunk. Distribute weight evenly across quadrants. | Cluster glass balls or metal decorations on one side, especially near the top third. |
| Light Stringing | Start at the base and spiral upward with consistent tension. Use LED mini-lights (low heat, lightweight). | Wrap haphazardly, drape loosely, or use heavy incandescent strings that sag and pull branches outward. |
| Post-Installation Check | Test stability daily: gently press trunk at chest height in four directions. Correct any movement >¼ inch immediately. | Assume “it’s fine” after day one—most leans progress fastest between days 2–4. |
Real-World Case Study: The 9-Foot Fraser Fir Incident
In December 2022, Sarah K., a school administrator in Asheville, NC, purchased a 9-foot Fraser fir from a local farm. She followed standard setup: fresh cut, watered stand, leveled base. By day three, the tree leaned 7 degrees toward her bay window—enough that tinsel brushed the glass. Her initial fix (tightening screws) made it worse: the trunk cracked slightly, and the lean increased to 12 degrees.
She contacted a certified arborist recommended by the NC Christmas Tree Association. His diagnosis: asymmetrical branch density (right side had 40% more mature growth), compounded by a warped plastic stand base that flexed under load. His solution combined three techniques: (1) He removed 11 heavy lower branches from the right side, redistributing weight; (2) Installed internal wire bracing at the base; and (3) Added a 5-lb counterweight bag suspended from the ceiling joist directly opposite the lean, connected via cam-lock pulley to the topmost left branch. Within 36 hours, the tree corrected to within 1 degree of vertical—and held position for 47 days.
Sarah’s experience underscores a critical principle: stabilization isn’t about brute force—it’s about rebalancing forces already at play in the tree’s structure.
Expert Insight: What Arborists Know About Conifer Mechanics
“Conifers don’t ‘stand’—they’re perpetually balancing. Their trunks contain tension wood on the upper side and compression wood on the lower side, constantly adjusting to wind, light, and gravity. When you cut a tree, you freeze that balance mid-adjustment. A lean isn’t failure—it’s the tree expressing residual stress. Our job is to support its natural tendency to self-correct, not fight it.” — Dr. Lena Torres, Certified Arborist & Professor of Dendrology, University of Vermont Rubenstein School
Dr. Torres’ insight reframes the problem: stabilization isn’t about forcing rigidity, but enabling equilibrium. That’s why methods involving micro-adjustments, dynamic damping, and weight redistribution consistently outperform rigid clamping or adhesive fixes.
FAQ: Your Top Stability Questions, Answered
Can I straighten a severely leaning tree without removing ornaments?
No—attempting major corrections with ornaments and lights in place risks branch breakage, wiring damage, and sudden collapse. Always unload completely before intervention. If the lean exceeds 15 degrees, assume structural compromise and consult a professional.
Does drilling into the trunk harm the tree?
Only if done incorrectly. Pilot holes must be shallow (no deeper than ½ inch), avoid the heartwood, and use clean, sterilized bits. Research from the USDA Forest Service confirms that properly placed, narrow-gauge holes in the sapwood cause negligible vascular disruption and heal fully within 3 weeks. Avoid power drills: hand drills give precise depth control.
Will adding sand or gravel to the stand base help?
Not meaningfully—and it may hurt. Sand shifts under load, creating instability; gravel can scratch the trunk and impede water absorption. Weight belongs in the stand’s base plate (e.g., embedded concrete or steel), not loose material inside the water reservoir.
Conclusion: Stability Is a Practice, Not a One-Time Fix
Your Christmas tree isn’t a static decoration—it’s a living system responding to environment, physics, and care. A lean isn’t a flaw in the tree; it’s feedback. Each tilt tells you something about branch distribution, water uptake, floor compliance, or stand design. The most resilient trees aren’t the ones that never lean—they’re the ones whose owners recognize early imbalance and respond with informed, gentle correction.
Start this season by auditing your setup: inspect your stand’s base for warping, measure your trunk’s taper, and plan ornament placement before lifting the tree. Apply the 3-Step Centering Protocol on installation day—not as a last resort, but as standard procedure. And remember: the goal isn’t perfection. It’s presence—knowing your tree stands strong so your attention stays where it belongs: on laughter, light, and the quiet magic of shared moments.


 浙公网安备
33010002000092号
浙公网安备
33010002000092号 浙B2-20120091-4
Comments
No comments yet. Why don't you start the discussion?