
A leaning Christmas tree can be more than just an eyesore—it’s a safety hazard. Whether it’s threatening to topple under the weight of ornaments or slowly drifting toward the wall, a tilted tree undermines both the festive atmosphere and household safety. The good news: most tilting issues stem from preventable causes and can be corrected with proper technique and attention to detail. Understanding the mechanics behind tree stability helps ensure your centerpiece stays upright, secure, and picture-perfect throughout the season.
Common Causes of a Tilting Christmas Tree
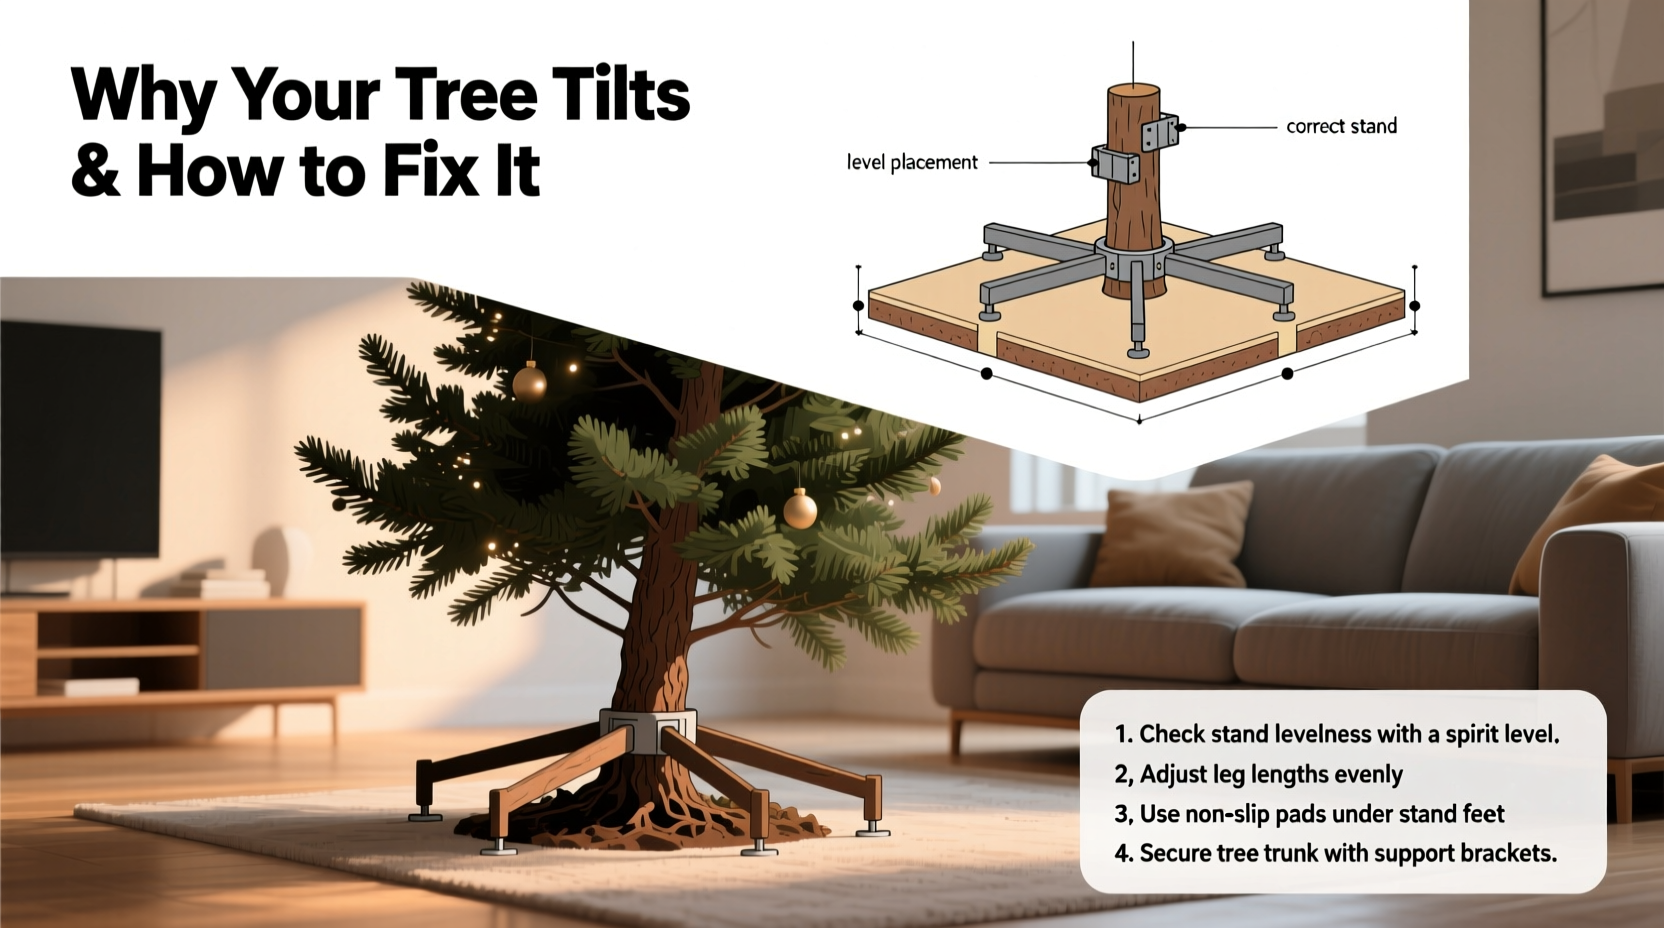
The first step in fixing a leaning tree is identifying what’s causing it. While some assume it's simply bad luck or an uneven floor, the reality is usually more mechanical. Trees tilt due to a combination of structural imbalance, improper setup, or equipment failure. Here are the most frequent culprits:
- Poorly trimmed trunk base: If the bottom of the tree isn’t cut flat and perpendicular to its length, it won’t sit evenly in the stand.
- Insufficient trunk contact with stand jaws: Many stands rely on metal clamps that grip the trunk. If the cut is too wide or the trunk is irregularly shaped, the grips may not make full contact.
- Overloading one side with decorations: Heavy garlands, oversized ornaments, or clustered lights create uneven weight distribution.
- Loose or low-quality stand: Plastic or outdated stands often lack the strength or adjustability needed for heavier trees.
- Uneven flooring: Carpets, sloped floors, or tiles with slight gradients can cause instability even if the stand appears tight.
- Drying out and shrinking: As a tree loses moisture, the trunk can shrink slightly, loosening the grip of the stand over time.
Choosing the Right Stand for Stability
Not all tree stands are created equal. The foundation of a stable display begins with selecting a stand engineered for your tree’s size and weight. A mismatch between tree and stand is one of the leading reasons for mid-season tilting.
Tree stands generally fall into three categories:
- Basic screw-type stands: Typically made of plastic or lightweight metal, these use two or three screws to clamp the trunk. Suitable only for small to medium trees (under 7 feet) and best avoided for heavy or full-bodied varieties like Fraser firs.
- Reservoir-based stands with lever tightening: These feature a water basin and a central lever that expands internal arms against the trunk. They offer better grip and hydration but require correct centering.
- Commercial-grade tripod stands: Designed for large or dense trees, these use three adjustable steel bolts that apply even pressure around the trunk. Ideal for trees over 8 feet or those with thick bases.
When shopping for a stand, prioritize weight capacity and adjustability. Look for models rated for at least 10–20 pounds more than your tree’s estimated weight. Also consider ease of access to the water reservoir—frequent refilling prevents drying, which in turn maintains trunk diameter and grip.
Stand Comparison: Features and Suitability
| Stand Type | Max Trunk Diameter | Water Capacity | Best For | Stability Rating (1–5) |
|---|---|---|---|---|
| Plastic Screw Clamp | 2.5 inches | 0.5–1 gallon | Trees under 6 ft | 2 |
| Lever-Action Reservoir | 4 inches | 1–1.5 gallons | 6–8 ft trees | 4 |
| Triple-Bolt Tripod | 6+ inches | 1.5–2 gallons | 8+ ft or dense trees | 5 |
Investing in a high-quality stand pays off in both safety and convenience. A sturdy base reduces the need for constant adjustments and minimizes the risk of collapse—especially important in homes with pets or young children.
Step-by-Step: How to Properly Secure Your Tree in the Stand
Even the best stand won’t perform well if the tree isn’t installed correctly. Follow this sequence to maximize stability from day one:
- Re-cut the trunk: Remove ½ to 1 inch from the bottom using a handsaw. This opens fresh wood cells for better water absorption and ensures a flat surface.
- Inspect the stand: Clean any debris from previous use. Check that all bolts, levers, and screws function smoothly.
- Fill the reservoir halfway: Add water before inserting the tree to test for leaks and simplify filling later.
- Insert the trunk vertically: Lower the tree straight down—do not force or angle it. Wiggle slightly if needed, but avoid twisting.
- Center the trunk: Ensure the tree stands in the middle of the stand. Use a level app or physical tool across branches to check alignment.
- Tighten evenly: If using a screw-type stand, tighten each bolt gradually in a star pattern—don’t fully tighten one side before starting another.
- Secure with additional support (if needed):strong> In high-risk environments, attach discreet fishing line or soft straps from upper branches to wall anchors.
- Top off water immediately: A freshly cut tree can drink a gallon in the first 24 hours. Keeping it hydrated prevents shrinkage and slippage.
Real-World Example: The Case of the Leaning Douglas Fir
Consider the experience of a family in Denver who purchased an 8-foot Douglas fir for their living room. Within two days, the tree began leaning toward the fireplace. At first, they assumed the hardwood floor was uneven. But upon inspection, they discovered multiple issues: the trunk had not been recut, the stand was a basic plastic model rated for 6-foot trees, and the left side was overloaded with handmade glass ornaments.
They resolved the issue by following a structured approach. First, they removed the tree and made a fresh horizontal cut. Next, they upgraded to a lever-action reservoir stand capable of holding trees up to 9 feet. After re-centering the tree and tightening the mechanism in stages, they redistributed decorations more evenly. Finally, they placed felt pads under one leg of the stand to compensate for a slight floor incline. The tree remained perfectly upright for the remainder of the season.
This case underscores a key principle: tilting is rarely due to a single factor. It’s the cumulative effect of small oversights that leads to failure. Addressing each element systematically restores balance and security.
Expert Insight: What Arborists and Holiday Safety Experts Recommend
Professional guidance reinforces the importance of technical precision in tree setup. According to Dr. Laura Bennett, urban forestry specialist at Colorado State University Extension:
“Just like planting a tree, setting up a Christmas tree involves understanding structure and support. A clean cut and proper stand alignment are non-negotiables. Without them, you're fighting physics from the start.” — Dr. Laura Bennett, Urban Forestry Specialist
Likewise, the National Fire Protection Association (NFPA) emphasizes stability as part of fire safety. A falling tree can rupture lights, spark electrical faults, or knock over candles. Their guidelines recommend anchoring tall trees and checking stand tightness every few days, especially during the first week when water uptake is highest and shrinkage risks begin.
Preventive Checklist: Keep Your Tree Upright All Season
To avoid tilting before it starts, follow this actionable checklist every year:
- ☐ Recut the trunk base before placing in the stand
- ☐ Choose a stand rated for your tree’s height and species
- ☐ Test the stand for wobble on your actual floor surface
- ☐ Insert the tree straight—no angling or forcing
- ☐ Tighten clamps or bolts evenly and incrementally
- ☐ Use a level to confirm vertical alignment
- ☐ Distribute heavy ornaments and garlands evenly
- ☐ Refill water daily, especially in the first 72 hours
- ☐ Recheck stand tightness after 3–5 days (as trunk may settle)
- ☐ Anchor top if necessary using soft, removable ties to walls or ceiling hooks
Frequently Asked Questions
Can I fix a tree that’s already leaning?
Yes, but act carefully. Gently guide the tree back to vertical while someone supports the base. Loosen the stand slightly, reposition the trunk, then retighten. Add water immediately afterward. Avoid jerking or pulling forcefully, which could damage the trunk or dislodge the stand.
Should I use glue or tape to secure the trunk in the stand?
No. Adhesives can damage the trunk and won’t provide meaningful structural support. They also make removal harder and increase fire risk. Rely instead on mechanical grip and proper fit.
Is it safe to place a tree near a heat source if it’s stable?
No. Even a perfectly balanced tree dries out faster near radiators, vents, or fireplaces. Dry trees are more flammable and prone to needle drop. The NFPA recommends keeping trees at least three feet away from all heat sources.
Final Steps for Long-Term Stability
Maintaining a straight Christmas tree isn’t a one-time task—it’s ongoing. After initial setup, monitor your tree daily for the first week. Look for signs of leaning, listen for creaking branches, and feel the stand for looseness. Rotate decorative weight as needed, and never allow the water reservoir to run dry.
If your tree continues to shift despite corrective measures, consider temporary stabilization methods. Soft nylon cords attached to eye hooks in the wall (or ceiling joists) can gently hold the upper third of the tree in place. Use tension adjusters to fine-tune pull without stressing branches. Remove these supports before takedown to avoid accidents.
Ultimately, a stable tree reflects thoughtful preparation. It’s not about perfection—it’s about respecting the physical realities of a living plant in a temporary home. With the right tools, techniques, and attention, your tree can stand proudly through the holidays, becoming a symbol of care as much as celebration.


 浙公网安备
33010002000092号
浙公网安备
33010002000092号 浙B2-20120091-4
Comments
No comments yet. Why don't you start the discussion?