
Concealer is one of the most essential tools in any makeup routine—designed to brighten under-eyes, cover blemishes, and create a polished base. But nothing undermines a carefully applied look faster than seeing your concealer settle into fine lines or crease within minutes of application. This frustrating phenomenon isn’t just about product quality; it’s often the result of mismatched formulas, improper prep, or technique errors. Understanding the root causes of creasing—and how to counteract them—can transform your makeup from fleeting to flawless.
Understanding Why Concealer Creases
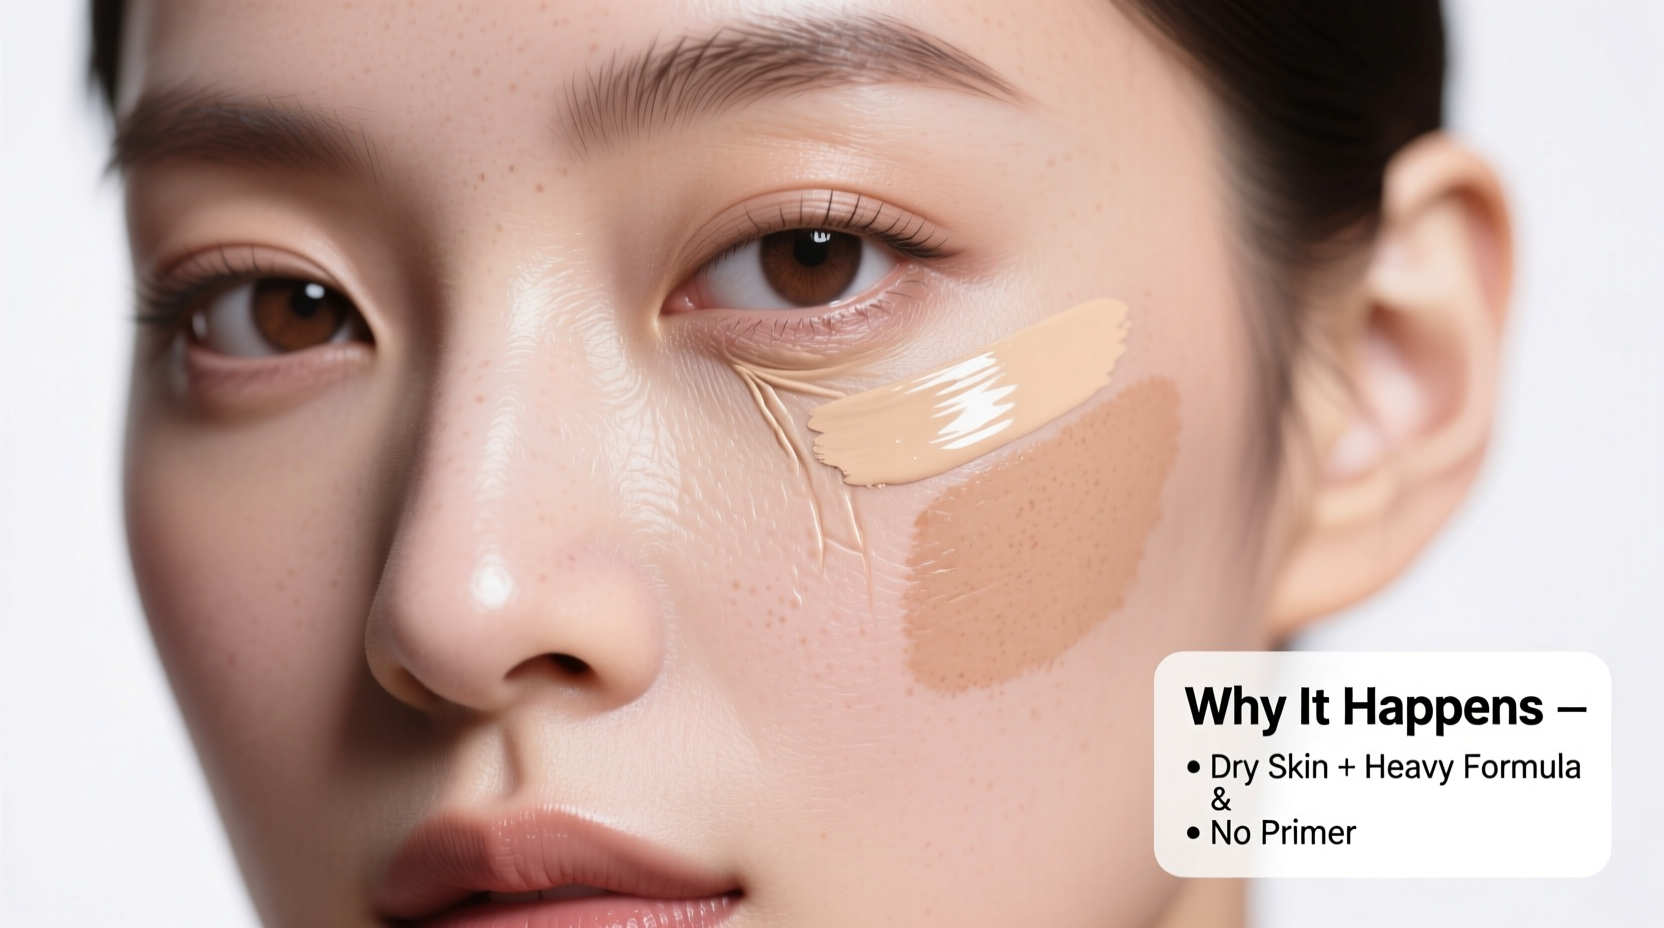
Creasing occurs when concealer sinks into fine lines, folds, or textured areas of the skin, creating visible lines or shadows that weren’t there before. While it’s commonly associated with under-eye use, it can happen around the nose, mouth, or forehead if not applied correctly. The reasons behind this are multifaceted and involve both biological and technical factors.
The skin under the eyes is among the thinnest on the body, making it prone to movement and dehydration. As we age, natural volume loss and collagen depletion deepen the hollows beneath the eyes, forming what’s known as the tear trough. When concealer is applied over these dynamic areas, facial expressions cause the skin to fold, pulling the product into those creases. However, even younger individuals experience creasing due to other contributing factors such as:
- Excess moisture: Applying concealer over damp or overly hydrated skin prevents proper adhesion.
- Wrong formula: Heavy, thick, or overly emollient concealers tend to slide and settle into lines.
- Over-application: Too much product increases the likelihood of migration and settling.
- Poor blending: Harsh edges or uneven layers trap movement and emphasize texture.
- Skipping setting: Without proper powder, even the best concealer can shift throughout the day.
The Role of Skin Preparation in Preventing Creasing
No concealer performs well on unprepared skin. Just as you wouldn’t paint a wall without priming it, applying makeup on dehydrated, oily, or flaky skin leads to poor results. Proper preparation creates a smooth, balanced canvas that supports longevity and seamless blending.
Start with a clean face using a gentle cleanser suited to your skin type. Follow with a hydrating toner if needed, then apply an eye cream specifically formulated for the delicate under-eye area. Look for ingredients like hyaluronic acid, peptides, or caffeine to plump and depuff without greasiness.
Avoid heavy occlusives like petroleum-based creams unless your skin is extremely dry—these can create a slippery barrier that prevents makeup from adhering. Instead, opt for lightweight gels or water-based creams that absorb quickly.
“Prepping the under-eye area with a targeted eye cream minimizes fine lines and gives concealer something to grip onto.” — Dr. Lena Park, Board-Certified Dermatologist
Step-by-Step Skin Prep Routine Before Concealer
- Cleanse face with a mild, non-drying cleanser.
- Apply hydrating toner (optional).
- Use a pea-sized amount of eye cream; pat gently with ring finger.
- Wait 3–5 minutes for full absorption.
- Apply a hydrating primer only where needed—avoid overloading the under-eye zone.
Choosing the Right Concealer Formula
Not all concealers are created equal, and selecting the wrong one is a leading cause of creasing. The ideal formula depends on your skin type, concerns, and desired finish.
For oily or combination skin, a matte, long-wear liquid concealer with buildable coverage works best. These are typically silicone-based, which helps them adhere better and resist movement. On the other hand, dry skin benefits from creamy, hydrating formulas that contain nourishing oils or glycerin—but beware of overly rich textures that may slip into lines.
Medium coverage concealers generally perform better than full-coverage ones when it comes to creasing. Heavier pigments often come with denser bases that sit on top of the skin rather than blending seamlessly. If you need more coverage, build up in thin layers rather than applying one thick coat.
| Skin Type | Recommended Formula | Ingredients to Look For | Formulas to Avoid |
|---|---|---|---|
| Oily | Matte, liquid, silicone-based | Dimethicone, silica, clay | Cream sticks, oil-rich liquids |
| Dry | Creamy, hydrating liquid | Hyaluronic acid, squalane, glycerin | Mattifying powders, alcohol-heavy |
| Mature | Lightweight, luminous | Peptides, light-reflecting particles | Thick, full-coverage cakes |
| Combination | Balanced liquid | Water-silicone blend | Extremely drying or greasy |
Application Techniques That Prevent Creasing
Even the best-prepped skin and highest-quality concealer will fail if applied incorrectly. Technique plays a critical role in whether your concealer lasts or collapses by midday.
Begin by using the smallest amount necessary. A little goes a long way—start with a rice-grain-sized dot per under-eye area. Apply it precisely where you need coverage: focus on the inner corner and any dark spots, avoiding the outer crease unless absolutely necessary.
Use a small, dense concealer brush or a damp beauty sponge to blend. Stippling (tapping motion) works better than dragging, which stretches the skin and pushes product into lines. Work outward from the nose, gently diffusing the edges so there’s no harsh demarcation.
If you're covering blemishes elsewhere on the face, apply concealer after foundation. This allows the base layer to smooth imperfections, reducing the amount of concealer needed and minimizing buildup.
Common Application Mistakes That Cause Creasing
- Applying too much product at once
- Dragging instead of stippling during blending
- Using fingers, which transfer heat and oil
- Ignoring color correction needs (e.g., using orange corrector under purple circles)
- Blending beyond necessary areas, increasing surface tension
“In professional makeup artistry, less is always more when it comes to concealer. Precision beats coverage every time.” — Marcus Reed, Celebrity MUA
Setting Your Concealer the Right Way
Setting is arguably the most crucial step in preventing creasing. It locks the product in place, absorbs excess oils, and creates a stable film that resists movement.
The best method is the “baking” technique—but not in the way many assume. True baking involves applying a generous amount of translucent powder under the eyes, leaving it to sit while you continue the rest of your makeup, then dusting it off. However, this can be overkill for everyday wear and may accentuate dryness.
A more balanced approach is selective setting: lightly press a small amount of finely-milled translucent powder directly onto the concealer using a fluffy brush or folded tissue. Pressing—not swiping—ensures the powder integrates without disturbing the product.
For oily skin, consider a mattifying powder with silica. For dry or mature skin, opt for a hydrating setting spray used *after* powder to soften any chalkiness while still locking everything in.
Timeline: How to Set Concealer Without Creasing
- Apply concealer and blend immediately.
- Wait 60 seconds for it to set slightly on the skin.
- Take a small fluffy brush and dip into translucent powder.
- Gently press (don’t swipe) powder onto the center of the under-eye area.
- Remove excess with a clean brush or soft tap.
- Finish with a light mist of setting spray if desired.
Mini Case Study: From Constant Creasing to All-Day Wear
Sophia, a 34-year-old marketing executive, struggled daily with her concealer folding into fine lines by 10 a.m., despite reapplying during lunch. She used a popular full-coverage stick concealer she loved for its pigment but found it dried out her under-eyes by noon.
After consulting a dermatologist and reviewing her routine, changes were made: she switched to a hydrating eye cream with caffeine, waited five minutes before makeup, and replaced her stick concealer with a fluid, medium-coverage liquid. She began applying smaller amounts and setting only the inner corners with a micro-powder puff.
Within days, her concealer stayed smooth until evening. The key wasn’t one single fix but a holistic adjustment to prep, product, and technique.
Frequently Asked Questions
Does setting spray really help prevent creasing?
Yes, but only when used correctly. A good setting spray acts as a final sealant, fusing layers of makeup together. However, sprays alone won’t stop creasing if the underlying steps—like proper prep and setting with powder—are skipped. Use it as the last step, holding the bottle 8–10 inches away and misting in an “X” and “T” pattern.
Can I use eyeshadow as a setting powder?
Only if it’s a sheer, matte shade close to your skin tone. Pigmented or shimmer shadows will darken or glitterize the under-eye area. Translucent or skin-toned pressed powders designed for setting are safer and more effective.
Is it better to apply concealer before or after foundation?
It depends on your goal. For overall brightness and spot correction, apply concealer after foundation. This reduces the amount needed and avoids pilling. For targeted blemish coverage, apply after foundation to avoid disturbing the base. For under-eyes, many prefer doing it before foundation to ensure a clean, isolated layer.
Final Checklist: Stop Concealer Creasing in 7 Steps
- Start with clean, exfoliated skin.
- Apply a lightweight eye cream and wait 5 minutes.
- Choose a concealer suited to your skin type and concern.
- Use a minimal amount—pea-sized or less per eye.
- Blend with a stippling motion using a sponge or brush.
- Set with a light press of translucent powder.
- Lock in with a setting spray if desired.
Conclusion
Concealer creasing isn’t inevitable—it’s a solvable issue rooted in routine, product choice, and method. By refining your prep, selecting the right formula, and mastering subtle application and setting techniques, you can achieve a fresh, crease-free finish that lasts from morning meetings to evening plans. Makeup should enhance confidence, not require constant maintenance. Take control of your routine, experiment mindfully, and embrace the small adjustments that make the biggest difference.


 浙公网安备
33010002000092号
浙公网安备
33010002000092号 浙B2-20120091-4
Comments
No comments yet. Why don't you start the discussion?