
Floor creaking is one of the most common household annoyances, especially in older homes or newly constructed ones that haven’t fully settled. That persistent squeak underfoot can disrupt quiet evenings, wake sleeping children, or simply make a home feel less solid than it should. While creaks rarely indicate structural danger, they do affect comfort and perceived quality. The good news: most causes are fixable with modest tools and effort. Understanding what’s behind the noise—and how to stop it—is the first step toward a quieter, more peaceful living space.
What Causes Floor Creaking?
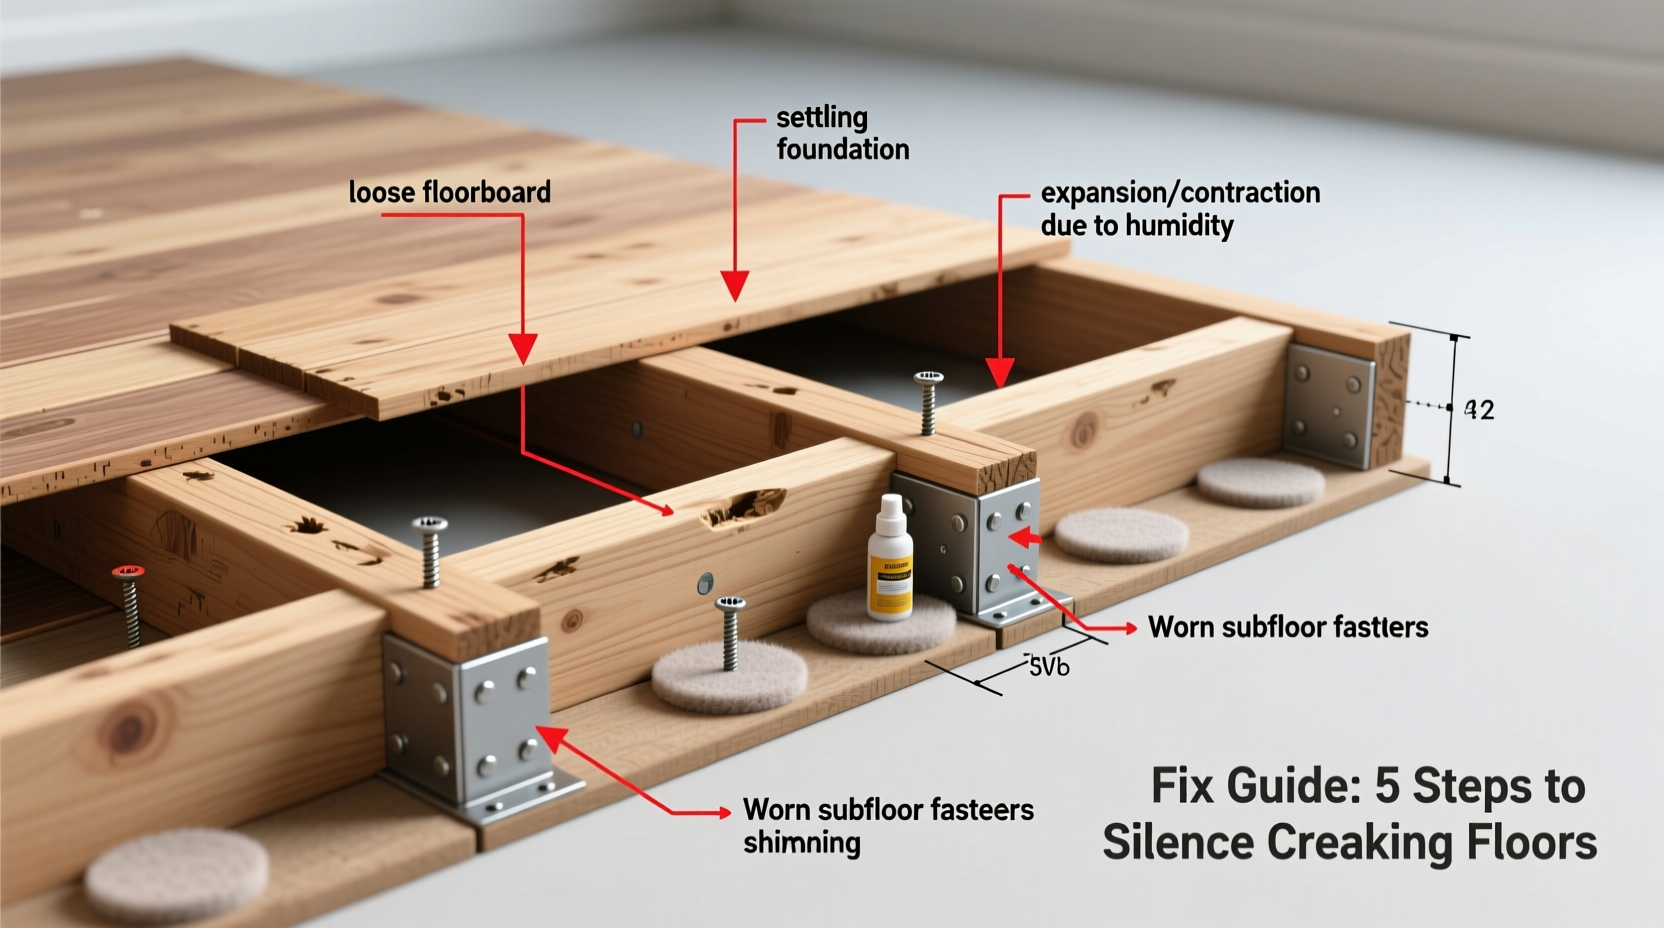
Creaking floors are almost always the result of friction between wooden components in the flooring system. As people walk across a floor, the weight causes slight movement in the subfloor, joists, or finish flooring. When wood rubs against wood—or against fasteners like nails or screws—it produces the familiar squeaking or popping sound.
The root cause often lies beneath the surface. Over time, wood expands and contracts due to changes in humidity and temperature. This movement can create tiny gaps between the subfloor and the floor joists. Nails may loosen, and boards may shift slightly, allowing them to move independently and generate noise when pressure is applied.
In some cases, poor initial construction contributes to early creaking. For example, if subfloor panels were not adequately glued or screwed to joists during installation, movement begins sooner. Similarly, using low-grade plywood or insufficient joist spacing can increase deflection and accelerate wear.
“Most floor squeaks aren’t a sign of failure—they’re just signs of movement. Wood moves. The trick is managing that movement so it doesn’t become noise.” — Daniel Reeves, Residential Structural Carpenter with 25 years of experience
Common Sources of Squeaky Floors
Different parts of the floor assembly contribute to noise in different ways. Identifying where the problem originates helps determine the best repair method.
- Subfloor-to-Joist Movement: The most frequent cause. When the subfloor separates slightly from the joists, each footstep creates micro-movements that produce sound.
- Loose Fasteners: Nails can work loose over time due to wood shrinkage or inadequate sinking during installation. Screws are less likely to back out but may still vibrate.
- Joist Deflection: If joists are spaced too far apart or are undersized for the span, they flex under load, causing adjacent materials to rub.
- Expansion and Contraction: Seasonal humidity changes cause wood to swell or dry out, leading to temporary or recurring creaks.
- Finish Flooring Movement: Hardwood planks or engineered flooring can rub at seams or against baseboards if not properly acclimated or installed.
Step-by-Step Guide to Silencing Creaky Floors
Fixing squeaky floors doesn’t require replacing the entire surface. Most solutions target the connection points between structural elements. Below is a systematic approach to eliminate creaks based on accessibility and severity.
- Map the Problem Areas: Walk through the room and mark every spot that squeaks using masking tape or a small pencil dot. Note whether the noise occurs near walls, in the center of the room, or along specific floorboard seams.
- Determine Access: Decide whether you can access the underside of the floor (from a basement or crawlspace) or must work from above. Access from below is often easier and cleaner.
- Inspect Joists and Subfloor: From below, look for gaps between the joists and subfloor. Use a flashlight and check for visible nail pops or loose edges.
- Insert Shims (if gap exists): If there’s a visible gap between the subfloor and joist, insert cedar shims coated with construction adhesive. Tap them gently until snug. Do not force, as this can raise the floor.
- Reinforce with Screws: Drive corrosion-resistant deck screws through the subfloor into the joist directly beneath each squeak. Countersink slightly and plug if visible from above. This pulls the layers tightly together.
- Apply Construction Adhesive: For larger areas, inject subfloor adhesive through pre-drilled holes before screwing. This fills voids and prevents future movement.
- Tackle from Above (no access below): Use specialized screw systems like Squeeeeek No More or Trim Head Screws that minimize surface damage. Alternatively, carefully drive finishing nails at an angle into the joist, then set and fill.
- Secure Finish Flooring: For hardwood squeaks between boards, apply powdered graphite or talcum powder into the seam to reduce friction. In severe cases, face-nail and re-finish individual boards.
- Test and Adjust: Walk over repaired areas. If squeaking persists, additional screws or adhesive may be needed.
Tools You’ll Need
| Tool | Purpose | Alternative |
|---|---|---|
| Drill/Driver | Driving screws and pilot holes | Hand screwdriver (slower) |
| Stud Finder or Joist Locator | Locating support beams from above | Knock test + measurement |
| Deck Screws (2.5–3 inches) | Securing subfloor to joists | Ring-shank nails |
| Construction Adhesive (subfloor grade) | Filling gaps and bonding layers | Not recommended as sole fix |
| Cedar Shims | Filling gaps from below | Plastic shim (less ideal) |
| Countersink Bit & Wood Plugs | Finishing screw holes invisibly | Spackle for small repairs |
Do’s and Don’ts When Fixing Squeaky Floors
Avoid making common mistakes that could worsen the issue or create new problems.
| Action | Do | Don't |
|---|---|---|
| Securing subfloor | Use screws instead of nails for lasting hold | Over-tighten and warp the subfloor |
| Working from above | Pre-drill holes to prevent splitting | Drive screws randomly without locating joists |
| Using adhesive | Inject into gaps before fastening | Rely solely on glue without mechanical fasteners |
| Handling finish flooring | Use wax or powder to lubricate hardwood seams | Wet wood excessively during cleaning |
| Seasonal changes | Monitor squeaks in dry winter months | Assume all squeaks need immediate repair |
Real-World Example: A 1920s Home Revival
A homeowner in Chicago purchased a historic bungalow built in 1927. While charming, the second-floor hallway emitted a loud squeak with every step. With no basement access, repairs had to come from above. After marking the spot, they used a stud finder to confirm joist location. A single 2.5-inch trim-head screw was driven through the existing gap between two oak floorboards, positioned to hit the joist directly. The screw was countersunk and filled with matching putty. The squeak vanished immediately and did not return after six months of monitoring. The entire fix took 20 minutes and cost under $5.
This case illustrates that even in older homes with solid lumber construction, targeted interventions are often enough. Full refinishing or subfloor replacement wasn’t necessary—just precise diagnosis and correct execution.
When to Call a Professional
While many squeaks can be resolved DIY, certain situations warrant expert help:
- Multiple widespread squeaks: Indicates systemic issues like inadequate joist support or major subfloor detachment.
- Visible sagging or bounce: Could point to undersized joists, moisture damage, or termite infestation.
- No access from below and finished ceilings: Requires careful removal of sections or use of advanced tools like magnetic joist locators and angled drivers.
- Post-renovation squeaks: If new flooring was installed improperly, a flooring contractor may need to adjust or refasten the system.
Professionals may use techniques like sistering joists (adding adjacent support), installing diagonal bracing, or employing pneumatic fastening systems for large-scale stabilization.
Prevention Tips for Future Installations
If you're building, renovating, or installing new flooring, take steps to prevent squeaks before they start.
“The cheapest way to avoid squeaky floors is to glue and screw the subfloor during installation. It adds 20% to labor time but eliminates 90% of future calls.” — Maria Tran, General Contractor specializing in custom homes
- Always use subfloor adhesive when laying plywood or OSB over joists.
- Space screws every 6–8 inches along joist intersections, not just perimeter.
- Allow wood flooring to acclimate for 48–72 hours in the installation environment.
- Use proper nailing patterns and stagger joints in both subfloor and finish flooring.
- Maintain indoor humidity between 35% and 55% year-round to minimize expansion and contraction.
FAQ: Common Questions About Creaky Floors
Are squeaky floors dangerous?
No, in nearly all cases, squeaky floors are not structurally dangerous. They indicate movement, not weakness. However, if accompanied by sagging, cracking drywall, or door misalignment, consult a structural engineer.
Can I fix a squeaky floor without damaging the finish?
Yes. Products like the Squeeeeek No More kit use adjustable brackets and screws that attach between the subfloor and joist from above, minimizing surface impact. Alternatively, driving screws at an angle between floorboards can hide fasteners effectively.
Why do new floors sometimes squeak?
Even new homes can have squeaky floors due to green lumber drying out, improper fastening, or delayed settling. It doesn’t reflect poor craftsmanship necessarily, but attention to subfloor attachment standards can prevent it.
Final Checklist: How to Silence Your Floor for Good
- Walk through affected rooms and mark all squeaky spots.
- Determine if you have access from below (basement/crawlspace).
- Gather tools: drill, screws, adhesive, shims, joist finder.
- From below: Shim gaps and screw up into subfloor.
- From above: Locate joists, pre-drill, and secure with screws.
- For hardwood: Lubricate seams with talc or graphite.
- Test results and re-tighten if needed.
- Consider humidity control to reduce seasonal recurrence.
Conclusion: Take Control of Your Home’s Comfort
A quiet floor is more than a convenience—it’s a sign of a well-maintained, stable home. Creaks may seem minor, but they erode comfort over time. The methods outlined here offer practical, lasting solutions without requiring demolition or expensive contractors. Whether you’re dealing with a century-old house or a new build with loose subflooring, the fix is usually within reach. Armed with the right knowledge and tools, you can restore peace underfoot and enjoy a home that feels as solid as it looks.


 浙公网安备
33010002000092号
浙公网安备
33010002000092号 浙B2-20120091-4
Comments
No comments yet. Why don't you start the discussion?