
There’s nothing more frustrating than spending time on your makeup routine only to end up with a heavy, unnatural finish. If your foundation settles into fine lines, appears patchy, or feels thick like a mask, you’re not alone—many people struggle with what’s commonly known as “cakey” foundation. The good news? It’s rarely about the product alone. More often, it's a combination of skin prep, application technique, and product compatibility that leads to the problem.
Cakey foundation doesn’t just affect your appearance—it can undermine confidence and make your skin look older or drier than it is. But understanding the root causes and applying targeted solutions can transform your base from dull to dewy. This guide breaks down exactly why cakeiness happens and walks you through three actionable steps to fix it for good.
Why Foundation Looks Cakey: The Root Causes
Cakey foundation isn’t random—it’s usually the result of specific missteps in your skincare-makeup routine. Understanding these underlying factors is the first step toward achieving a flawless complexion.
Dry or Dehydrated Skin
Skin lacking moisture struggles to hold onto foundation evenly. When applied over dry patches, foundation clings to flaky areas and accentuates texture. Dehydration (a lack of water) versus dryness (a lack of oil) both contribute—especially when using mattifying or full-coverage formulas that can be drying.
Over-Application and Layering
Many people believe that more foundation equals better coverage. In reality, piling on layers traps product in pores and lines, leading to buildup. Over time, this excess settles and oxidizes, creating a caked-on effect by midday.
Poor Blending Technique
Even the best foundation can look bad if not blended properly. Using fingers without tools, skipping edges, or not allowing layers to set between applications disrupts the finish. Tools matter—brushes, sponges, and even hand warmth impact how seamlessly product melds into skin.
Incompatible Formulas
Mixing incompatible textures—like a silicone-heavy primer with a water-based foundation—can cause pilling or separation. Similarly, using too many mattifying products on naturally dry skin strips necessary slip, making blending difficult.
Wrong Shade or Oxidation
A foundation that matches at the counter but darkens on the skin (due to oxidation) can appear muddy or flat. This shift alters the visual weight of the makeup, contributing to a heavier look.
“Foundation should enhance your skin, not replace it. The goal is radiance, not opacity.” — Lila Monroe, Celebrity Makeup Artist
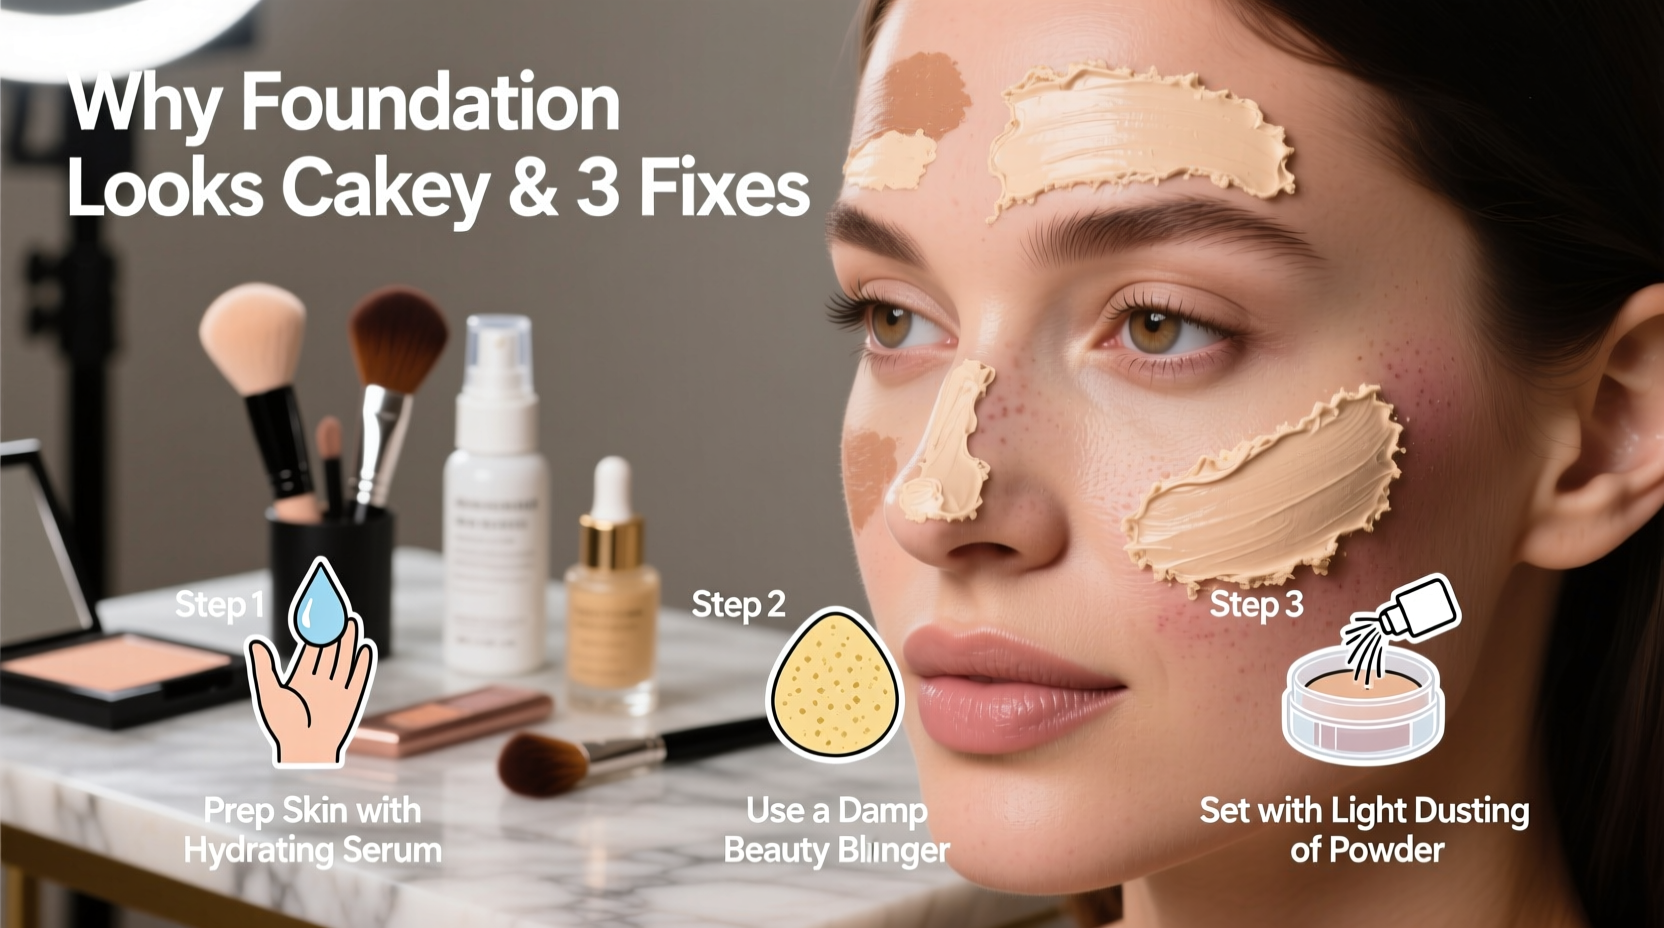
Step 1: Prep Your Skin Like a Pro
The canvas determines the painting. No matter how high-end your foundation, poor prep will sabotage results. Focus on hydration, balance, and surface smoothness.
Double Cleanse (If Wearing Makeup)
Start with clean skin. Use an oil-based cleanser followed by a water-based one to remove impurities without stripping natural oils. Residual sunscreen or old makeup creates uneven texture, causing foundation to cling unpredictably.
Hydrate Before You Prime
Apply a lightweight hydrating toner or essence after cleansing. Look for ingredients like hyaluronic acid, glycerin, or ceramides. These attract water to the skin and create a plump surface for smoother application.
Moisturize According to Skin Type
- Dry skin: Use a rich cream with emollients like shea butter or squalane. Apply 10–15 minutes before foundation to allow absorption.
- Oily skin: Opt for a gel-cream or oil-free lotion. Skipping moisturizer leads to rebound oil production and uneven wear.
- Combination skin: Layer lighter hydration on oily zones, richer creams on dry areas.
Prime Strategically
Primer isn’t mandatory, but it helps extend wear and blur imperfections. Choose based on concern:
- Pore-minimizing: Silicone-based (dimethicone) for textured skin.
- Hydrating: Water-based with hyaluronic acid for dryness.
- Matte: For oily T-zones—but avoid all-over use on dry skin.
Step 2: Choose the Right Foundation and Apply Correctly
Once your skin is prepped, focus shifts to product selection and technique. This is where most cakeiness occurs—and where small changes yield big improvements.
Select a Compatible Formula
Match your foundation to your skin type and desired finish:
| Skin Type | Best Foundation Type | Avoid |
|---|---|---|
| Dry | Hydrating, serum-like, dewy finish | Mattifying powders, alcohol-heavy liquids |
| Oily | Lightweight, oil-free, buildable coverage | Heavy creams, overly luminous formulas |
| Combination | Water-based, natural finish | Full-coverage matte unless spot-used |
| Mature | Luminous, medium coverage | Flat matte, powder foundations |
Use the Right Tool for Seamless Blend
Your application tool dramatically affects outcome:
- Beauty sponge (damp): Ideal for sheer to medium buildable coverage. Bounces product into skin for a skin-like finish.
- Dense buffing brush: Best for full coverage with liquid or cream. Use circular motions to press—not drag—product.
- Fingers: Warmth helps melt cream products, but only suitable for lightweight formulas. Avoid on dry skin due to tugging.
Apply in Thin Layers
Less is more. Start with a pea-sized amount and build only where needed. Focus on areas like redness around the nose or blemishes—don’t blanket the entire face unless necessary.
- Dot foundation on center of face: forehead, nose, cheeks, chin.
- Blend outward using downward strokes to avoid lifting facial hair or disrupting skincare.
- Use a damp sponge to gently press edges into neck and hairline—no harsh lines.
- Let set for 60 seconds, then assess. Add second thin layer only to trouble spots.
Step 3: Set Smartly and Maintain All Day
Setting locks in your work—but done wrong, it adds heaviness. The key is precision, not powder overload.
Blot Before Setting
After foundation application, wait two minutes. Oily areas may start to shine. Gently blot (don’t rub) with a tissue or blotting paper to remove excess oil without disturbing makeup.
Use Powder Only Where Needed
Full-face powder is rarely necessary. Instead, spot-set high-oil zones: under eyes (if prone to creasing), T-zone, and chin.
- Translucent powder: For setting and reducing shine without adding color.
- Pressed powder: Convenient for touch-ups; use with a small fluffy brush.
- Powder puff: Press lightly—don’t swipe—for invisible hold.
Lock With Setting Spray (The Final Seal)
A mist of setting spray dissolves any remaining harsh lines and fuses layers together. It transforms makeup from “applied” to “one with the skin.”
Hold bottle 8–10 inches away. Mist in an “X” and “T” pattern: left to right, top to bottom, then down the center. Let air dry—don’t fan or touch.
Midday Touch-Up Strategy
If shine builds or foundation fades, skip reapplying foundation. Instead:
- Blot excess oil.
- Use a pressed powder only on shiny spots.
- Refresh with a hydrating mist or antioxidant spray.
- Optional: dab concealer only on faded areas, then spritz again.
“Setting spray isn’t optional if you want longevity. It melts powders and liquids together into a second skin.” — Diego Reyes, Editorial Makeup Director
Real-Life Example: From Cakey to Clear
Sophie, 34, worked in an air-conditioned office and wore full-coverage foundation daily. By 11 a.m., her makeup would settle into laugh lines and appear patchy near her nose. She blamed the foundation—switching brands four times in a year—but saw no improvement.
After consultation, her routine was assessed. Key issues: she skipped moisturizer (afraid of oiliness), used a dry beauty blender, and set her entire face with loose powder. Her skin was dehydrated despite being oily on the surface—a common imbalance.
The fix:
- Added a lightweight gel moisturizer 10 minutes before makeup.
- Switched to a hydrating primer only on dry zones.
- Used a damp sponge instead of a brush.
- Applied half the usual foundation amount and built only on redness.
- Replaced full-face powder with targeted pressing on the T-zone.
- Finished with a dewy setting spray.
Result: within two days, her foundation looked smoother, lasted longer, and didn’t emphasize lines. She now receives compliments on her “great skin”—not her makeup.
FAQ: Common Questions About Cakey Foundation
Can I fix cakey foundation once it’s already applied?
Yes—gently blot with a tissue to remove excess. Then, mist with a hydrating facial spray and use a damp sponge to lightly press and lift buildup. Finish with setting spray to rebalance.
Does skin exfoliation help prevent cakey foundation?
Absolutely. Exfoliating 1–2 times per week removes dead cells that trap foundation and cause patchiness. Use a gentle chemical exfoliant (like lactic or mandelic acid) rather than gritty scrubs that can irritate skin.
Is it better to apply foundation with fingers, brush, or sponge?
It depends on your formula and skin type. Fingers work well for creamy, hydrating foundations. Sponges give the most natural finish. Brushes offer precision and full coverage. A damp sponge is the safest choice for avoiding cakeiness across skin types.
Checklist: How to Avoid Cakey Foundation
- ✅ Double cleanse and hydrate skin before makeup
- ✅ Use moisturizer suited to your skin type
- ✅ Let skincare absorb fully (5–10 min) before priming
- ✅ Choose a foundation that matches your skin’s needs and tone
- ✅ Apply in thin layers using a damp sponge or proper brush
- ✅ Blend edges into neck and hairline
- ✅ Spot-set with powder only where necessary
- ✅ Finish with a setting spray in an “X” and “T” motion
- ✅ Blot, don’t reapply, during touch-ups
- ✅ Exfoliate gently 1–2 times weekly for smooth texture
Conclusion: Transform Your Base, Not Just Cover It
Cakey foundation isn’t a failure of beauty—it’s a signal that your routine needs refinement. By focusing on preparation, mindful application, and intelligent setting, you can achieve a base that looks fresh, natural, and lasts. Remember, the best foundation doesn’t hide your skin; it elevates it.
You don’t need ten products or professional training. Just three deliberate steps: prep thoroughly, apply minimally and precisely, and set strategically. Implement them consistently, and you’ll notice the difference not just in the mirror—but in how confidently you carry yourself.


 浙公网安备
33010002000092号
浙公网安备
33010002000092号 浙B2-20120091-4
Comments
No comments yet. Why don't you start the discussion?