
Baking bread at home is a deeply satisfying experience—there’s nothing quite like the smell of fresh-baked sourdough or a golden loaf of whole wheat filling your kitchen. But when your carefully risen dough suddenly deflates in the oven, it can be both confusing and disheartening. This issue—known as “oven collapse”—is more common than many realize, especially among new bakers. The good news? Most causes are preventable once you understand what went wrong. From overproofing to improper scoring, several subtle missteps can sabotage your bake. This guide breaks down the science behind collapsing bread, identifies the top beginner errors, and provides actionable solutions so your next loaf rises proudly and stays intact.
Understanding Oven Spring and Why Bread Collapses
Oven spring refers to the rapid rise that occurs during the first 10–15 minutes of baking. As the dough heats up, gases trapped inside expand, and yeast experiences a final burst of fermentation before dying off around 140°F (60°C). This expansion creates a light, airy crumb. However, if the structure of the dough isn’t strong enough to support this expansion, or if internal pressure becomes unbalanced, the loaf can crack unpredictably—or worse, collapse entirely.
Collapse doesn't always mean total failure. Sometimes, it's a slight dip in the center; other times, the entire loaf caves in like a soufflé gone wrong. Either way, the root cause lies in structural weakness or imbalance in one or more stages of the process: mixing, fermentation, shaping, proofing, or baking.
Common Beginner Errors That Cause Bread to Collapse
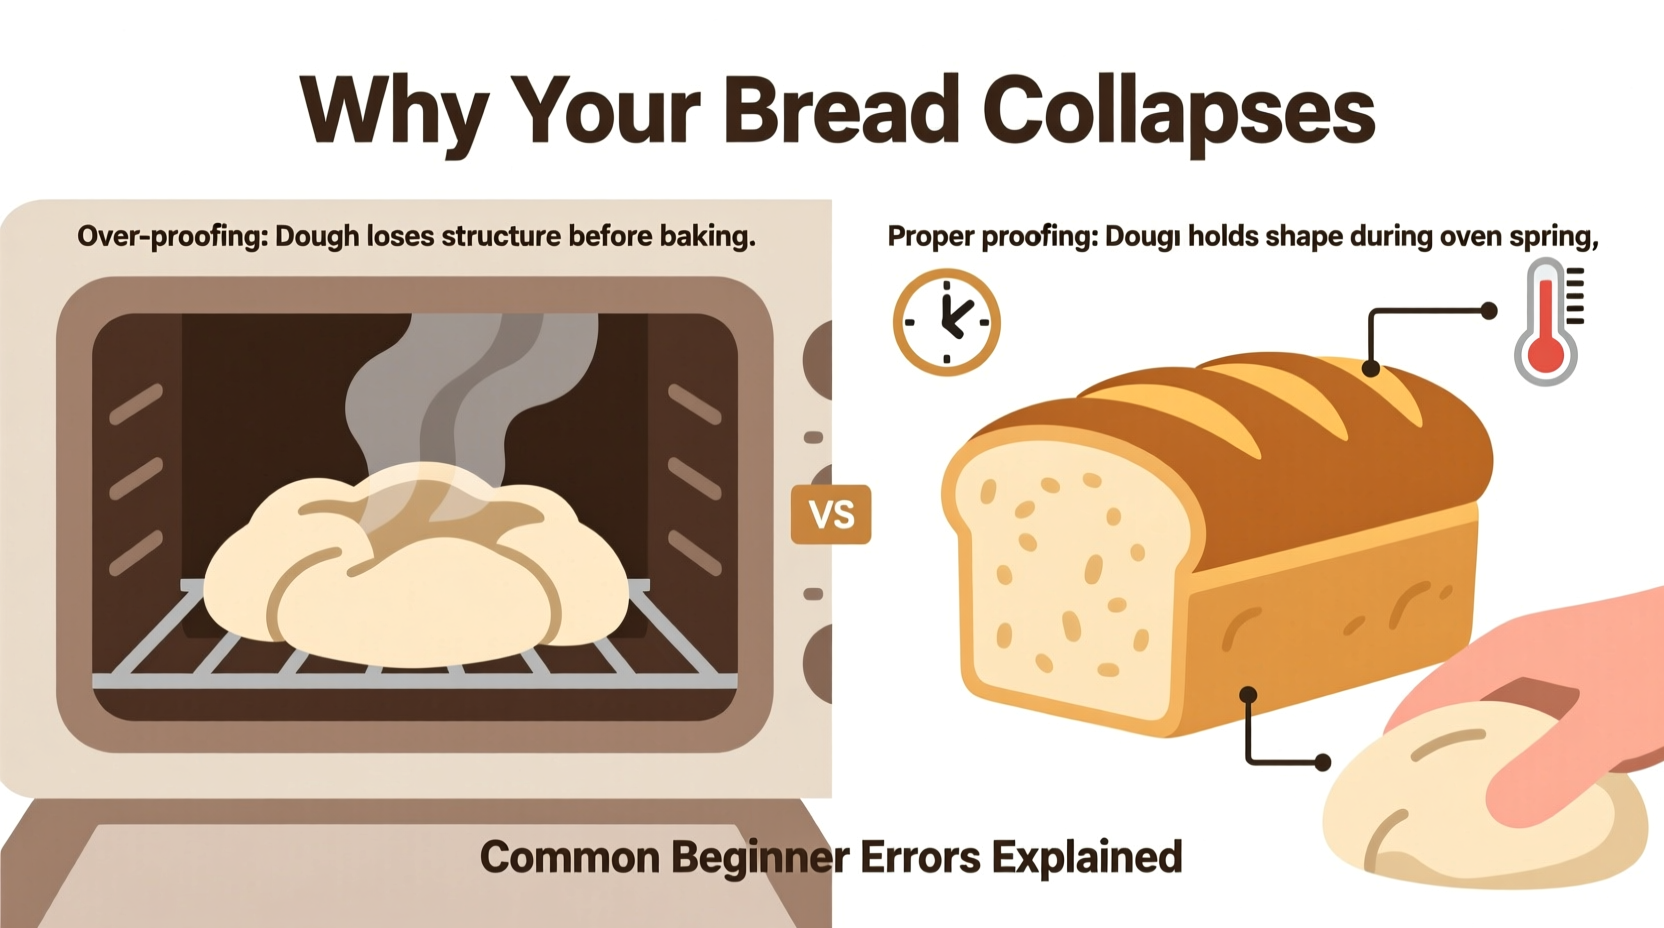
1. Overproofing the Dough
One of the most frequent culprits behind collapsed bread is overproofing. When dough proofs too long, the gluten network weakens as gas bubbles grow excessively large. These overstretched cells can't withstand the stress of oven spring, leading to rupture and collapse.
You can test for proper proofing with the “poke test”: gently press your fingertip into the dough. If it springs back slowly and leaves a slight indentation, it’s ready. If it doesn’t spring back at all, it’s overproofed. If it springs back immediately, it needs more time.
“Overproofed dough lacks resilience. It’s like an overinflated balloon—it might look impressive, but one wrong move and it bursts.” — Daniel Leader, author of Bread Alone
2. Underdeveloped Gluten Structure
Gluten is the protein framework that gives bread its strength and elasticity. Without sufficient gluten development, the dough cannot trap gas effectively or maintain shape during baking. Beginners often under-knead by hand or rely solely on short mixer times, resulting in fragile dough.
To build strong gluten, knead until the dough passes the “windowpane test”: stretch a small piece between your fingers. If it forms a thin, translucent membrane without tearing, the gluten is well-developed.
3. Inconsistent or Incorrect Oven Temperature
An oven that runs too hot or too cold dramatically affects how bread sets. If the oven is too cool, the dough expands slowly, weakening the structure before the crust forms. If it’s too hot, the exterior hardens prematurely while steam continues building inside, eventually forcing a blowout or collapse.
Always preheat your oven thoroughly—ideally for at least 45 minutes—and use an independent oven thermometer to verify accuracy. Many home ovens display incorrect temperatures, which skews results.
4. Poor Scoring Technique
Scoring—making shallow cuts on the surface of the loaf before baking—allows controlled expansion during oven spring. Without proper scoring, pressure builds unevenly, causing random cracks or splits that compromise structural integrity.
Use a sharp blade (like a lame or razor) and make decisive, swift cuts about ½ inch deep. Avoid dragging the knife, which can seal the surface instead of opening it. For round boules, a single deep cross or circular pattern works well; for batards, a few diagonal slashes help direct expansion.
5. Excessive Moisture or High Hydration Without Skill
High-hydration doughs (75% water or more) produce open, artisan-style crumb structures—but they’re notoriously difficult for beginners to handle. Too much water weakens gluten unless properly developed through techniques like stretch-and-folds. Without this, the dough sags during baking.
Start with moderate hydration (around 65–70%) using all-purpose or bread flour before advancing to wetter recipes. King Arthur All-Purpose Flour, for example, has higher protein than standard brands, helping beginners manage moisture better.
Do’s and Don’ts: Quick Reference Table
| Do’s | Don’ts |
|---|---|
| Use the poke test to check proofing readiness | Assume rising time listed in recipe is exact—ignore room temperature effects |
| Knead until windowpane stage is achieved | Stop kneading just because the dough isn’t sticky anymore |
| Preheat oven and baking vessel (e.g., Dutch oven) for at least 45 minutes | Place dough in a cold or insufficiently heated oven |
| Score decisively with a sharp blade | Make hesitant, shallow cuts that don’t penetrate deeply enough |
| Let shaped loaf rest on parchment for easy transfer | Delay transferring to oven after final proof—dough may begin to spread |
Step-by-Step Guide to Preventing Collapse
Follow this sequence to minimize the risk of collapse and ensure a stable, well-risen loaf:
- Mix thoroughly: Combine ingredients evenly. Use autolyse (resting flour and water for 20–30 minutes before adding yeast and salt) to improve gluten formation.
- Knead adequately: Knead by hand for 10–15 minutes or use a stand mixer with dough hook for 6–8 minutes until smooth and elastic.
- Fold for strength: Perform 3–4 sets of stretch-and-folds during bulk fermentation (every 30 minutes in warm environments).
- Monitor proofing closely: Proof until puffy and passing the poke test—not based solely on time. Cooler kitchens require longer proofing.
- Shape tightly: Pre-shape into a round, rest 20 minutes, then shape final form with surface tension. Tuck seams underneath securely.
- Final proof wisely: Use a proofing basket (banneton) to support shape. If refrigerating overnight, ensure dough is not already overproofed before chilling.
- Preheat fully: Heat oven and baking vessel (Dutch oven, stone, or steel) for at least 45 minutes.
- Score confidently: Transfer dough smoothly and score with firm, clean strokes.
- Bake with steam: Trap steam in a covered Dutch oven for the first 20 minutes, then uncover to allow crust to set.
- Cool completely: Wait at least 1–2 hours before slicing. Cutting too early releases trapped steam and can cause internal collapse.
Mini Case Study: Sarah’s Sourdough Struggles
Sarah, a home baker in Portland, had been trying to master sourdough for months. Her loaves looked promising during proofing—round, domed, and full of bubbles—but every time she opened the oven, her heart sank. The beautiful boule would have caved in slightly in the center, leaving a sunken crater.
She reviewed her process: feeding her starter regularly, using a 70% hydration recipe, and baking in a Dutch oven. What she hadn’t considered was her proofing environment. She was letting her dough rise on the counter overnight during a particularly warm spell (room temp ~78°F). Unbeknownst to her, her 12-hour proof was actually a 7-hour overproof.
After switching to a shorter room-temperature proof followed by a cold retard in the fridge, her loaves transformed. The crust cracked beautifully along the score lines, and the interior rose evenly. The culprit wasn’t her starter or oven—it was timing amplified by ambient heat.
Essential Checklist for Successful Baking
- ✅ Starter is active and bubbly (if using sourdough)
- ✅ Dough passes the windowpane test
- ✅ Bulk fermentation ends when dough is ~50% increased in volume
- ✅ Final proof passes the poke test (slow rebound with light imprint)
- ✅ Oven and baking vessel preheated for at least 45 minutes
- ✅ Loaf scored with sharp blade, ½ inch deep
- ✅ Baked with initial steam phase (covered for first 20 mins)
- ✅ Fully cooled before slicing (wait minimum 1 hour)
Frequently Asked Questions
Why does my bread rise in the oven and then fall?
This typically indicates overproofing. The dough expands rapidly during oven spring, but the weakened gluten structure can’t sustain the lift, causing it to collapse once internal gases escape or the crust sets unevenly.
Can I save an overproofed loaf?
Sometimes. Gently deflate the dough, reshape it, and let it proof again for a shorter period. While texture may be denser, it can still bake acceptably. However, severely overproofed dough often lacks recovery potential.
Does altitude affect bread collapse?
Yes. At higher elevations, lower atmospheric pressure allows gases to expand faster, increasing the risk of premature rising and collapse. Bakers above 3,000 feet often reduce yeast by 25%, decrease sugar, and shorten proofing times to compensate.
Conclusion: Build Confidence Through Consistency
Bread baking is equal parts science and intuition. A collapsed loaf isn’t a failure—it’s feedback. Each mistake reveals something about your process, whether it’s proofing duration, gluten development, or oven behavior. By focusing on fundamentals—proper gluten formation, accurate proofing, and consistent heat—you’ll steadily improve your results.
Don’t rush the rise. Don’t skip the windowpane test. And never underestimate the power of a well-executed score. With attention to detail and a willingness to learn from each bake, you’ll soon pull perfectly risen, golden-crusted loaves from your oven with confidence.


 浙公网安备
33010002000092号
浙公网安备
33010002000092号 浙B2-20120091-4
Comments
No comments yet. Why don't you start the discussion?