
Cracking in homemade soap during the curing phase is a common frustration for beginners. You’ve carefully measured your oils, mixed your lye solution, poured the batter into molds—only to find deep fissures or surface splits days later. While cracking doesn’t always ruin the soap’s usability, it can affect appearance, structural integrity, and even indicate deeper issues in your process. Understanding the root causes and how to prevent them is essential for consistent, professional-quality results.
This guide dives into the science behind soap cracking, explores real-world scenarios, and offers actionable fixes tailored for new soapmakers. Whether you’re using cold process, hot process, or a hybrid method, these insights will help you produce smooth, stable bars every time.
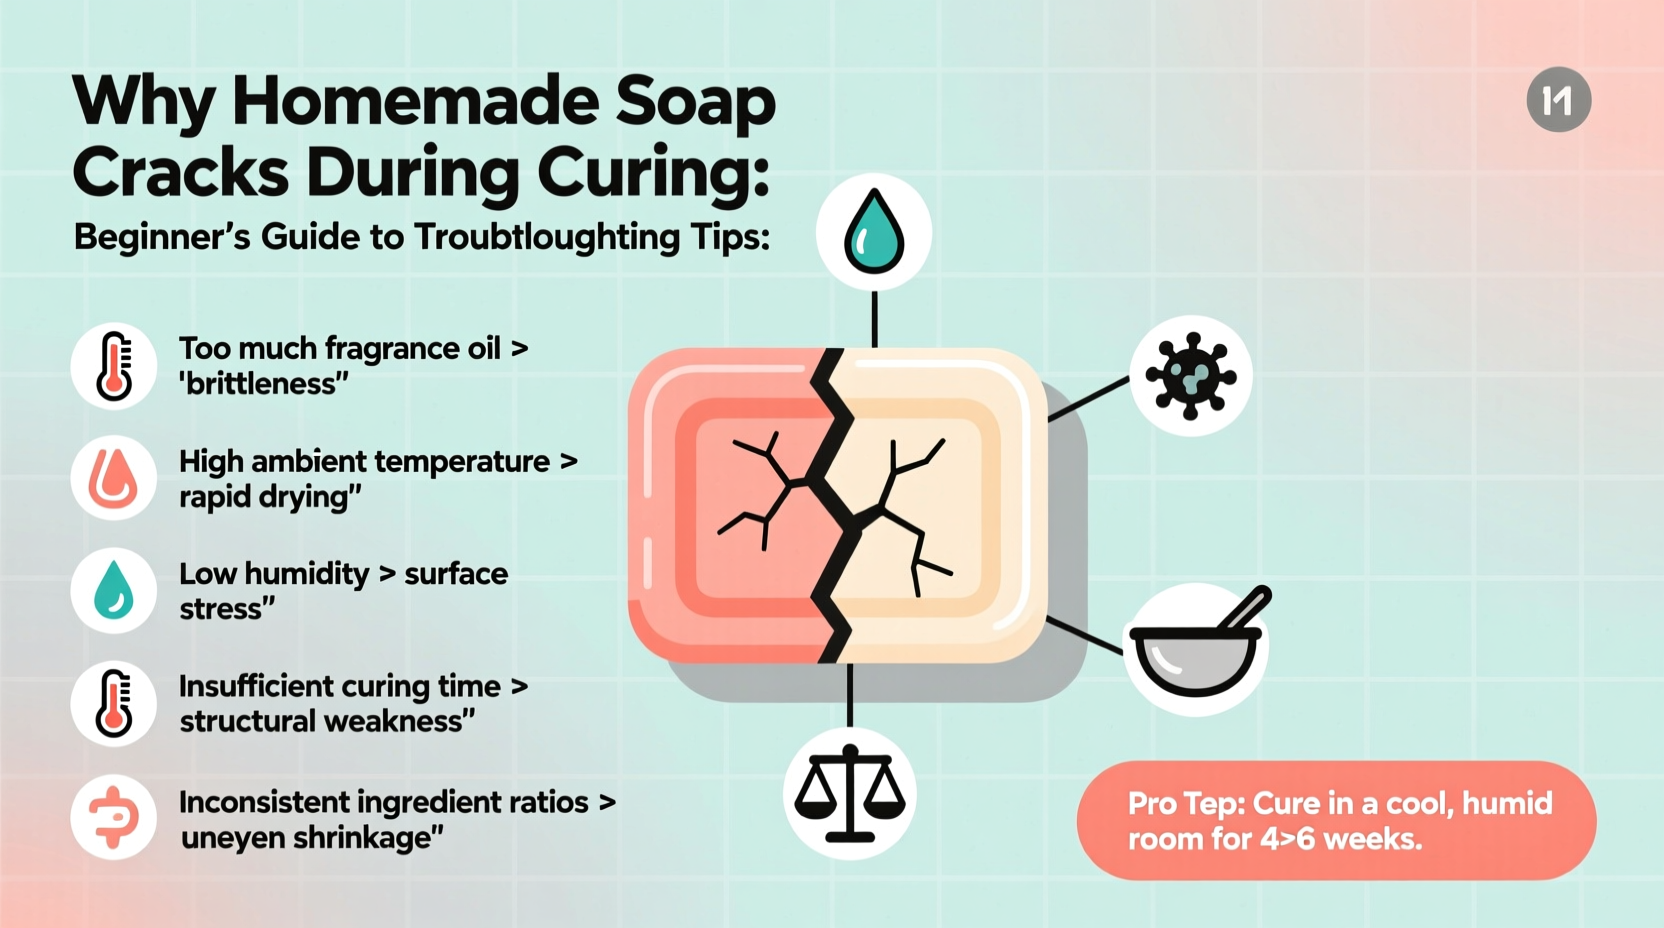
The Science Behind Soap Cracking
Soap cracking occurs when internal stress develops faster than the bar can adapt. In cold process soap making, saponification generates heat, which causes expansion. As the soap cools and cures, it contracts. If this contraction is uneven or too rapid, tension builds up—leading to cracks.
Several factors contribute to this imbalance:
- Thermal shock: Sudden temperature changes cause outer layers to harden while the center remains hot and expanding.
- High water content : More water means more movement during evaporation, increasing shrinkage stress.
- Overheating: Excessive gel phase temperatures accelerate reactions and create thermal gradients.
- Poor mold insulation: Inconsistent cooling leads to differential contraction.
Cracks typically appear on the surface or through the center of the loaf. Surface cracks are often shallow and cosmetic, while deep central cracks suggest significant internal stress.
Common Causes of Cracking and How to Fix Them
1. Overheating During Gel Phase
The gel phase is a natural part of saponification where the soap heats up internally, turning translucent. While not required, many soapers encourage full gel to enhance color and hardness. However, excessive heat—especially in warm environments or with large batches—can lead to thermal runaway.
When the center reaches high temperatures (over 180°F), it expands rapidly. The cooler outer layer resists this expansion, then contracts more quickly as it cools, creating cracks.
Solution: Avoid insulating heavily unless necessary. For small batches or in warm climates, skip insulation altogether. Use a fan to gently cool the mold’s surface if you notice excessive sweating or condensation inside the mold.
2. High Water Content in the Recipe
Beginners often use full-water recipes for easier mixing and longer working time. But excess water takes longer to evaporate during curing, causing greater shrinkage over time. This slow, uneven drying pulls the soap apart internally.
Solution: Reduce water by 10–20% using a lye calculator. A “water discount” helps minimize shrinkage without compromising safety or trace. For example, instead of using a 38% lye concentration, try 28–30%. This results in a thicker batter but faster cure and less cracking.
3. Pouring Too Hot or Cold
Temperature plays a crucial role. Pouring at too high a temperature (above 130°F) increases the risk of overheating. Conversely, pouring too cold (below 90°F) can cause uneven saponification and weak structure.
Solution: Aim for a pour temperature between 95°F and 110°F for both oils and lye solution. Use an infrared thermometer to monitor accurately. Let ingredients cool naturally rather than rushing with ice baths, which can cause separation.
4. Using Problematic Oils
Certain high-hardness oils like coconut oil (above 30%) or shea butter (above 15%) can make soap brittle if not balanced with conditioning oils like olive or sunflower. Brittle soap is more prone to cracking under stress.
Solution: Balance your recipe. Keep coconut oil below 30%, and pair hard butters with liquid oils. A well-rounded formula includes 40–60% olive oil, 20–30% coconut, 10–20% sustainable palm (or alternative), and 5–10% soft butters.
“Many beginners crack their first few batches because they don’t realize how much heat retention affects structure. It’s not just chemistry—it’s physics.” — Dr. Lila Nguyen, Formulation Chemist & Artisan Soap Educator
Step-by-Step Guide to Prevent Cracking
Follow this proven sequence to minimize cracking risks from start to finish:- Design a balanced recipe: Use a trusted lye calculator. Limit coconut oil to 25–30%, include 5–10% castor or sweet almond oil for flexibility.
- Apply a water discount: Reduce water to 27–30% of oil weight. Example: For 1000g oils, use ~280g water instead of 380g.
- Control temperatures: Cool oils and lye solution to 95–105°F before mixing. Mix slowly to avoid air pockets.
- Avoid over-blending: Stick blend only until light trace. Over-mixing introduces air and speeds trace, reducing workability.
- Pour gently: Tap mold lightly to release bubbles. Don’t vibrate or shake excessively.
- Insulate wisely: Cover mold with parchment paper, then a loose towel. Do not wrap tightly or place in an oven unless avoiding gel phase.
- Monitor for 24–48 hours: Check for signs of overheating (condensation, darkening, bubbling). If soap feels very hot, uncover slightly to cool.
- Unmold at the right time: Wait 3–5 days. Soap should be firm but slightly soft in the center. Premature unmolding increases cracking risk.
- Cure properly: Place cut bars on wax paper in a cool, dry, ventilated area. Rotate weekly. Cure for 4–6 weeks minimum.
Do’s and Don’ts: Quick Reference Table
| Do’s | Don’ts |
|---|---|
| Use a 10–20% water discount | Use full water without adjusting for climate |
| Pour between 95°F and 110°F | Pour above 130°F or below 90°F |
| Insulate lightly with breathable fabric | Wrap tightly in plastic or blankets |
| Balance hard oils with soft ones | Use >30% coconut oil without adjustments |
| Allow 3–5 days before unmolding | Unmold after 24 hours to “check progress” |
| Cure bars with space between them | Stack or crowd soaps during early cure |
Real Example: Sarah’s First Batch Gone Wrong
Sarah, a beginner soapmaker in Texas, followed a popular online recipe using 35% coconut oil, 50% olive oil, and 15% shea butter. She used full water and poured at 125°F. Excited, she wrapped the mold in two towels and placed it in a closed cardboard box overnight.
The next morning, she found deep vertical cracks running through the center of her loaf. The soap felt hot to the touch. Despite the cracks, she unmolded after 36 hours. After cutting, several bars broke in half during curing.
After reviewing her process, Sarah adjusted: she reduced coconut oil to 28%, applied a 15% water discount, poured at 100°F, and covered the mold with only a single cotton towel. Her next batch cured perfectly—no cracks, no breakage, and a smoother texture.
Her takeaway? “I thought more insulation meant better saponification. I learned that sometimes, less heat is more control.”
Checklist: Crack-Free Soap Success Plan
- ✅ Use a lye calculator to verify water amount and superfat
- ✅ Limit coconut oil to 30% or less
- ✅ Apply water discount (27–30% lye concentration)
- ✅ Cool oils and lye to 95–110°F before mixing
- ✅ Blend only to light trace; avoid over-mixing
- ✅ Pour smoothly and tap mold gently
- ✅ Insulate lightly—never seal airtight
- ✅ Monitor temperature for first 24 hours
- ✅ Wait 3–5 days before unmolding
- ✅ Cure bars on a rack with airflow, turned weekly
Frequently Asked Questions
Can cracked soap still be used?
Yes, cracked soap is safe and functional. Shallow cracks may disappear as the bar cures and hardens. Deep cracks might weaken the bar, causing it to break, but the soap itself performs normally. Consider rebatching cracked batches into smaller bars or embeds.
Does altitude affect soap cracking?
Indirectly, yes. Higher altitudes lower boiling points, accelerating water evaporation. This can increase shrinkage stress. If you live above 3,000 feet, consider a slight water increase (5–10%) or store molds in a slightly more humid environment during initial set.
Why do some recipes crack and others don’t, even with the same method?
Different oil profiles react uniquely to heat and water loss. A high-coconut recipe behaves differently than an all-olive one. Even fragrance oils can impact stability—some accelerate trace or heat production. Always test new recipes in small batches first.
Final Thoughts: Turning Mistakes Into Mastery
Cracking is not a failure—it’s feedback. Every batch teaches you something about temperature, formulation, and timing. The most experienced soapmakers once faced the same frustrations. What separates them is persistence and attention to detail.
By understanding the causes of cracking and applying targeted solutions, you gain control over your craft. Start with one adjustment at a time: reduce water, adjust temperature, or modify your oil blend. Track your changes and results. Soon, you’ll produce consistent, beautiful bars that reflect your growing skill.


 浙公网安备
33010002000092号
浙公网安备
33010002000092号 浙B2-20120091-4
Comments
No comments yet. Why don't you start the discussion?