
A fully functioning ice maker is one of the quiet heroes of modern kitchens—until it stops working. When ice begins accumulating where it shouldn’t, such as in clumps inside the bin or forming solid blocks around the mechanism, it’s clear something’s wrong. Freezing issues are among the most common complaints with refrigerator ice makers, but they’re often misunderstood. The problem isn’t always a faulty part or aging appliance; sometimes, it’s a simple imbalance in temperature, water flow, or airflow that you can correct at home.
This guide breaks down the root causes behind recurring ice maker freeze-ups and provides practical, proven solutions you can apply immediately. Whether your unit is built into the freezer door or tucked in the upper corner of the fridge, understanding how it operates—and what disrupts that operation—is key to fixing and preventing future issues.
How Ice Makers Work: A Quick Overview
To troubleshoot effectively, it helps to understand the basic cycle of an automatic ice maker:
- Water Supply: Water flows from the household line through a solenoid valve into the ice mold.
- Freezing Phase: The water freezes into cubes over 60–90 minutes, depending on freezer temperature.
- Ejection: A heating element briefly warms the mold to loosen the ice, then ejector fingers push the cubes out.
- Harvest Cycle Completion: Cubes drop into the storage bin, and the cycle repeats.
The system relies on precise timing, consistent temperatures, and unobstructed movement. When any part of this process falters—especially during ejection or water refilling—it can lead to excess ice buildup, blockages, or complete failure.
Common Causes of Ice Maker Freeze-Ups
Ice accumulation doesn’t happen randomly. It stems from specific mechanical or environmental failures. Below are the most frequent culprits:
1. Inadequate Freezer Temperature
If the freezer runs too cold—typically below 0°F (-18°C)—the ice may not release properly after freezing. Overly low temps cause excessive frost and can freeze the ejection mechanism itself, leading to jammed gears or blocked dispensers.
2. Faulty or Stuck Ejector Mechanism
The metal fingers or rake responsible for pushing ice out can become stuck due to wear, ice bridging, or motor failure. When they don’t retract fully, residual ice builds up around them, creating a snowball effect.
3. Water Inlet Valve Issues
A leaking or slow-closing water inlet valve allows excess water into the mold. This overflow freezes and forms a solid mass under the ejector arms. Over time, this ice blocks movement entirely.
4. Poor Air Circulation
Refrigerators need proper air circulation to maintain even cooling. If vents near the ice maker are blocked by food items or frost buildup, warm spots can form, causing inconsistent freezing and partial melting followed by re-freezing.
5. Defective Heater Assembly
During the harvest cycle, a small heater briefly warms the mold (usually for 3–8 seconds) to release the cubes. If this heater fails or shorts out, the ice sticks firmly to the mold, and repeated cycles compound the problem.
6. Low Water Pressure or Clogged Filter
Insufficient water pressure results in underfilled molds. Thin ice cubes break easily and get caught in moving parts. Meanwhile, a dirty water filter restricts flow and introduces debris that can interfere with valve operation.
7. Door Seal Leaks or Frequent Opening
Warm, humid air entering the freezer when the door seals poorly or opens frequently leads to condensation. That moisture freezes on internal components, including the ice maker, accelerating frost accumulation.
“Most ice maker problems we see in service calls stem from preventable conditions like poor airflow or neglected maintenance.” — Carlos Mendez, Appliance Repair Technician with 15 years of field experience
Step-by-Step Guide to Fixing a Frozen Ice Maker
Before calling a technician, try these troubleshooting steps. Many issues can be resolved in under an hour with basic tools and safety precautions.
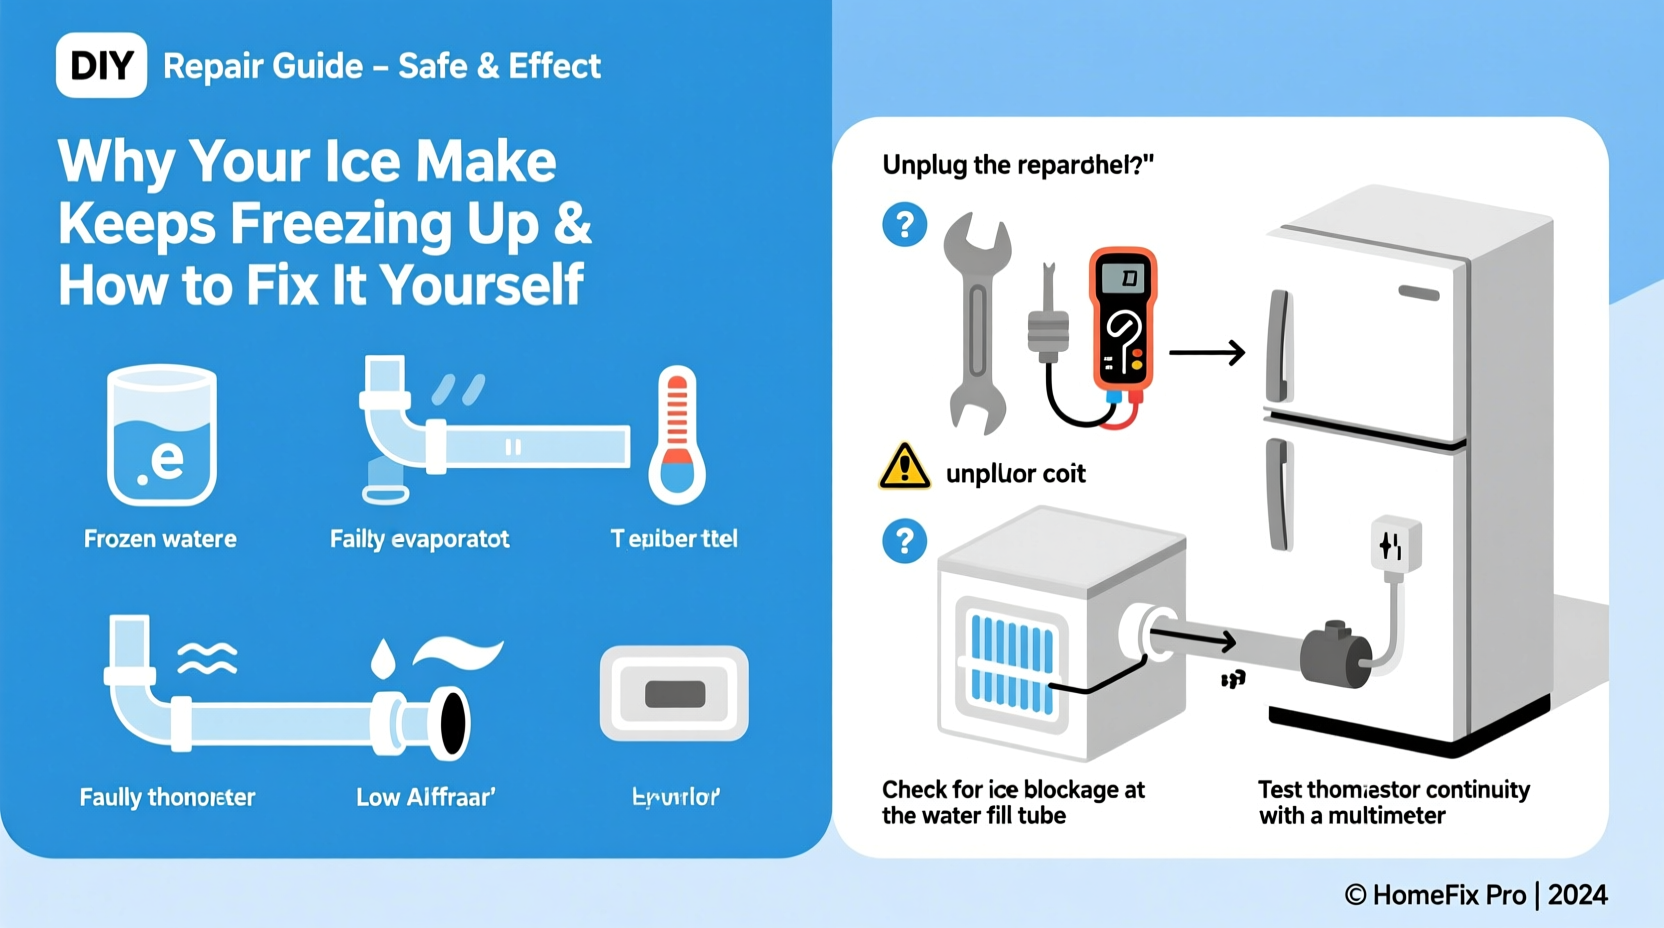
Step 1: Unplug the Refrigerator and Remove Ice Buildup
Safety first. Unplug the unit or turn off power at the circuit breaker. Remove all ice from the bin and use a plastic scraper or soft spatula to break up large chunks around the ice maker. Avoid metal tools—they can damage plastic components or scoring evaporator coils.
Step 2: Locate and Inspect the Ice Maker
Depending on your model, the ice maker may be behind a front cover, mounted on the side wall, or suspended from the ceiling of the freezer compartment. Gently remove any panels using a screwdriver if needed. Look for visible signs of ice encasing motors, gears, or wiring.
Step 3: Test the Ejector Arms
Manually rotate the ejector assembly (if accessible). It should move smoothly through a full cycle. If resistance is felt, defrost further or check for broken gear teeth. Some models have a test button—press it to initiate a cycle and observe motion.
Step 4: Check the Water Inlet Valve
Located at the back of the fridge, this valve controls water entry. Disconnect the supply line and inspect for leaks or mineral deposits. Use a multimeter to test continuity—if there’s no reading, the solenoid is likely failed and needs replacement.
Step 5: Examine the Harvest Heater
This small component sits beneath the ice mold. With the power off, disconnect the wires and test for continuity using a multimeter. No continuity means the heater is dead and must be replaced.
Step 6: Replace or Clean the Water Filter
Even if the filter isn’t overdue, replace it temporarily to rule out flow issues. Most filters last 6 months or 500 gallons. Flush the new filter according to manufacturer instructions before resuming normal operation.
Step 7: Restore Power and Monitor Operation
Once everything is dry and reassembled, plug the fridge back in. Allow 24 hours for the freezer to stabilize. Watch the first few cycles closely. Properly functioning units will fill, freeze, heat slightly, and eject cleanly.
Dos and Don’ts When Fixing Your Ice Maker
| Do | Don’t |
|---|---|
| Unplug the refrigerator before starting work | Use sharp metal tools near plastic or wiring |
| Defrost thoroughly before inspecting moving parts | Force stuck components without checking for ice jams |
| Check water pressure (should be 20–120 psi) | Ignore persistent dripping from the fill tube |
| Replace old water filters every 6 months | Assume the problem is the ice maker module without testing valves or heaters |
| Keep the freezer organized to allow airflow | Overfill the ice bin, which can obstruct ejection |
Mini Case Study: Resolving Chronic Freeze-Up in a Side-by-Side Unit
Mark, a homeowner in Minnesota, noticed his Kenmore side-by-side fridge was producing less ice each week. Eventually, the bin filled with solid ice, rendering the dispenser useless. He assumed the ice maker had failed and considered replacement.
Instead, he followed a diagnostic checklist: first verifying the freezer temp was set to -5°F, far colder than necessary. He adjusted it to 0°F. Next, he removed the ice maker and found a thick layer of ice around the ejector motor. After thawing and drying, he tested the harvest heater—it showed no continuity. A $28 replacement heater fixed the core issue.
He also replaced the water filter, which hadn’t been changed in over a year. Within two days, the ice maker resumed normal production. Mark now checks his settings twice a year and replaces the filter on schedule, avoiding recurrence.
Preventive Maintenance Checklist
- ✅ Set freezer temperature between 0°F and 5°F (-18°C to -15°C)
- ✅ Replace water filter every 6 months
- ✅ Inspect door gaskets monthly for cracks or gaps
- ✅ Clear frost buildup from vents near the ice maker quarterly
- ✅ Ensure the ice bin is not overfilled or jammed
- ✅ Listen for unusual sounds during the harvest cycle
- ✅ Clean the ice bin every 3–6 months with mild soap and water
Frequently Asked Questions
Why does my ice maker freeze up even though the freezer isn’t too cold?
Even at optimal temperatures, a malfunctioning harvest heater or leaking water valve can cause localized freezing. The brief heating phase is critical for releasing cubes—if it fails, ice remains stuck and accumulates over cycles.
Can I bypass the ice maker if it keeps failing?
Yes. Most models allow you to turn off the ice maker via a switch or by lifting the shutoff arm. While this stops production, it prevents further water waste and potential flooding from a stuck valve.
Is it worth repairing an older ice maker?
It depends on the cost of parts versus replacement. For units under 7 years old, replacing a heater or valve is usually economical. If multiple components fail repeatedly, consider upgrading the entire module or evaluating whether a standalone ice maker might better suit your needs.
Final Thoughts: Take Control Before Calling for Help
An ice maker that keeps freezing up is more than an inconvenience—it wastes water, risks damaging your refrigerator, and diminishes your kitchen’s efficiency. But in most cases, the solution lies within reach. By understanding how the system works and applying methodical diagnostics, you can identify and resolve the root cause without professional help.
Regular maintenance, attention to temperature settings, and timely filter changes go a long way toward preventing issues. When problems do arise, approach them systematically: defrost, inspect, test, and replace only what’s necessary.


 浙公网安备
33010002000092号
浙公网安备
33010002000092号 浙B2-20120091-4
Comments
No comments yet. Why don't you start the discussion?