
A sudden roar from your laptop’s fan can be more than just annoying—it’s often a sign that something isn’t running as it should. While some level of fan noise is normal during intensive tasks, persistent or unusually loud sounds may point to underlying issues affecting both performance and hardware longevity. The good news is that many of these problems are preventable or easily fixable with the right knowledge. Understanding why your laptop fan gets loud—and how to address it—can save you time, protect your device, and restore peace to your workspace.
What Triggers Excessive Fan Noise?
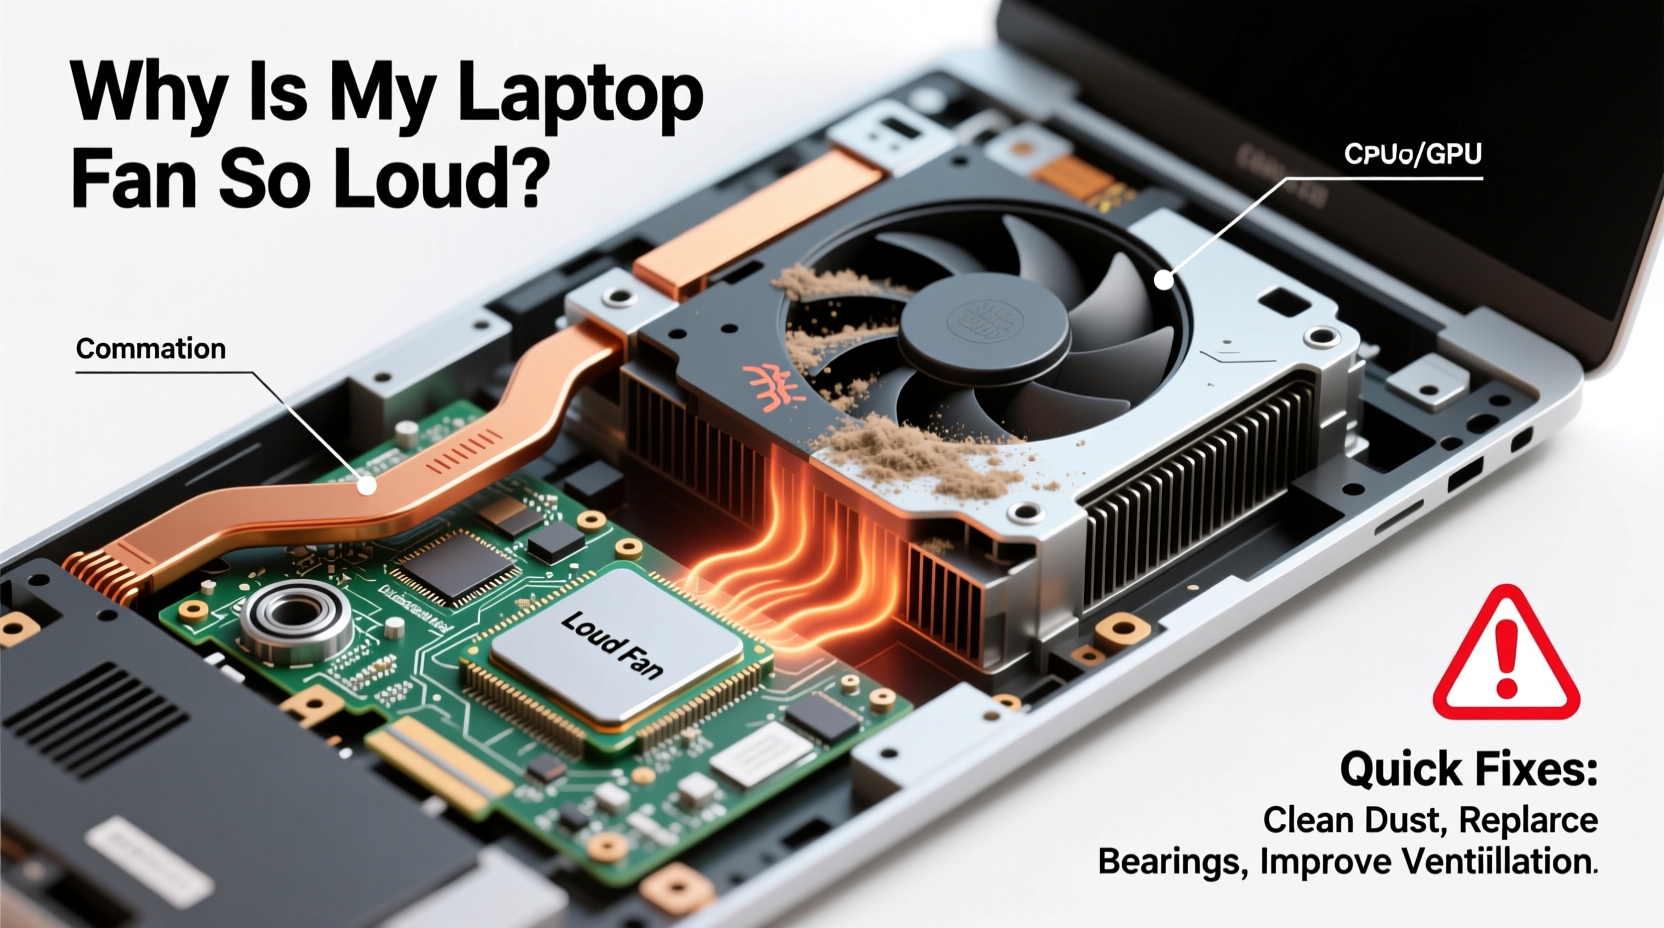
Laptop fans exist to regulate internal temperature by expelling hot air generated by the CPU, GPU, and other components. When temperatures rise, the fan spins faster to cool things down, which naturally increases noise. However, when the fan runs at high speed constantly—even during light usage—there’s likely an issue beyond routine heat generation.
Several factors can cause your laptop fan to work harder than necessary:
- Dust buildup in vents and cooling fins: Over time, dust accumulates inside the fan housing and heatsink, restricting airflow and reducing cooling efficiency.
- High CPU or GPU usage: Background processes, malware, or resource-heavy applications can push your processor to its limits, generating excess heat.
- Poor ventilation: Using your laptop on soft surfaces like beds or couches blocks intake vents, trapping heat inside.
- Failing thermal paste: On older laptops, dried-out or degraded thermal paste between the CPU and heatsink reduces heat transfer, forcing the fan to compensate.
- Outdated BIOS or firmware: Some systems have inefficient power or thermal management until updated.
- Ambient temperature: Hot rooms make it harder for the laptop to dissipate heat, increasing fan activity.
Common Causes and How to Diagnose Them
Before jumping into fixes, it helps to identify what’s actually causing the problem. Here’s how to pinpoint the source of excessive fan noise:
Check System Resource Usage
Open your operating system’s task manager (Ctrl+Shift+Esc on Windows, Activity Monitor on macOS) and look for processes consuming high CPU or disk resources. If you see an application consistently using over 50% CPU without reason, it could be malfunctioning or malicious.
Malware, cryptocurrency miners, or bloated software suites often run silently in the background, heating up your system unnecessarily.
Monitor Internal Temperatures
You can use tools like HWMonitor (Windows), Core Temp, or iStat Menus (macOS) to check real-time component temperatures. Normal idle CPU temperatures range between 40–50°C (104–122°F). Anything above 70°C (158°F) under light load suggests poor cooling.
If temperatures spike quickly during basic tasks, the cooling system isn’t keeping up.
Listen for Patterns
Pay attention to when the fan kicks in:
- Does it ramp up immediately after booting? Could indicate startup bloat or background updates.
- Only during video calls or gaming? Likely normal under heavy load—but only if it quiets down afterward.
- Constantly, even with no apps open? Points to dust, failing hardware, or software inefficiency.
“Persistent fan noise is one of the earliest warning signs of thermal stress. Addressing it early can prevent long-term damage.” — Dr. Alan Reyes, Hardware Engineer at TechShield Labs
Quick Fixes You Can Try Right Now
Not every solution requires opening your laptop or reinstalling your OS. Start with these practical, low-effort steps:
1. Clean Air Vents with Compressed Air
Dust is the number one enemy of efficient cooling. Use a can of compressed air to blow out debris from the side and bottom vents. Hold the can upright and use short bursts to avoid moisture discharge.
2. Close Unnecessary Programs and Startup Items
Reduce CPU load by disabling nonessential apps from launching at startup:
- Press Ctrl+Shift+Esc to open Task Manager.
- Go to the “Startup” tab.
- Disable entries like cloud sync tools, chat apps, or updaters you don’t need immediately.
This reduces initial system load and prevents unnecessary background heat generation.
3. Adjust Power Settings
On Windows, switch to “Balanced” or “Power Saver” mode in Control Panel > Power Options. These settings limit CPU performance slightly but significantly reduce heat output and fan noise.
On macOS, ensure “Automatic graphics switching” is enabled (if available), allowing the system to use integrated graphics instead of the power-hungry discrete GPU when possible.
4. Use a Laptop Cooling Pad
A powered cooling pad with one or more fans provides additional airflow from beneath the laptop. Especially useful for gaming or workstation-class machines prone to overheating.
5. Update Your System
Install the latest OS updates, driver patches, and BIOS upgrades. Manufacturers often release firmware improvements that optimize thermal management and fan control algorithms.
When Software Isn’t Enough: Hardware-Level Solutions
If software tweaks don’t quiet the fan, it’s time to consider deeper hardware-related causes.
Replace Thermal Paste
After 2–4 years of use, thermal paste between the CPU and heatsink can dry out, crack, or lose effectiveness. Reapplying high-quality thermal paste (like Arctic MX-4 or Noctua NT-H1) dramatically improves heat conduction and lowers operating temperatures.
This requires disassembling the laptop, removing the heatsink, cleaning off old paste with isopropyl alcohol, and applying a pea-sized amount of new paste before reassembly. Proceed carefully or consult a technician if you’re uncomfortable.
Upgrade to an SSD (If Still Using HDD)
Mechanical hard drives generate more heat and consume more power than solid-state drives. Upgrading not only speeds up your system but also reduces overall thermal load.
Vacuum Internal Components (Advanced)
For users comfortable with disassembly, using a small vacuum or anti-static brush to clean dust from the fan blades and heatsink fins can restore near-new cooling performance. Avoid cotton swabs—they can leave fibers behind.
| Cause | Symptoms | Solution |
|---|---|---|
| Dust-clogged vents | Fan runs loudly even at idle; visible dust in grills | Clean with compressed air; repeat every 3–6 months |
| Background app overload | High CPU usage with no active programs | Manage startup items; scan for malware |
| Degraded thermal paste | Overheating despite clean internals; throttling | Reapply thermal paste (every 2–3 years) |
| Poor surface placement | Fan ramps up within minutes of use | Use on hard, flat surface; elevate for airflow |
| Failing fan motor | Grinding noise, inconsistent speed, or no spin | Replace fan assembly (professional repair advised) |
Mini Case Study: Sarah’s Overheating Work Laptop
Sarah, a freelance graphic designer, noticed her 3-year-old laptop becoming increasingly noisy during client Zoom calls and photo editing sessions. Despite closing all apps, the fan continued whirring loudly, and the bottom of the device became too hot to touch.
She first checked Task Manager and found Adobe Creative Cloud updater consuming 78% CPU in the background. Disabling it helped slightly, but temperatures remained high. She then used compressed air to clean the side vents—revealing a thick layer of lint-like dust.
After cleaning, idle temperatures dropped from 75°C to 52°C, and fan noise decreased by over 60%. Six months later, when performance dipped again, she reapplied thermal paste herself using a tutorial, extending the laptop’s usable life by another two years.
Sarah’s experience shows that combining simple maintenance with targeted interventions can resolve most fan noise issues without costly replacements.
Step-by-Step Maintenance Checklist
Follow this checklist every 3–6 months to keep your laptop running quietly and efficiently:
- Inspect vents visually: Look for visible dust or blockages.
- Clean exterior vents: Use compressed air to blow out debris.
- Monitor CPU usage: Open Task Manager/Activity Monitor and sort by CPU %.
- Disable unnecessary startup programs: Remove non-critical auto-launch apps.
- Update OS and drivers: Install pending updates for stability and efficiency.
- Check ambient environment: Ensure room temperature is moderate and laptop is on a hard surface.
- Reapply thermal paste (annually or biennially): Especially if temps exceed 70°C at idle.
- Consider professional servicing: If noise persists or unusual sounds occur (grinding, clicking).
Frequently Asked Questions
Is it bad if my laptop fan is always loud?
Consistently loud fan noise usually means your laptop is working harder than it should to stay cool. While not immediately dangerous, prolonged overheating can degrade battery life, throttle performance, and shorten the lifespan of internal components like the CPU and motherboard.
Can I disable the fan to stop the noise?
No. Disabling the fan—even temporarily—risks severe overheating, which can lead to automatic shutdowns or permanent hardware damage. The fan is a critical safety feature. Instead, address the root cause of the noise.
How do I know if my fan is failing?
Signs of a failing fan include irregular speed (ramping up and down randomly), complete silence when the laptop is hot, or strange noises like grinding or rattling. If you suspect fan failure, stop using the laptop and seek repair immediately.
Conclusion: Silence Starts with Smart Care
A loud laptop fan doesn’t have to be the price of productivity. Most cases stem from preventable issues like dust accumulation, software bloat, or poor ventilation—problems within your control. By adopting regular maintenance habits and responding promptly to warning signs, you can keep your laptop cool, quiet, and performing at its best for years.
Start today: clean those vents, review your startup apps, and give your machine the airflow it deserves. Small actions now can prevent big repairs—or premature replacement—down the line.


 浙公网安备
33010002000092号
浙公网安备
33010002000092号 浙B2-20120091-4
Comments
No comments yet. Why don't you start the discussion?