
Nail polish that lifts or chips just hours after a meticulous application can be incredibly frustrating. You've taken the time to prep, paint, and wait—only to see your efforts flake away by bedtime. This isn't just bad luck; it's usually the result of preventable mistakes in preparation, product choice, or technique. Understanding the root causes of premature chipping is the first step toward achieving a durable, glossy finish that lasts for days, not hours.
Professional manicurists know that longevity starts long before the brush touches the nail. From the condition of your natural nails to the order in which you apply layers, every detail matters. Whether you're painting at home or visiting a salon, the principles remain the same: proper prep, correct technique, and smart maintenance extend wear time significantly.
The Science Behind Nail Polish Adhesion
Nail polish doesn’t “stick” to your nails like tape—it bonds chemically and mechanically to the nail plate surface. The keratin structure of your nail determines how well polish adheres. When the surface is oily, uneven, or contaminated with residue, the polish layer becomes unstable from the start.
Most modern polishes use nitrocellulose as a film-forming agent. As the solvents evaporate, this compound forms a hard, flexible coating. However, if the base coat fails to grip properly, the entire system collapses. That’s why skipping base coat or applying over moisturizer residue drastically reduces durability.
Humidity, temperature, and even the pH level of your skin can affect drying times and adhesion. In high-humidity environments, polish may dry too slowly, creating a tacky layer that attracts dust and debris. Conversely, in dry climates, it might dry too fast on the surface while remaining soft underneath, leading to cracks and early chipping.
“Over 70% of chipping issues stem from improper nail prep, not product quality.” — Dr. Lena Torres, Cosmetic Dermatologist and Nail Health Specialist
Common Causes of Early Chipping (And How to Fix Them)
Chipping within hours is rarely due to one single factor. It’s typically a combination of missteps in the process. Below are the most frequent culprits and their solutions:
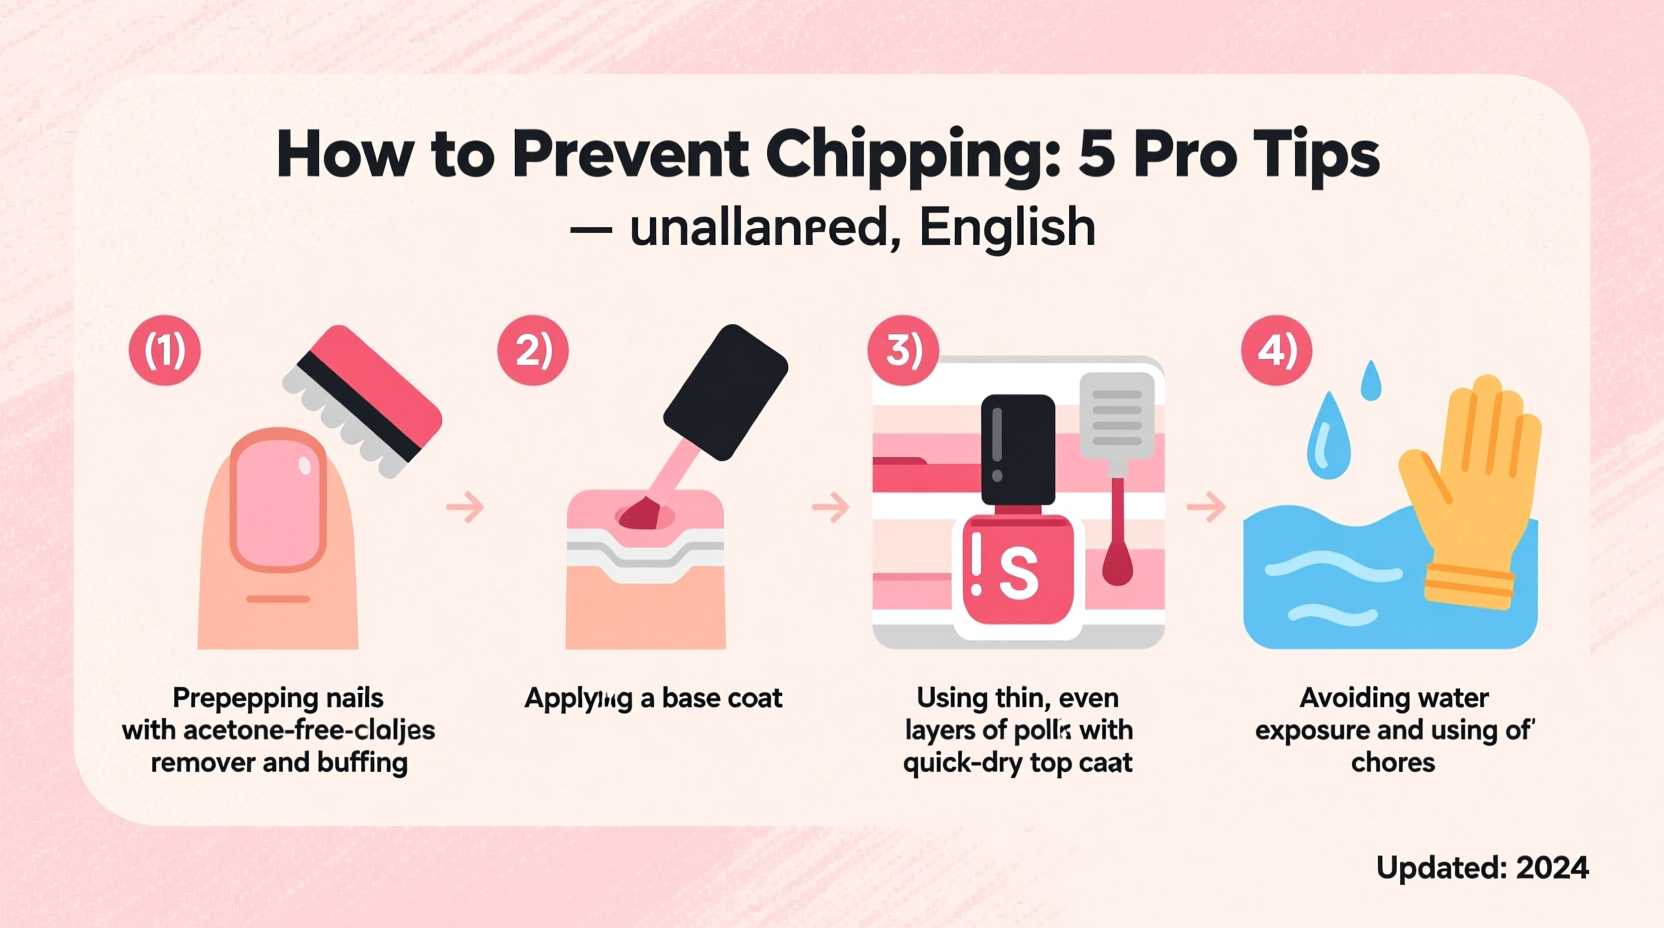
1. Inadequate Nail Preparation
Cleaning and prepping the nail surface is non-negotiable. Any trace of oil, lotion, or old polish prevents the base coat from bonding effectively. Many people skip dehydrating the nail, assuming clean means dry—but natural oils seep to the surface quickly.
2. Skipping Base Coat
Base coat isn’t optional. It acts as a primer, sealing the nail and providing a uniform surface for color. Some base coats also contain adhesion promoters like polyester resins that enhance grip.
Using colored polish directly on the nail creates microscopic gaps where moisture can penetrate, causing lifting. Over time, this weakens the bond and leads to peeling at the edges.
3. Applying Thick Coats
Thick layers take longer to dry and shrink unevenly as they cure, creating tension that results in cracks. Thin, even coats dry faster and adhere better.
Instead of two thick layers, apply three thin ones, allowing 2–3 minutes of drying time between each. This builds opacity without compromising integrity.
4. Not Sealing the Tips
The free edge of the nail is the most vulnerable area. Daily activities like typing, opening packages, or washing dishes put stress here. If the tip isn’t sealed properly, polish lifts from the underside.
After each coat—including the topcoat—run the brush along the tip of the nail to cap it. This creates a protective barrier that resists wear.
5. Using Expired or Low-Quality Products
Nail polish degrades over time. Old formulas thicken, separate, and lose their binding agents. Brushes become stiff, making smooth application impossible.
Discard polish that smells strongly of acetone, has lumps, or takes more than five minutes to self-level after application. Invest in reputable brands known for formula stability.
Step-by-Step Guide to a Long-Lasting Manicure
Achieving chip-resistant polish requires a disciplined routine. Follow this timeline for best results:
- Remove old polish using acetone-free remover to avoid overdrying nails.
- Shape nails with a fine-grit file, filing in one direction to prevent splitting.
- Push back cuticles gently after softening with warm water or cuticle oil.
- Buff lightly to smooth ridges but avoid aggressive buffing, which thins the nail.
- Dehydrate nails with alcohol-soaked wipes. Let air-dry completely.
- Apply base coat in thin, even strokes. Cap the tips. Wait 3 minutes.
- Apply first color coat thinly. Avoid flooding the cuticles. Dry 3–4 minutes.
- Apply second color coat the same way. Cap tips again. Dry 5 minutes.
- Add third coat if needed for full coverage. Let dry thoroughly.
- Seal with top coat—use a quick-dry or gel-infused formula. Re-cap the tips.
- Wait at least 30 minutes before heavy use. Apply cuticle oil around (not on) nails after 2 hours.
This method minimizes exposure to stress during the critical curing phase. Most chipping occurs when people rush into activity too soon after painting.
Do’s and Don’ts for Extended Wear
| Do’s | Don’ts |
|---|---|
| Use a ridge-filling base coat on weak or textured nails | Apply lotion right before polishing |
| Reapply top coat every 2–3 days | Peel off polish instead of using remover |
| Wear gloves when cleaning or doing dishes | Use nails as tools (e.g., opening bottles) |
| Store polish in a cool, dark place | Shake polish vigorously—swirl gently instead |
| Hydrate cuticles daily (after top coat dries) | Paint over damaged or peeling nails |
Real-World Example: Sarah’s Transformation
Sarah, a graphic designer from Portland, used to re-paint her nails every other day. She blamed her job—constantly typing and using a stylus—but after tracking her routine, she realized she skipped base coat and applied thick layers to save time. Her nails were often greasy from hand cream applied minutes before painting.
She adjusted her method: removed all moisturizer before starting, used a hydrating base coat, applied three thin color layers, and capped the tips. She also began wearing cotton gloves under nitrile ones when cleaning her workspace.
Result? Her manicure lasted nine full days with only minor tip wear. “I didn’t change products—just my process,” she said. “Now I get compliments instead of questions about when I last painted them.”
Choosing the Right Products Matters
Not all polishes are created equal. Look for formulations with these features:
- Flexible polymers – These allow the polish to move with the nail instead of cracking.
- Quick-dry additives – Acetates or silica help surface drying and reduce dust settling.
- Gel-like top coats – Provide a harder, more resilient finish without UV curing.
- Stabilized pigments – Prevent separation and ensure even application.
Brands like OPI, Essie, and Zoya have developed long-wear lines with enhanced adhesion technology. For extra durability, consider peel-off base coats paired with soak-off systems—they reduce stress on the nail during removal, preserving the surface for future applications.
FAQ: Common Questions About Chipping Polish
Why does my polish chip at the tips so quickly?
The tips bear the brunt of daily contact. Without proper sealing during application, the polish lifts from underneath. Always “cap” the free edge with each coat to create a protective seal.
Can I fix chipped polish without redoing the whole manicure?
Yes. Clean the area with polish remover, apply a tiny drop of matching color to the chip, let it dry, then seal with top coat. This works best for small flakes. For larger areas, full touch-up is better.
Does cold water really help polish dry faster?
Immersing nails in cold water for 1–2 minutes can help set the surface by cooling and contracting the polish film. Adding ice enhances the effect. However, this doesn’t replace proper drying time—internal layers still need hours to fully cure.
Final Checklist for Chip-Free Nails
- Prep Checklist:
- ☐ Remove old polish
- ☐ Shape and buff gently
- ☐ Push back cuticles
- ☐ Dehydrate with alcohol
- Application Checklist:
- ☐ Apply base coat (cap tips)
- ☐ Use thin color layers (2–3 coats)
- ☐ Allow drying between coats
- ☐ Seal with high-quality top coat
- Aftercare Checklist:
- ☐ Wait 30+ minutes before heavy use
- ☐ Reapply top coat every 3 days
- ☐ Wear gloves for wet tasks
- ☐ Moisturize cuticles (avoid nail surface)
Conclusion: Lasting Polish Starts With Process
Chipping isn’t inevitable. With the right preparation, application technique, and maintenance, your nail polish can stay flawless for over a week. It’s not about using the most expensive brand or having perfect nails—it’s about consistency and attention to detail.
Start implementing these strategies today. Focus on one habit at a time: begin with proper dehydration, then master thin coats, and finally, integrate weekly top coat refreshes. Small changes yield dramatic results.


 浙公网安备
33010002000092号
浙公网安备
33010002000092号 浙B2-20120091-4
Comments
No comments yet. Why don't you start the discussion?