
Every December, thousands of homeowners face the same frustrating ritual: flipping the switch on their outdoor lights only to find darkness where warmth and cheer should be. The timer—once reliable in October—now blinks erratically, resets to factory defaults, or refuses to power on entirely. This isn’t bad luck. It’s physics meeting poor design. Outdoor light timers aren’t inherently “cold-weather resistant” unless explicitly engineered for it. Most consumer-grade models sold at big-box retailers operate reliably only between 32°F and 104°F (0°C to 40°C). Below freezing, internal components behave unpredictably—not because they’re defective, but because they were never designed for sustained subzero exposure.
This failure isn’t just inconvenient; it undermines safety, energy efficiency, and seasonal enjoyment. A timer that drops out mid-holiday means lights stay on all night—increasing electricity costs and light pollution—or worse, stays off entirely, leaving walkways unlit and entryways vulnerable. Understanding *why* cold disables these devices—and what actually works to counteract it—is essential for anyone managing exterior holiday lighting beyond a single-season setup.
The Science Behind the Failure: Why Cold Breaks Timers
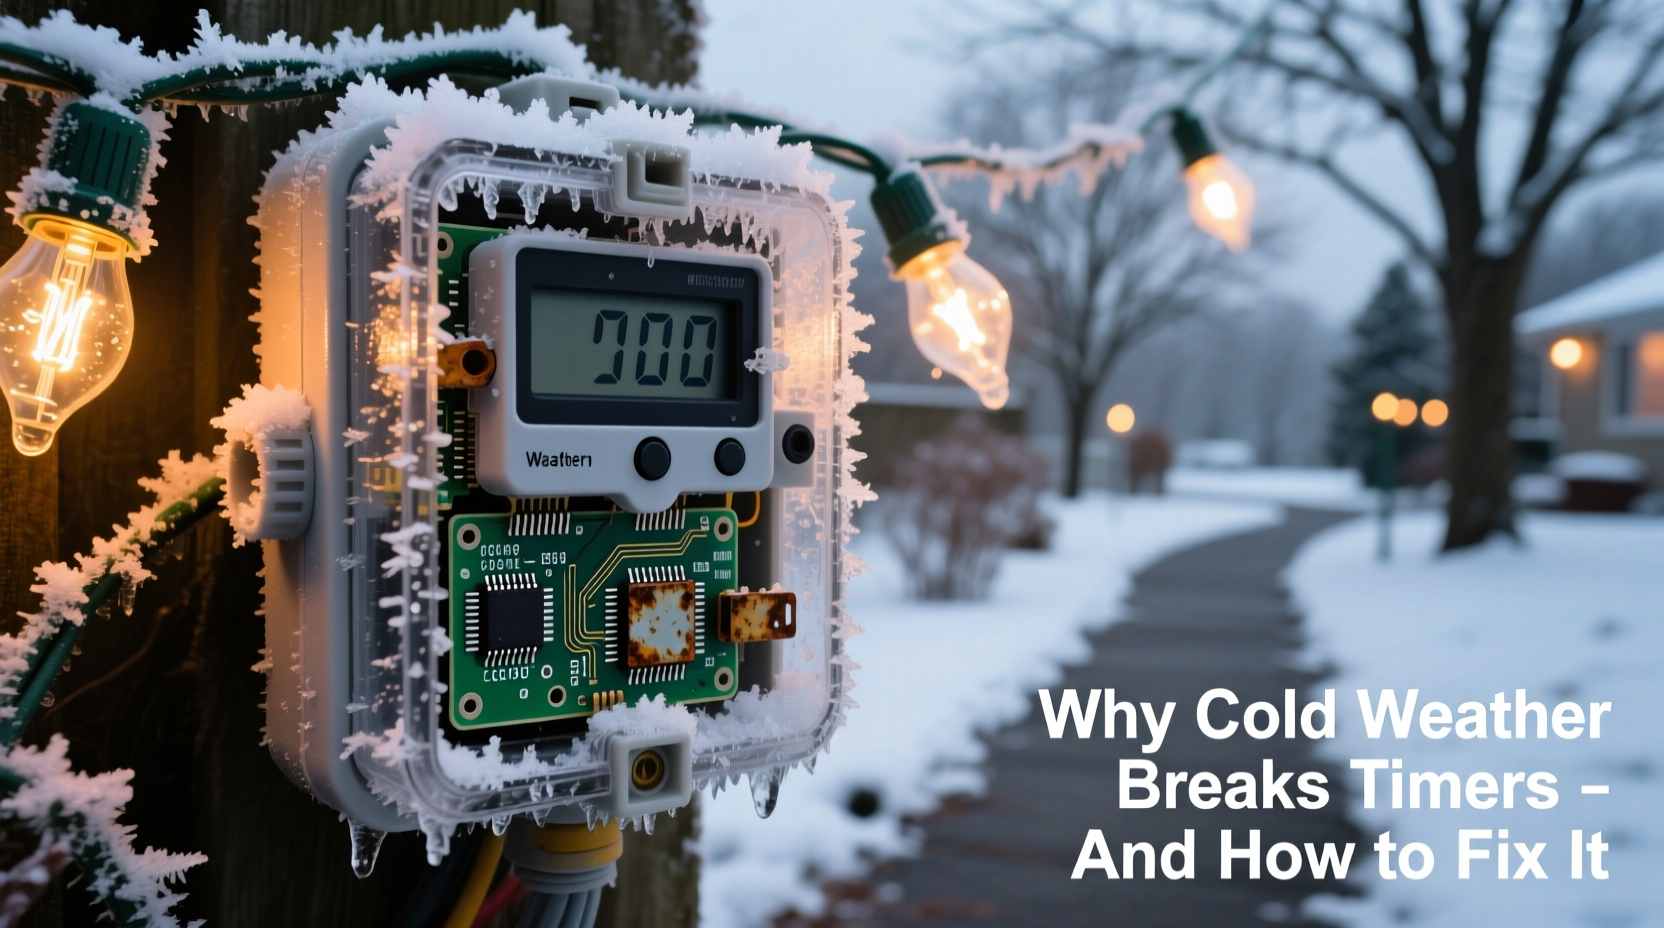
Outdoor timers fail in cold weather not from one single flaw, but from the cumulative stress of low temperatures on four interdependent systems: electronics, power sources, mechanical interfaces, and environmental seals.
First, lithium and alkaline batteries—the most common power sources for backup memory and real-time clocks—lose voltage output rapidly below 32°F. At 14°F (−10°C), an alkaline AA battery may deliver less than 40% of its rated capacity. Without sufficient voltage, the microcontroller can’t retain time settings or trigger relay activation. Second, electrolytic capacitors—used for filtering and power stabilization—experience increased internal resistance and reduced capacitance in cold conditions. This leads to voltage sags during load switching, causing microprocessor brownouts and spontaneous resets.
Third, plastic housings and internal gaskets contract at different rates than metal contacts and circuit board traces. Repeated thermal cycling (daytime thaw/night freeze) induces micro-fractures in solder joints and housing seams—especially near the battery compartment or terminal block. Fourth, moisture trapped inside the unit condenses when temperatures drop, forming conductive paths across circuitry. Even units rated IP44 (splash-resistant) aren’t sealed against internal condensation over extended subfreezing periods.
“Most residential timers are built for indoor garages—not exposed eaves or frost-prone porches. Their ‘outdoor’ label refers to UV resistance and basic rain deflection—not operational reliability at −20°C.” — Carlos Mendez, Senior Applications Engineer, Leviton Lighting Controls
Diagnosing the Real Culprit: Not All Failures Are Equal
Before replacing hardware, isolate whether the issue is temperature-related or symptomatic of another problem. Observe behavior over three consecutive nights with ambient temperatures below 25°F (−4°C):
- Intermittent power loss (lights cut out at 2 a.m., then resume at 5 a.m.) suggests capacitor degradation or battery voltage sag—not total failure.
- Complete time reset (display shows 12:00, no programmed schedule) points to backup battery depletion or EEPROM memory corruption.
- No display illumination but audible relay click indicates the control circuit is dead while the power path remains intact—likely microcontroller freeze or cold-induced solder joint fracture.
- Relay chattering (rapid on/off cycling) signals insufficient holding voltage to maintain the electromagnetic coil—a classic sign of cold-weakened battery or failing power supply.
Proven Fixes & Cold-Weather Upgrades
Replacing a $15 timer every year is neither economical nor sustainable. These solutions address root causes—not symptoms—with documented success across USDA Hardiness Zones 3–6 (where winter lows regularly reach −40°F).
1. Upgrade to a True Cold-Rated Timer
Look for models certified to UL 508A (industrial control standard) and explicitly rated for operation down to −40°F/C. These use wide-temperature-range components: solid polymer capacitors (not electrolytic), industrial-grade microcontrollers, and lithium-thionyl chloride backup batteries (which operate reliably from −55°C to +85°C). Brands like Intermatic EJ500C, GE Enbrighten Z-Wave Plus (model 45610), and Honeywell RPLS740B meet this threshold. Avoid “weather-resistant” claims without published low-temperature specs—many are marketing terms, not engineering guarantees.
2. Relocate the Timer Strategically
Mounting location matters more than housing rating. A timer in direct wind exposure on a north-facing wall will run 15–20°F colder than one tucked under a deep eave or inside a covered porch ceiling. Ideal placement: within 3 feet of a heat source (e.g., recessed above an exterior door with interior HVAC bleed) but shielded from rain and snow accumulation. Never mount directly on metal surfaces—aluminum and steel conduct cold rapidly into enclosures.
3. Insulate—Without Trapping Moisture
Wrap the timer housing in closed-cell neoprene foam tape (not fiberglass or bubble wrap), leaving ventilation gaps at top and bottom. This creates a thermal buffer without sealing in condensation. Pair with a desiccant pack (silica gel, rechargeable type) secured inside the enclosure using double-sided tape—replaced every 45 days. Do *not* use hand warmers or external heaters: uneven heating causes thermal stress cracks and voids UL certification.
4. Replace Standard Batteries Immediately
Remove alkaline or zinc-carbon backup batteries and replace them with lithium AA or CR123A cells—rated for −40°C operation. Lithium batteries maintain stable voltage across extreme cold and have 2–3× the shelf life. Ensure contacts are clean and slightly bent for firm pressure—cold-induced contraction loosens weak connections.
Cold-Weather Timer Maintenance Checklist
Follow this sequence annually, before Thanksgiving:
- Power off the circuit and verify no voltage at terminals with a non-contact tester.
- Open the timer housing and inspect for moisture, white crystalline residue (battery corrosion), or cracked solder joints near the battery holder.
- Clean contacts with 91% isopropyl alcohol and a soft brush; dry thoroughly with compressed air.
- Replace backup battery with lithium cell—never mix chemistries or brands.
- Apply dielectric grease to terminal screws and wire nuts to inhibit ice formation and corrosion.
- Seal unused knockouts with silicone-rated outdoor caulk (not duct tape or hot glue).
- Test operation for 72 hours indoors at 40°F (refrigerator setting) before final outdoor installation.
Real-World Example: The Minneapolis Porch Project
In December 2022, Sarah K., a homeowner in Minneapolis (Zone 4a, avg. January low: −2°F), installed new LED string lights on her front porch with a $22 “heavy-duty outdoor timer.” By December 10th, the lights failed nightly between 1 a.m. and 4 a.m. She tried resetting, replacing batteries, and covering the unit with a plastic bag—none worked. An electrician diagnosed voltage drop across the relay coil using a multimeter: 10.2V at 35°F, but only 6.8V at 12°F—below the 7.5V minimum required for stable hold-in. He replaced the timer with an Intermatic EJ500C, relocated it inside the insulated soffit cavity (maintaining 28°F ambient even at −15°F outside), and added lithium backup. The system operated without interruption through February 2023—including during a 72-hour stretch at −31°F. Total cost: $68. Total downtime: zero.
Do’s and Don’ts for Cold-Weather Timer Operation
| Action | Do | Don’t |
|---|---|---|
| Battery Replacement | Use lithium AA or CR123A cells rated to −40°C; check expiration date | Install alkaline batteries or mix old/new cells |
| Housing Protection | Wrap with ¼\" closed-cell neoprene; add rechargeable silica gel pack | Encase in plastic bags, tape, or foam board—no airflow |
| Wiring | Use 14 AWG outdoor-rated wire; torque terminals to 12 in-lb | Extend with indoor-rated extension cords or daisy-chain multiple timers |
| Testing | Validate function at 25°F for 48 hours before final mounting | Rely solely on “works fine in garage” as proof of cold readiness |
| Reset Protocol | After cold exposure, wait 20 minutes indoors before reprogramming | Force reprogram while display is blank or flickering |
FAQ: Cold-Weather Timer Questions Answered
Can I use a smart plug instead of a dedicated timer?
Only if it’s explicitly rated for outdoor cold operation. Most Wi-Fi smart plugs (e.g., TP-Link Kasa, Wemo) are rated only to 32°F and lack weatherproofing for sustained freezing. Their internal power supplies and RF modules suffer accelerated capacitor aging below 40°F. Industrial-grade smart relays (like Shelly Pro 3EM) with −40°C ratings exist—but require professional installation and network configuration.
Why do some timers work fine in my neighbor’s yard but fail in mine?
Microclimate differences dominate performance. Your timer may sit in a frost pocket (low-lying area where cold air pools), receive direct north wind exposure, or be mounted on uninsulated masonry that radiates cold. A 15-foot difference in elevation or orientation can create a 10–12°F temperature differential. Use a min/max thermometer inside the timer housing for 48 hours to confirm actual operating temps before assuming hardware failure.
Will upgrading to LED lights solve the timer issue?
No—LEDs reduce load on the timer’s relay, but don’t eliminate cold-related electronic failures. In fact, many LED drivers introduce high-frequency noise that exacerbates capacitor stress in cheap timers. The core issue remains the timer’s internal components—not the light source.
Conclusion: Build Resilience, Not Ritual
Outdoor Christmas light timers shouldn’t be disposable holiday accessories. They’re control systems—small, yes, but critical infrastructure for seasonal safety, ambiance, and energy discipline. When yours fails in cold weather, it’s not a personal shortcoming or a fluke of winter. It’s evidence of a mismatch between expectation and engineering reality. The fixes outlined here—strategic relocation, lithium battery upgrades, true cold-rated hardware selection, and disciplined maintenance—are not shortcuts. They’re investments in predictability. They transform a recurring December frustration into a quiet, confident certainty: when you set the schedule, the lights will honor it—through wind, snow, and single-digit cold.
Start this season with intention. Pull your current timer from its mount, test its cold response, and apply one upgrade from this guide. Document what changes—and share your results. Because the best holiday traditions aren’t just about light. They’re about reliability, care, and the quiet pride of a system that works—exactly as promised.


 浙公网安备
33010002000092号
浙公网安备
33010002000092号 浙B2-20120091-4
Comments
No comments yet. Why don't you start the discussion?