
Nothing disrupts a productive morning like the sudden error message: “Paper Jam.” You were just printing an important document or school assignment, and now you're left staring at a tangled sheet of paper deep inside your machine. Printer jams are among the most common—and frustrating—issues faced by home users. But before you call a technician or consider replacing your device, understand that most jams can be resolved with simple, methodical troubleshooting.
Printer jams occur for a variety of reasons, from worn rollers to incorrect paper loading. The good news is that with basic tools and a little patience, you can diagnose and resolve the issue yourself. This guide breaks down the root causes, walks you through safe clearing techniques, and offers long-term prevention strategies to keep your printer running smoothly.
Understanding How Printers Work (and Where Jams Happen)
To effectively troubleshoot a paper jam, it helps to know how paper travels through a printer. In most inkjet and laser printers, the process follows a consistent path:
- Pickup: The pickup roller grabs a sheet from the input tray.
- Feeding: Feed rollers move the paper into the printer’s body.
- Printing: The print head (inkjet) or fuser unit (laser) applies ink or toner.
- Exit: Output rollers push the printed page into the output tray.
Jams typically occur in one of four zones: the input tray, the middle transport area, near the print mechanism, or at the output. Each zone has its own set of failure points. For example, worn pickup rollers may fail to grip paper properly, while debris in the fuser unit of a laser printer can trap paper mid-print.
Common Causes of Printer Jams
While paper jams seem random, they almost always stem from identifiable mechanical or user-related issues. Understanding these root causes is key to both fixing and preventing future problems.
1. Incorrect Paper Loading
Overloading the tray, using wrinkled or damp paper, or misaligning the guides can cause multiple sheets to feed at once or skew during transit. Even slight curling from humidity can throw off alignment.
2. Worn or Dirty Rollers
The rubber rollers responsible for moving paper degrade over time. Dust, paper fibers, and dried toner reduce their grip, leading to slips and misfeeds. Laser printers are especially prone to roller wear due to heat exposure.
3. Foreign Objects or Debris
Staples, paper clips, or torn paper fragments often go unnoticed but can obstruct the paper path. These items usually enter when users force-feed envelopes or labels without proper guidance.
4. Environmental Factors
High humidity warps paper, making it stickier and harder to feed. Conversely, overly dry air increases static, causing sheets to cling together. Temperature fluctuations can also affect internal components.
5. Using the Wrong Paper Type
Not all paper is created equal. Heavy cardstock, glossy photo paper, or handmade textures may exceed your printer’s recommended weight or thickness. Always check your printer’s manual for supported media types.
“Over 60% of service calls for home printers are related to paper handling issues—most of which could have been avoided with routine maintenance.” — David Lin, Certified Printer Technician, HP Authorized Support
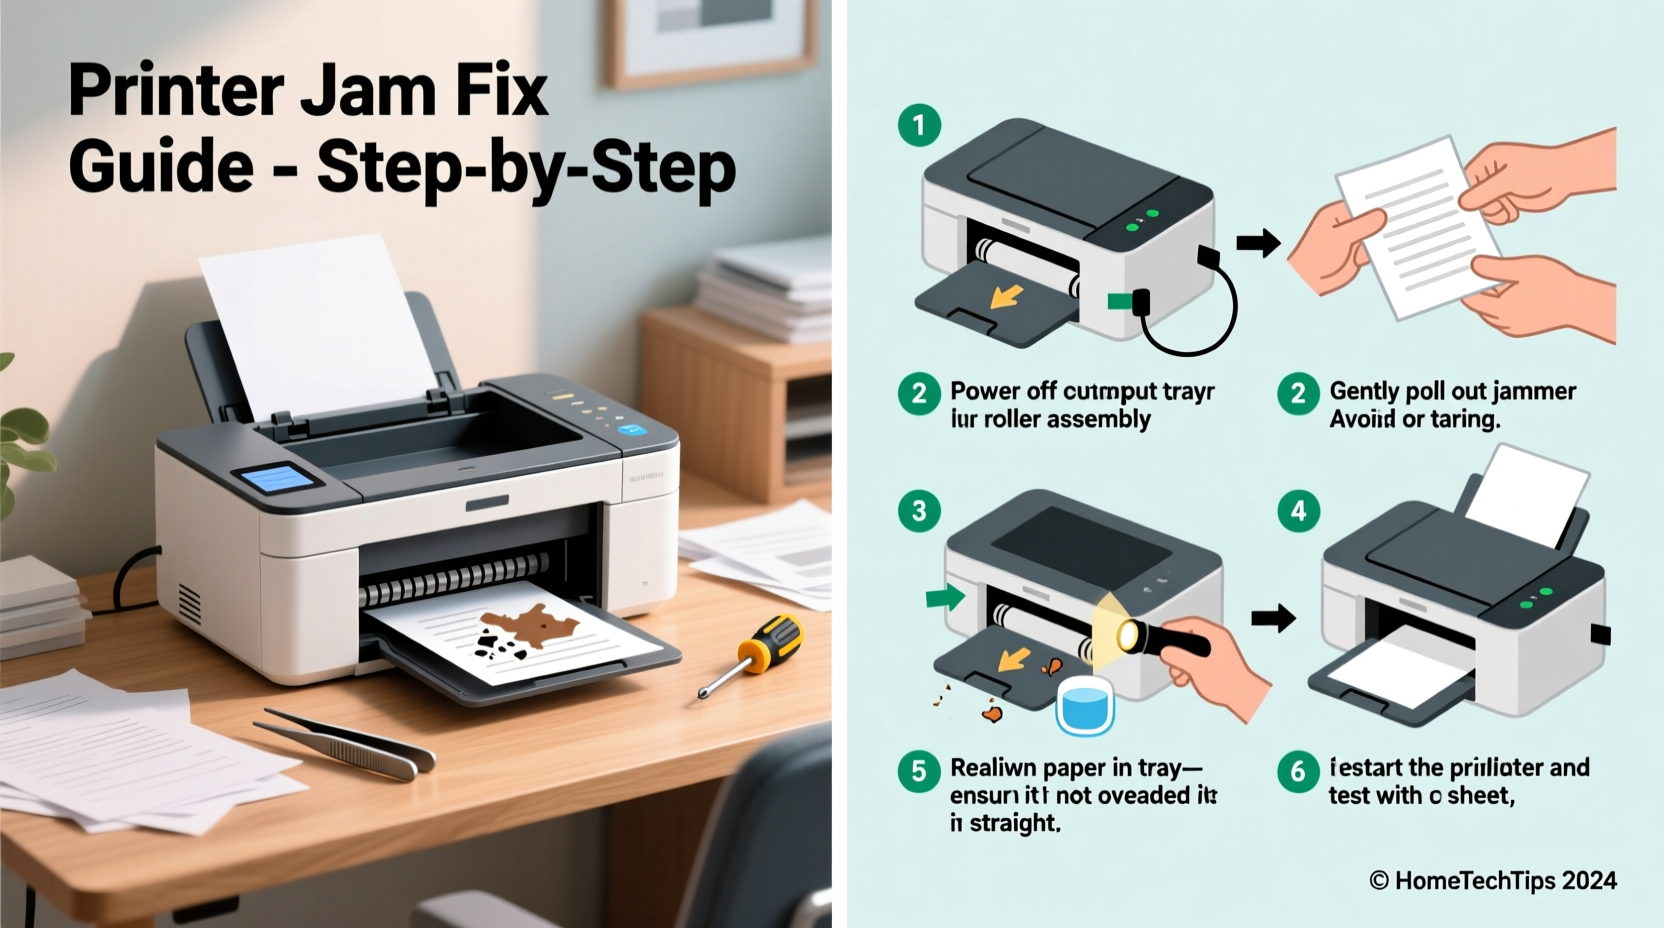
Step-by-Step Guide to Clearing a Paper Jam
Follow this systematic approach to safely remove jammed paper and inspect for underlying issues.
- Power Down: Turn off the printer and disconnect it from power. Never attempt to pull paper while the machine is on.
- Open Access Panels: Locate and open any accessible doors—input trays, rear access covers, duplex units, or top hatches—depending on your model.
- Inspect the Paper Path: Look for visible signs of jammed paper. Do not yank blindly; pulling too hard can tear the sheet and leave fragments behind.
- Gently Remove Paper: Grasp the paper with both hands and pull slowly in the direction of paper travel. If resistance occurs, reverse slightly to loosen before continuing forward.
- Check Hidden Areas: Examine under rollers, behind cartridges, and near the fuser (in laser models). Use a flashlight if needed.
- Remove Debris: Use compressed air or a soft brush to clean dust and paper fragments. Avoid cotton swabs, as fibers can shed and cause new jams.
- Close and Test: Reassemble all panels, plug in the printer, and run a test print using plain A4/Letter paper.
Prevention Checklist: Stop Jams Before They Start
Regular maintenance is more effective than emergency fixes. Use this checklist monthly to minimize jam risks:
- ✅ Load only the recommended amount of paper (usually 150–200 sheets max).
- ✅ Fan paper stacks before loading to separate sheets and reduce static.
- ✅ Adjust paper guides snugly—too loose causes skewing, too tight causes friction.
- ✅ Clean pickup and feed rollers every 2–3 months using a lint-free cloth dampened with water.
- ✅ Store paper in a sealed container away from moisture and direct sunlight.
- ✅ Replace consumables like rollers or maintenance kits per manufacturer guidelines.
- ✅ Run a “clean page” or “test print” weekly to keep mechanisms active.
Do’s and Don’ts of Paper Handling
| Do | Don’t |
|---|---|
| Fan paper before loading to prevent clumping | Load crumpled or folded paper |
| Use paper within the printer’s specified weight range (e.g., 75–90 gsm) | Feed sticky labels or laminated sheets unless explicitly supported |
| Clean rollers with a slightly damp microfiber cloth | Use alcohol or solvents on rubber rollers—they cause cracking |
| Store spare paper flat and sealed | Leave paper in the tray for weeks in humid environments |
| Check for firmware updates that improve paper handling | Ignore recurring jam warnings—early intervention prevents bigger issues |
Real-World Example: Sarah’s Home Office Struggle
Sarah, a freelance graphic designer, relied on her all-in-one inkjet printer for client proofs and invoices. Over two weeks, she experienced frequent jams—sometimes mid-job—delaying deliveries. Frustrated, she nearly bought a new model until a colleague suggested checking the rear access panel.
Upon inspection, she found a small piece of a torn envelope lodged near the duplex unit. After removing it and cleaning the rollers with a dry cloth, her printer ran flawlessly. She later realized she’d been feeding thick presentation envelopes without adjusting the paper-thickness lever—a setting she hadn’t known existed.
This case highlights how minor oversights compound into chronic issues. A five-minute inspection saved Sarah over $150 and preserved her existing equipment.
When to Seek Professional Help
Most jams are user-fixable, but certain symptoms suggest deeper mechanical failure:
- Recurrent jams in the same location despite thorough cleaning
- Unusual grinding or clicking noises during operation
- Visible damage to rollers or gears
- Printer fails to recognize paper even when loaded correctly
In such cases, internal components like the pickup assembly, separation pad, or fuser unit may need replacement. While DIY repair kits exist, improper handling can void warranties or create safety hazards—especially with high-voltage parts in laser printers.
If your printer is under warranty or less than three years old, contact the manufacturer’s support. For older models, weigh the cost of repair against the price of a reliable replacement. Modern printers often offer better efficiency, connectivity, and durability for under $150.
Frequently Asked Questions
Why does my printer jam only when printing double-sided?
Duplex printing requires paper to make a U-turn inside the machine, increasing the chance of misalignment. Ensure the duplex unit is free of debris and that you’re using paper within the recommended weight. Some models struggle with anything above 80 gsm in automatic double-sided mode.
Can I use third-party paper to save money?
You can, but quality varies widely. Cheap paper often has inconsistent thickness, higher moisture content, and rougher surfaces—all contributing to jams. Stick to reputable brands like HP, Canon, or Hammermill for critical jobs. Reserve budget paper for drafts.
My printer says there’s a jam, but I see no paper. What should I do?
A sensor may be triggered by a microscopic fragment or false signal. Open all access points and inspect thoroughly with a flashlight. Gently wipe paper path sensors (small optical lenses) with a dry cotton swab. Then power-cycle the printer to reset the system.
Final Thoughts: Keep Your Printer Running Smoothly
A jammed printer doesn’t mean the end of its life—it’s often a cry for attention, not replacement. By understanding the mechanics behind paper movement, responding promptly to jams, and maintaining your device regularly, you can extend its lifespan and avoid unnecessary stress.
Treat your printer like any precision tool: respect its limits, clean it periodically, and load compatible supplies. Small habits—like fanning paper before loading or wiping rollers quarterly—pay off in reliability and performance.


 浙公网安备
33010002000092号
浙公网安备
33010002000092号 浙B2-20120091-4
Comments
No comments yet. Why don't you start the discussion?