
If you've ever opened your rice cooker only to find a charred, stuck-on layer at the bottom—despite following the same water-to-rice ratio every time—you're not alone. Burnt rice isn't just frustrating; it can ruin meals, shorten your appliance's lifespan, and raise concerns about safety and cleanliness. While rice cookers are designed to simplify cooking, they aren’t immune to issues. The root causes of burnt rice range from incorrect water levels to faulty components or even subtle user habits. Understanding these factors is essential to restoring consistent, fluffy results.
Burning doesn’t always mean your rice cooker is defective. In many cases, it’s a symptom of mismatched ingredients, improper maintenance, or overlooked operational details. By diagnosing the underlying cause, you can make targeted adjustments that resolve the issue permanently. This guide breaks down the most common reasons for scorched rice, offers step-by-step solutions, and shares real-world insights from kitchen experts to help you get perfect rice every time.
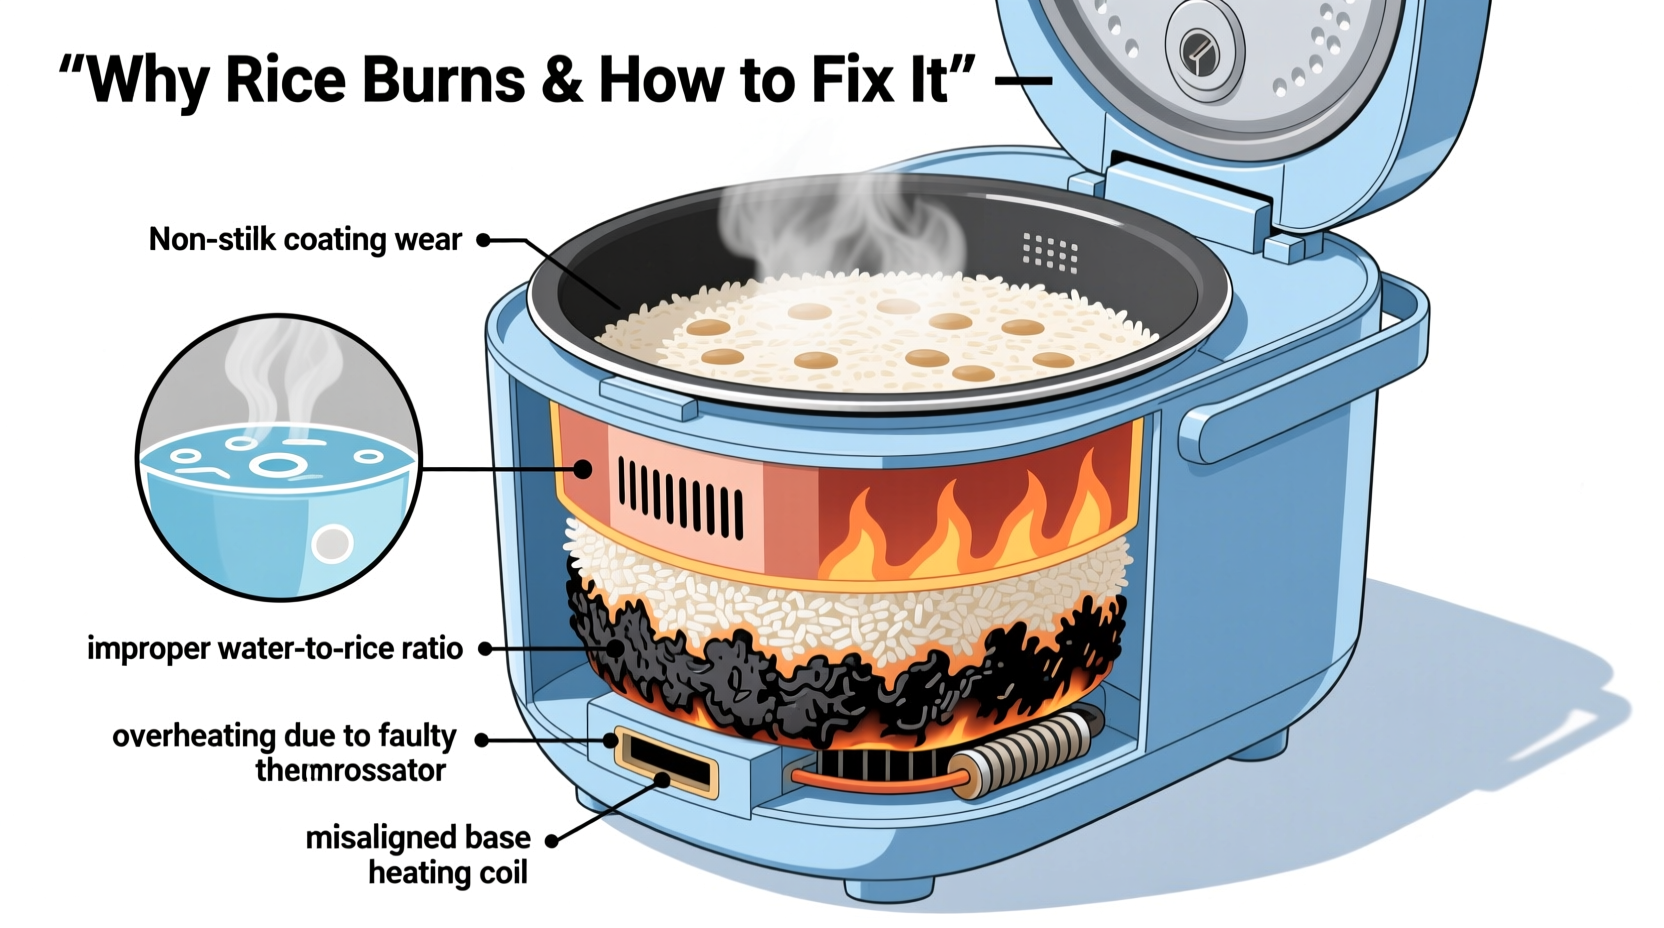
Common Causes of Burnt Rice in Rice Cookers
The first step in solving any problem is identifying its source. Several interrelated factors can lead to a burnt bottom layer in your rice cooker. Most are easily correctable once recognized.
- Inaccurate water-to-rice ratio: Too little water leads to dry, overheated grains at the base. Even a small miscalculation can result in scorching, especially with older models lacking advanced sensors.
- Residue buildup on the heating plate: Over time, spills and steam condensation leave behind starch and mineral deposits. These insulate the pot from even heat distribution, causing localized hot spots.
- Non-stick coating damage: Scratches or wear on the inner pot reduce its ability to conduct heat evenly and increase sticking, which accelerates burning.
- Using the wrong rice type without adjustment: Brown rice, wild rice, or glutinous varieties require more water and longer cooking times. Using white rice settings for these types often results in under-hydration and burning.
- Faulty thermal sensor or thermostat: If the internal temperature sensor is dirty or malfunctioning, the cooker may not switch to “keep warm” mode at the right time, leading to overcooking and charring.
- Leaving rice unattended after cooking: Extended \"keep warm\" periods—especially beyond two hours—can slowly dehydrate the bottom layer until it burns.
Step-by-Step Guide to Prevent Burnt Rice
Fixing burnt rice isn’t just about trial and error—it’s about systematic troubleshooting. Follow this sequence to identify and eliminate the cause.
- Check your water-to-rice ratio: Use the measuring lines inside the pot as a starting point, but verify with standard ratios: 1:1.25 for white rice, 1:1.5–1.75 for brown rice. Adjust based on brand and age of rice (older rice absorbs more water).
- Clean the inner pot and heating plate: Remove the pot and wipe the heating element with a damp cloth. For stubborn residue, use a soft sponge with mild vinegar solution. Avoid abrasive scrubbers.
- Inspect the non-stick coating: Look for scratches, peeling, or discoloration. If damaged, replace the pot—many manufacturers sell replacements by model number.
- Verify rice type and setting: Match the rice variety to the correct function (e.g., “brown,” “sushi,” “quick”). If your model lacks specific settings, manually adjust water and allow extra time.
- Test the thermal sensor: Locate the sensor in the center of the heating plate. Clean it gently with alcohol on a cotton swab. A blocked sensor can delay mode switching.
- Avoid prolonged keep-warm cycles: Serve rice within 1–2 hours of completion. For longer holding, transfer to an insulated container.
- Run a test cycle: Cook plain white rice with fresh water and a clean pot. If burning persists, the issue may be hardware-related.
Do’s and Don’ts When Using a Rice Cooker
| Do’s | Don’ts |
|---|---|
| Rinse rice until water runs clear to remove excess starch | Use metal utensils that scratch the non-stick surface |
| Use the provided measuring cup (often smaller than standard cups) | Overfill beyond the maximum line indicated in the pot |
| Clean the heating plate regularly | Ignore persistent sticking or browning patterns |
| Replace worn-out inner pots promptly | Leave rice on “keep warm” for more than 2 hours |
| Follow manufacturer’s instructions for different rice types | Assume all rice requires the same water ratio |
Real Example: How One Home Cook Fixed Chronic Burning
Sarah, a home cook in Portland, had struggled with burnt rice for months. She used the same jasmine rice and water amount each time, yet nearly every batch developed a dark, crispy layer at the bottom. Frustrated, she considered replacing her three-year-old rice cooker. Instead, she decided to troubleshoot systematically.
First, she reviewed her process: she wasn’t rinsing the rice, used tap water directly from the faucet, and occasionally used a fork to stir during cooking. She also noticed a faint film on the heating plate she hadn’t cleaned in over a year.
Following online advice, Sarah rinsed her rice twice, measured water using the cup included with the cooker, cleaned the heating element with vinegar, and stopped stirring. On her next cook, the rice came out perfectly fluffy—with no sign of burning. She later discovered that stirring disrupted steam circulation, while residue on the plate created hot zones. Her simple changes saved her $60 and restored confidence in her appliance.
“Many rice cooker problems stem from minor habits we don’t realize are harmful. Rinsing rice, cleaning the base, and avoiding metal tools can make a dramatic difference.” — Chef Luis Mendez, Culinary Instructor and Appliance Specialist
Troubleshooting Checklist
Use this checklist whenever you encounter burnt rice. Go through each item methodically to isolate the cause.
- ✅ Rinse rice before adding to the pot
- ✅ Measure water using the rice cooker’s cup, not a standard measuring cup
- ✅ Wipe down the heating plate and sensor with a damp cloth
- ✅ Inspect the inner pot for scratches or warping
- ✅ Select the correct cooking program for your rice type
- ✅ Avoid opening the lid or stirring during cooking
- ✅ Remove rice within 1–2 hours after cooking completes
Frequently Asked Questions
Can I still use my rice cooker if the bottom layer burns occasionally?
Occasional burning due to user error (like low water) is usually safe, but frequent charring may indicate a deeper issue. Persistent burning can damage the heating element or trigger smoke alarms. Clean thoroughly and reassess your technique. If the problem continues, discontinue use until inspected.
Does hard water contribute to burnt rice?
Yes. Hard water leaves mineral deposits on the heating plate and inner pot, reducing heat conductivity and promoting hot spots. If you have hard water, wipe the heating element monthly with a vinegar-dampened cloth and consider using filtered water for cooking.
Is it safe to eat slightly burnt rice?
A thin, lightly toasted layer (okoge in Japanese cuisine) is edible and even enjoyed by some. However, heavily charred rice contains acrylamide and other compounds formed at high heat, which may pose health risks with regular consumption. It’s best to discard severely burnt batches and clean the pot thoroughly before reuse.
When to Replace Your Rice Cooker
Even with proper care, rice cookers have a finite lifespan—typically 5 to 7 years with regular use. Signs it’s time to upgrade include:
- Repeated burning despite correct water ratios and cleaning
- Failure to switch to “keep warm” mode automatically
- Visible damage to the heating plate or electrical components
- Unusual smells, smoke, or tripped circuit breakers during operation
Modern rice cookers with fuzzy logic or induction heating offer better temperature control and are less prone to burning. Investing in a higher-end model may save time and food waste in the long run, especially if you cook rice daily.
Final Tips for Consistently Perfect Rice
Perfect rice isn’t just about the appliance—it’s about attention to detail. Small habits compound into big results. Here are additional strategies used by experienced cooks:
- Let rice rest after cooking: Allow 10–15 minutes with the lid closed after the cycle ends. This equalizes moisture and prevents a soggy top and dry bottom.
- Use distilled or filtered water: Especially in areas with hard or chlorinated water, this improves texture and reduces residue buildup.
- Season after cooking: Adding salt, oil, or broth before cooking can alter boiling points and absorption rates. For best results, add seasonings after the rice is done.
- Store leftover rice properly: Transfer to an airtight container and refrigerate within two hours. Reheat with a splash of water to restore moisture.
Conclusion
Burnt rice in your rice cooker is a solvable problem—not a sentence to endless sticky cleanup or wasted meals. By understanding the mechanics of heat distribution, maintaining your appliance, and refining your cooking technique, you can achieve consistently excellent results. Whether the culprit is an overlooked water ratio, a grimy heating plate, or an aging pot, the fixes are straightforward and cost-effective.
Start applying these insights today: clean your cooker, measure precisely, and respect the process. Share your success—or challenges—in the comments below. If you found this guide helpful, pass it along to someone who’s tired of scraping burnt rice off the bottom of their pot. With the right knowledge, every grain can be perfectly cooked.


 浙公网安备
33010002000092号
浙公网安备
33010002000092号 浙B2-20120091-4
Comments
No comments yet. Why don't you start the discussion?