
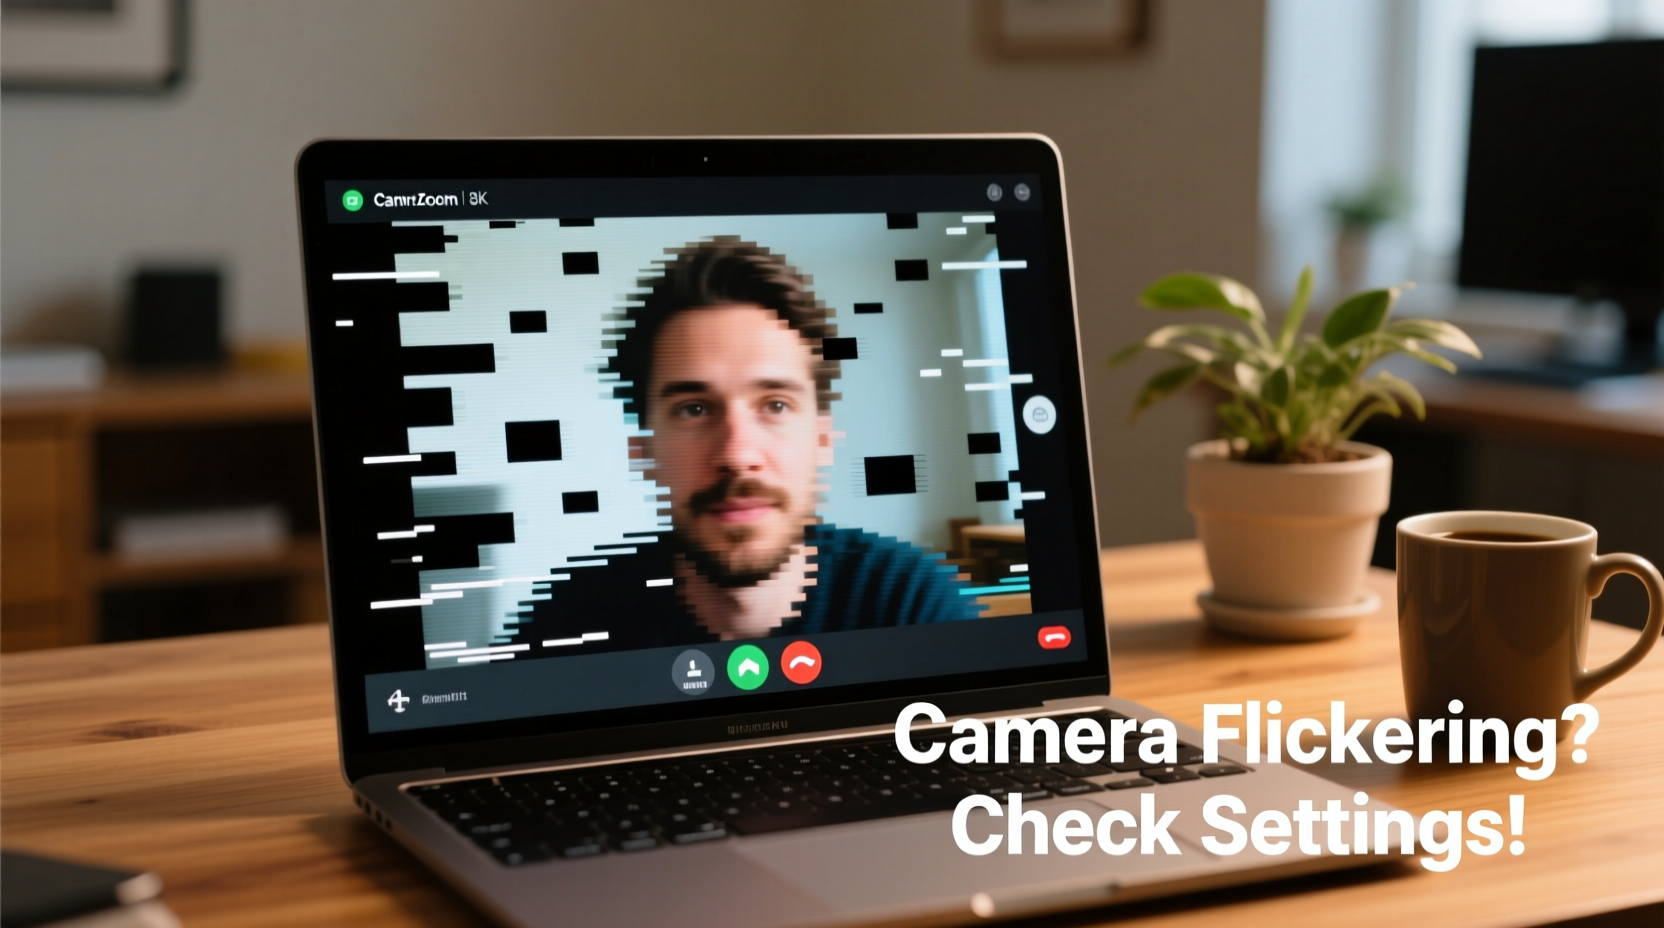
If you've ever been in the middle of an important Zoom meeting and suddenly noticed your screen flickering—your image pulsing between bright and dark, or your background appearing to strobe—you're not alone. Screen flickering during video calls is a surprisingly common issue that can undermine professionalism, distract participants, and even cause eye strain or discomfort. While it might seem like a technical glitch with Zoom itself, the root cause often lies in a combination of camera settings, lighting conditions, and hardware behavior. Understanding why this happens—and how to fix it—is essential for anyone relying on video communication for work, education, or personal connection.
Flickering doesn't always mean your camera is broken or your internet is failing. More often, it's the result of mismatched frequencies between artificial lighting and your camera’s frame rate. This creates a visible pulsing effect, especially under fluorescent or LED lights. Other factors include outdated drivers, incompatible software settings, or power-saving features interfering with video capture. The good news: most causes are preventable or easily corrected with the right knowledge.
Understanding the Science Behind Screen Flicker
To effectively address screen flickering, it helps to understand what's actually happening at the technical level. Most modern digital cameras—whether built into laptops or external webcams—capture video by taking a series of still images per second, known as the frame rate (measured in frames per second, or FPS). Common frame rates include 30 FPS and 60 FPS. When these images are displayed rapidly, they create the illusion of smooth motion.
However, many types of artificial lighting, particularly fluorescent and some LED bulbs, do not emit light continuously. Instead, they pulse rapidly—often at the same frequency as the alternating current (AC) in your electrical system. In North America, this is typically 60 Hz; in Europe and many other regions, it's 50 Hz. If your camera’s frame rate isn’t synchronized with the frequency of the light source, it captures alternating moments of brightness and dimness, resulting in a visible flicker or banding effect across your screen.
“Flicker in video calls is almost always a synchronization mismatch between lighting frequency and camera shutter timing.” — Dr. Alan Zhou, Imaging Systems Engineer, MIT Media Lab
This phenomenon is more pronounced in certain environments. For example, office buildings lit with overhead fluorescent fixtures are notorious for causing flicker during video calls. Even some modern LED lights, though marketed as “flicker-free,” may still emit subtle pulses that cameras can detect—even if the human eye cannot.
Step-by-Step Guide to Eliminate Camera Flicker
Fixing screen flicker doesn’t require expensive equipment. With a systematic approach, you can diagnose and resolve the issue using tools you already have. Follow these steps in order:
- Identify the Lighting Source
Determine whether you’re under fluorescent, LED, or incandescent lighting. Fluorescent and cool-white LEDs are the most likely culprits. Try moving near a window or switching to a warm-toned desk lamp to see if the flicker disappears. - Adjust Your Camera’s Frame Rate
Open your camera settings through Zoom or your operating system. In Zoom, go to Settings > Video. Look for options to change the camera frame rate. If you're in a 60 Hz region (like the US), set your camera to 30 FPS or 60 FPS. In 50 Hz regions (Europe, Australia), use 25 FPS or 50 FPS. Matching your frame rate to the local power frequency reduces flicker. - Enable Anti-Flicker Settings
Some cameras and laptops include built-in anti-flicker features. On Windows, open the Camera app, click the gear icon, and look for \"Flicker Reduction\" or \"Power Line Frequency.\" Set it to match your region (50 Hz or 60 Hz). Mac users may find similar options in System Settings > Camera, depending on the model and macOS version. - Update Camera Drivers and Software
Outdated drivers can prevent proper frame rate control. On Windows, go to Device Manager > Cameras, right-click your camera, and select \"Update driver.\" On Mac, ensure your system is up to date via System Settings > General > Software Update. - Test in a Controlled Environment
Move to a room with natural light or use a soft, continuous-spectrum LED ring light designed for video. These lights are engineered to minimize flicker and provide consistent illumination.
Camera Settings Checklist: Prevent Flicker Before It Starts
Prevention is better than correction. Use this checklist before every important call to ensure a stable, professional video feed:
- ✅ Confirm your camera is set to the correct frame rate (30/60 FPS in 60 Hz regions, 25/50 FPS in 50 Hz regions)
- ✅ Enable anti-flicker mode in camera settings if available
- ✅ Avoid sitting directly under ceiling fluorescent lights
- ✅ Use natural daylight or a flicker-free LED video light
- ✅ Close blinds if sunlight creates harsh contrasts or reflections
- ✅ Test your video in Zoom’s preview window before joining a meeting
- ✅ Ensure all software (Zoom, OS, camera drivers) is updated
Do’s and Don’ts: Managing Light and Camera Interaction
| Do | Don’t |
|---|---|
| Use warm-white LED lights rated as “flicker-free” | Use cool-white or cheap LED bulbs without flicker certification |
| Position your light source in front of you (e.g., a ring light) | Have bright windows or lights behind you (causes backlighting) |
| Set your camera to manual exposure if supported | Allow auto-exposure to adjust constantly during calls |
| Face away from large windows if sunlight is inconsistent | Work under unshielded fluorescent tubes |
| Use a wired internet connection to avoid bandwidth-related glitches | Assume flicker is always caused by internet speed |
One often-overlooked factor is auto-exposure. Many cameras automatically adjust brightness based on scene changes. If a cloud passes over the sun or a light flickers slightly, the camera may overcompensate, causing your image to pulse. Disabling auto-exposure—or setting it manually—can eliminate this instability.
Real Example: How a Marketing Team Solved Their Weekly Meeting Flicker
A mid-sized marketing agency in Chicago reported recurring flickering issues during their Monday team Zoom calls. Several employees working from the office headquarters experienced severe banding and pulsing, while remote team members had no issues. At first, IT assumed it was a network problem, but testing revealed stable bandwidth and no packet loss.
The real breakthrough came when a team member recorded a short video of her screen during a flicker episode and shared it with the company’s AV consultant. Upon analysis, the consultant noticed a consistent horizontal banding pattern moving upward every few seconds—a classic sign of 60 Hz lighting interference. The office used energy-efficient LED panels that pulsed at 60 Hz, and the built-in laptop cameras were running at 29.97 FPS, just out of sync.
The solution was simple: the IT team deployed a group policy to set all company laptops’ camera settings to 30 FPS and enabled anti-flicker mode. They also replaced the overhead panels in the conference room with DC-powered, flicker-free LEDs. Within a week, the flickering stopped completely, and team morale improved—no one feared being the “glitchy person” on calls anymore.
“We spent weeks blaming Zoom, then Wi-Fi, then individual laptops. The fix took 15 minutes once we understood the lighting-camera interaction.” — Lena Park, IT Director, StratCom Agency
Advanced Fixes for Persistent Flicker Issues
If basic troubleshooting doesn’t resolve the flicker, consider these advanced solutions:
Use an External Webcam with Manual Controls
Many built-in laptop cameras lack fine-tuned settings. A high-quality external webcam—such as those from Logitech or Razer—offers manual control over shutter speed, exposure, white balance, and frame rate. This allows precise synchronization with your lighting environment.
Install Third-Party Camera Control Software
Tools like OBS Studio, ManyCam, or Webcam Settings (Windows) give granular control over camera parameters beyond what Zoom or default apps offer. For example, you can lock the exposure time to 1/60th of a second in a 60 Hz environment to eliminate flicker.
Modify Power Settings to Prevent Throttling
On laptops, aggressive power-saving modes can throttle CPU or GPU performance, affecting video processing. Go to Power Options (Windows) or Battery settings (Mac) and set your plan to “High Performance” or “Better Performance” during calls.
Check for Electromagnetic Interference
In rare cases, nearby electronics—such as monitors, chargers, or fluorescent ballasts—can interfere with camera sensors. Try relocating your laptop or webcam a few feet away from other devices to test.
FAQ: Common Questions About Zoom Screen Flicker
Is screen flicker a sign of a failing camera?
Not usually. While hardware failure can cause visual artifacts, true flicker—especially rhythmic banding or pulsing—is far more likely related to lighting and frame rate mismatch. If the issue disappears in natural light or with adjusted settings, the camera is likely functioning normally.
Can poor internet cause flickering on Zoom?
Poor bandwidth typically causes pixelation, freezing, or dropped video—not consistent flickering. However, if Zoom reduces video quality dynamically, it may amplify existing lighting artifacts. True flicker persists even with strong connections and high-quality settings.
Does flicker affect how others see me, or is it only on my screen?
It affects both. If your camera captures flicker due to lighting mismatch, everyone on the call sees it. Participants may not realize the cause, but they will notice the distracting visual effect. Fixing it improves your appearance and overall meeting experience.
Conclusion: Take Control of Your Video Presence
Screen flicker on Zoom calls is a solvable problem—one that hinges more on awareness than technical complexity. By aligning your camera settings with your lighting environment, updating software, and making small adjustments to your workspace, you can present yourself clearly and professionally in every virtual interaction. These fixes take minutes but deliver lasting benefits: smoother meetings, fewer distractions, and greater confidence on camera.
Don’t wait for the next flicker to disrupt an important presentation or client call. Apply these strategies today. Test your setup, optimize your lighting, and verify your settings. Small changes lead to big improvements in how you’re seen—and perceived—in the digital world.


 浙公网安备
33010002000092号
浙公网安备
33010002000092号 浙B2-20120091-4
Comments
No comments yet. Why don't you start the discussion?