
A steady drip from your shower head long after you’ve turned off the water isn’t just annoying—it can waste gallons of water over time and may signal a developing plumbing issue. While a brief trickle post-shower is normal due to residual water draining from the pipe, persistent dripping indicates an underlying problem. Understanding the root causes and knowing how to address them can save you money on water bills and prevent further damage to your bathroom fixtures.
This guide dives into the mechanics behind post-shower leaks, explores common failure points in different types of shower systems, and provides clear, actionable solutions—ranging from simple DIY adjustments to component replacements. Whether you have a standard fixed shower head or a modern multi-setting model, this article equips you with the knowledge to diagnose and resolve the issue effectively.
Common Causes of Post-Shutoff Shower Head Leaks
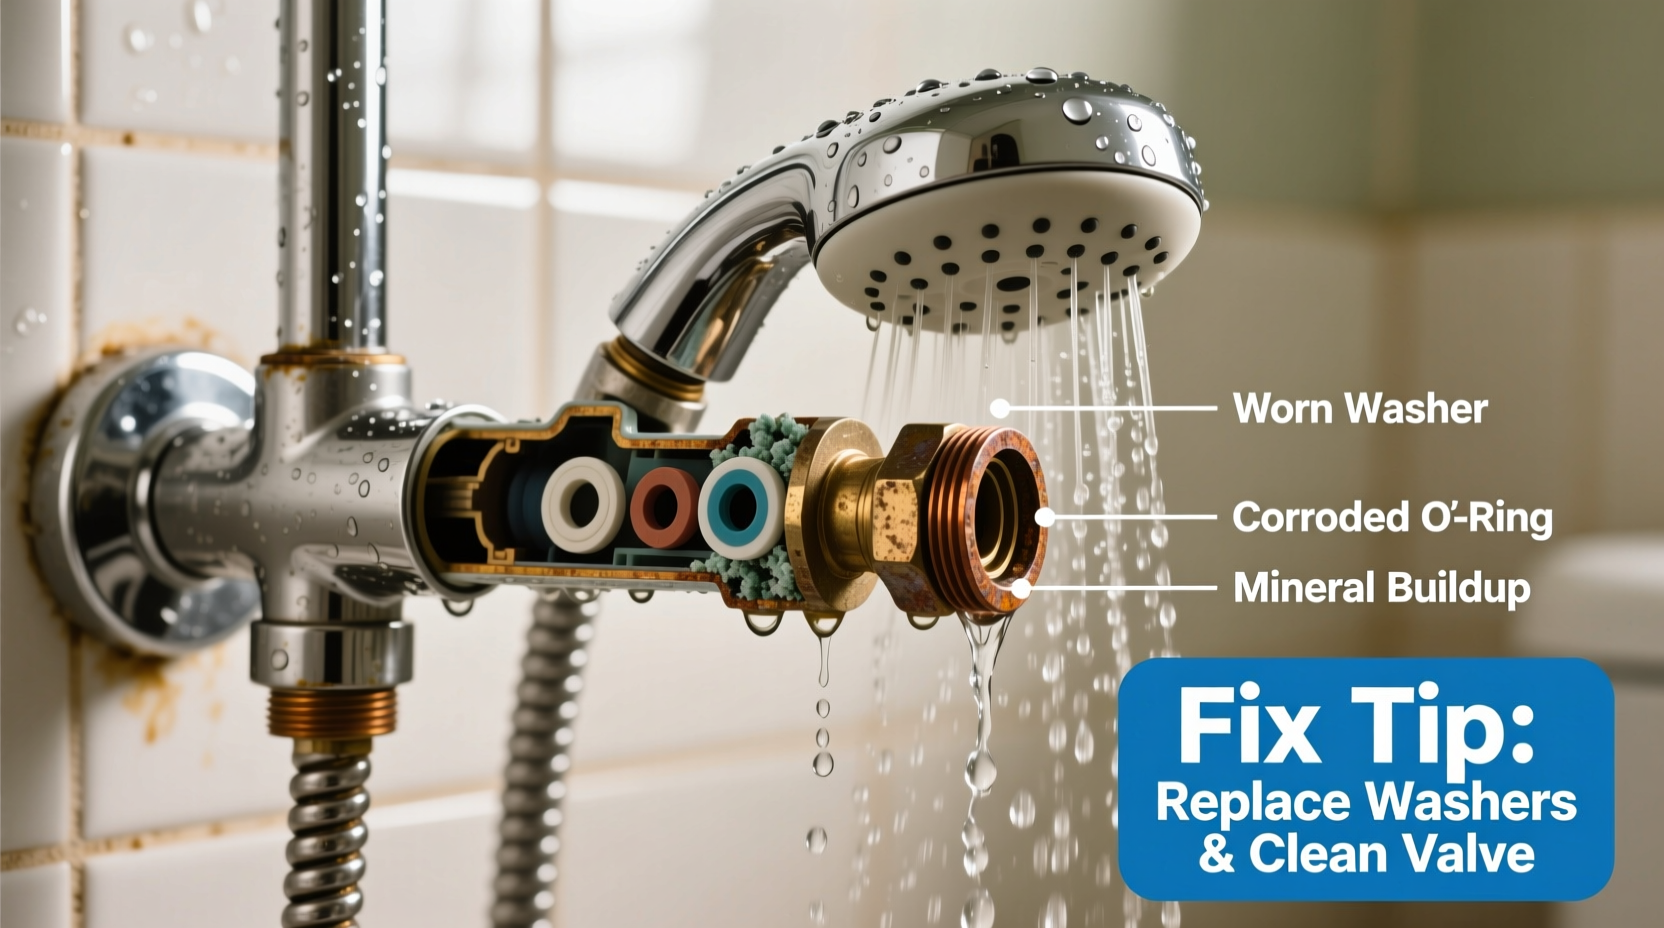
Water escaping from a shower head after the valve is closed usually stems from pressure imbalances, worn internal components, or design limitations in the plumbing system. The most frequent culprits include:
- Residual water drainage – A small amount of water draining immediately after use is normal and not a cause for concern.
- Failing cartridge or valve seal – In single-handle showers, a worn ceramic cartridge or rubber washer can allow water to seep through even when the handle is in the “off” position.
- Mineral buildup – Hard water deposits can clog internal passages or prevent seals from closing fully, leading to slow leaks.
- Pressure imbalance in mixing valves – If hot and cold water pressures are unequal, it can force water through the shower head instead of the faucet outlet.
- Defective diverter valve – In tub-and-shower combos, a faulty diverter meant to redirect water upward may fail to seal completely, allowing leakage.
- Loose connections or cracked piping – Physical damage or poor installation can create micro-leaks that manifest as drips at the shower head.
How Different Shower Systems React After Shutoff
The behavior of your shower post-use depends heavily on its design and valve type. Below is a comparison of common configurations and their typical leakage patterns.
| Shower Type | Normal Drip Duration | Common Leak Sources | Fix Complexity |
|---|---|---|---|
| Single-handle pressure-balancing valve | 5–10 seconds | Worn cartridge, mineral deposits | Moderate |
| Double-handle compression valve | Instant stop (no drip) | Rubber washer wear, loose packing nut | Low to Moderate |
| Tub-and-shower combo with diverter | Up to 15 seconds | Diverter stem wear, cross-connection | Moderate |
| Thermostatic mixing valve | 5 seconds max | Internal seal degradation, calibration drift | High |
| Electric tankless shower unit | None expected | Pump backflow, solenoid valve failure | High (professional help advised) |
If your system consistently exceeds these timeframes or drips intermittently hours later, intervention is likely needed.
Step-by-Step Guide to Diagnose and Fix a Leaking Shower Head
Before disassembling anything, confirm the leak is not simply residual water. Wait two minutes after shutting off the water. If drops continue beyond that, follow this diagnostic and repair process.
- Inspect for visible damage: Check the shower arm connection, faceplate, and hose (if applicable) for cracks or looseness. Tighten the shower head by hand or with a wrench wrapped in tape to avoid scratching.
- Remove and clean the shower head: Unscrew it and soak in a vinegar solution (1 part vinegar to 1 part water) for 30–60 minutes. Use an old toothbrush to scrub nozzles and filter screens. Reinstall and test.
- Check the diverter (if present): In tub-and-shower units, lift the diverter knob and listen for suction or gurgling. If water still flows from the spout while the shower is active, the diverter is failing and should be replaced.
- Disassemble the shower valve: Turn off water supply at the main or branch line. Remove the handle and escutcheon to access the cartridge or stem. For single-handle models, pull out the cartridge and inspect for cracks, warping, or calcification.
- Replace worn components: Match the old cartridge to a new one at a hardware store. Install according to manufacturer specs. For double-handle systems, replace both hot and cold washers—even if only one appears damaged.
- Reassemble and test slowly: Restore water supply gradually to avoid hydraulic shock. Open the shower valve gently and observe for leaks. Run both hot and cold settings to ensure balanced flow.
Mini Case Study: Resolving a Persistent Master Bath Leak
Sarah, a homeowner in Denver, noticed her master bathroom shower head dripped continuously for up to five minutes after use. She initially assumed it was normal until she measured nearly two gallons wasted per day. A plumber ruled out pipe cracks and confirmed water pressure was balanced. Upon disassembling the Moen single-handle valve, he found the ceramic cartridge coated in calcium sulfate deposits despite the home’s water softener.
The issue? The softener hadn’t been regenerated in months, allowing hard water to pass through. After replacing the cartridge and servicing the softener, the leak stopped entirely. Sarah now schedules quarterly valve inspections and uses a monthly vinegar flush to prevent recurrence. This case highlights how environmental factors like water quality interact with mechanical components to create leaks.
Expert Insight: What Plumbers See Most Often
“Over 70% of post-shutoff leaks we see stem from failed cartridges in single-lever showers. People don’t realize these wear out every 5–7 years, especially in hard water areas. Regular maintenance beats emergency repairs every time.” — Carlos Mendez, Master Plumber & Owner of ClearFlow Plumbing Services
Do’s and Don’ts When Fixing a Leaky Shower Head
Avoid making common mistakes that could worsen the problem or damage your fixtures. Follow this checklist to stay on track.
| Action | Do | Don't |
|---|---|---|
| Tightening connections | Use Teflon tape on threads; hand-tighten first | Over-tighten with a wrench, risking thread damage |
| Cleaning components | Soak in vinegar; use soft brush | Use abrasive pads or bleach-based cleaners |
| Replacing parts | Match OEM specifications exactly | Install universal cartridges without verification |
| Testing after repair | Turn water on slowly; check multiple cycles | Immediately run full pressure without inspection |
| Handling older systems | Assess for lead solder or galvanized pipes | Apply chemical descalers to vintage fixtures |
Preventative Maintenance Checklist
To minimize future leaks and extend the life of your shower system, perform these tasks regularly:
- ✅ Clean shower head nozzles every 3 months using vinegar soak
- ✅ Inspect cartridge or washers annually, especially in homes with hard water
- ✅ Balance hot and cold water pressure if sudden temperature shifts occur
- ✅ Replace shower arm washers every 2 years as preventive measure
- ✅ Install a whole-house water softener if hardness exceeds 7 gpg (grains per gallon)
- ✅ Flush the water heater annually to reduce sediment entering fixtures
When to Call a Professional Plumber
While many shower leaks are DIY-friendly, some situations require expert attention:
- Water continues to drip despite replacing the cartridge and cleaning all components.
- There’s visible corrosion inside the valve body or behind the wall.
- Leakage occurs behind tiles or down the wall, suggesting hidden pipe failure.
- Your home has polybutylene or PEX piping installed before 2000, which may have known joint issues.
- You’re uncomfortable cutting into walls or working with pressurized lines.
In such cases, a licensed plumber can use pressure testing, camera inspection, and code-compliant materials to resolve the issue safely.
FAQ: Common Questions About Shower Head Leaks
Is it normal for a shower head to drip after turning it off?
A few drops within 30 seconds of shutting off the water are normal due to gravity draining leftover water in the pipe. However, continuous dripping beyond a minute suggests a mechanical issue like a failing seal or pressure imbalance.
Can a leaking shower head increase my water bill?
Yes. A slow drip of 10 drops per minute wastes over 300 gallons per year. Faster leaks can add thousands of gallons annually, significantly raising utility costs. Fixing leaks promptly improves efficiency and reduces environmental impact.
Why does my shower head leak only when the sink is running?
This typically indicates a pressure imbalance. When you turn on the sink, it alters the hot-cold balance in the shared plumbing system, forcing water backward through the shower valve. Installing a pressure-balancing valve or checking for clogged aerators can resolve this.
Stop the Drip: Take Action Today
A leaking shower head is more than a minor inconvenience—it’s a sign that your plumbing system needs attention. By understanding the causes, applying targeted fixes, and maintaining your fixtures proactively, you can eliminate wasteful drips and extend the lifespan of your bathroom hardware. Most repairs take under an hour and cost less than $20 in replacement parts. Ignoring the issue risks higher water bills, mold growth, and potential structural damage over time.
Start with a simple cleaning and inspection. If the problem persists, methodically work through the valve components. With the right tools and knowledge, you can restore quiet, efficient operation to your shower. Share your experience or ask questions in the comments—your insight might help another homeowner solve their drip dilemma.


 浙公网安备
33010002000092号
浙公网安备
33010002000092号 浙B2-20120091-4
Comments
No comments yet. Why don't you start the discussion?