
A persistent drip from your shower head after you’ve turned off the water isn’t just annoying—it can waste gallons of water over time and may signal underlying issues in your plumbing system. While a small amount of residual water draining from the fixture is normal, continuous dripping minutes after use points to mechanical or installation problems. Understanding the root causes and knowing how to address them properly can save you money on water bills and prevent long-term damage to your bathroom fixtures.
This guide breaks down the most common reasons behind post-shower leakage, walks you through diagnosing the issue, and provides actionable solutions—ranging from simple DIY repairs to when it’s best to call a professional plumber.
Common Causes of Post-Shut-Off Shower Head Leaks
Several internal and external factors can cause a shower head to continue leaking after the water is turned off. Identifying the exact source is crucial before attempting any repair.
- Residual Water Drainage: After use, leftover water trapped in the shower arm or head naturally drains out due to gravity. This usually stops within 30 seconds and is not a true “leak.”
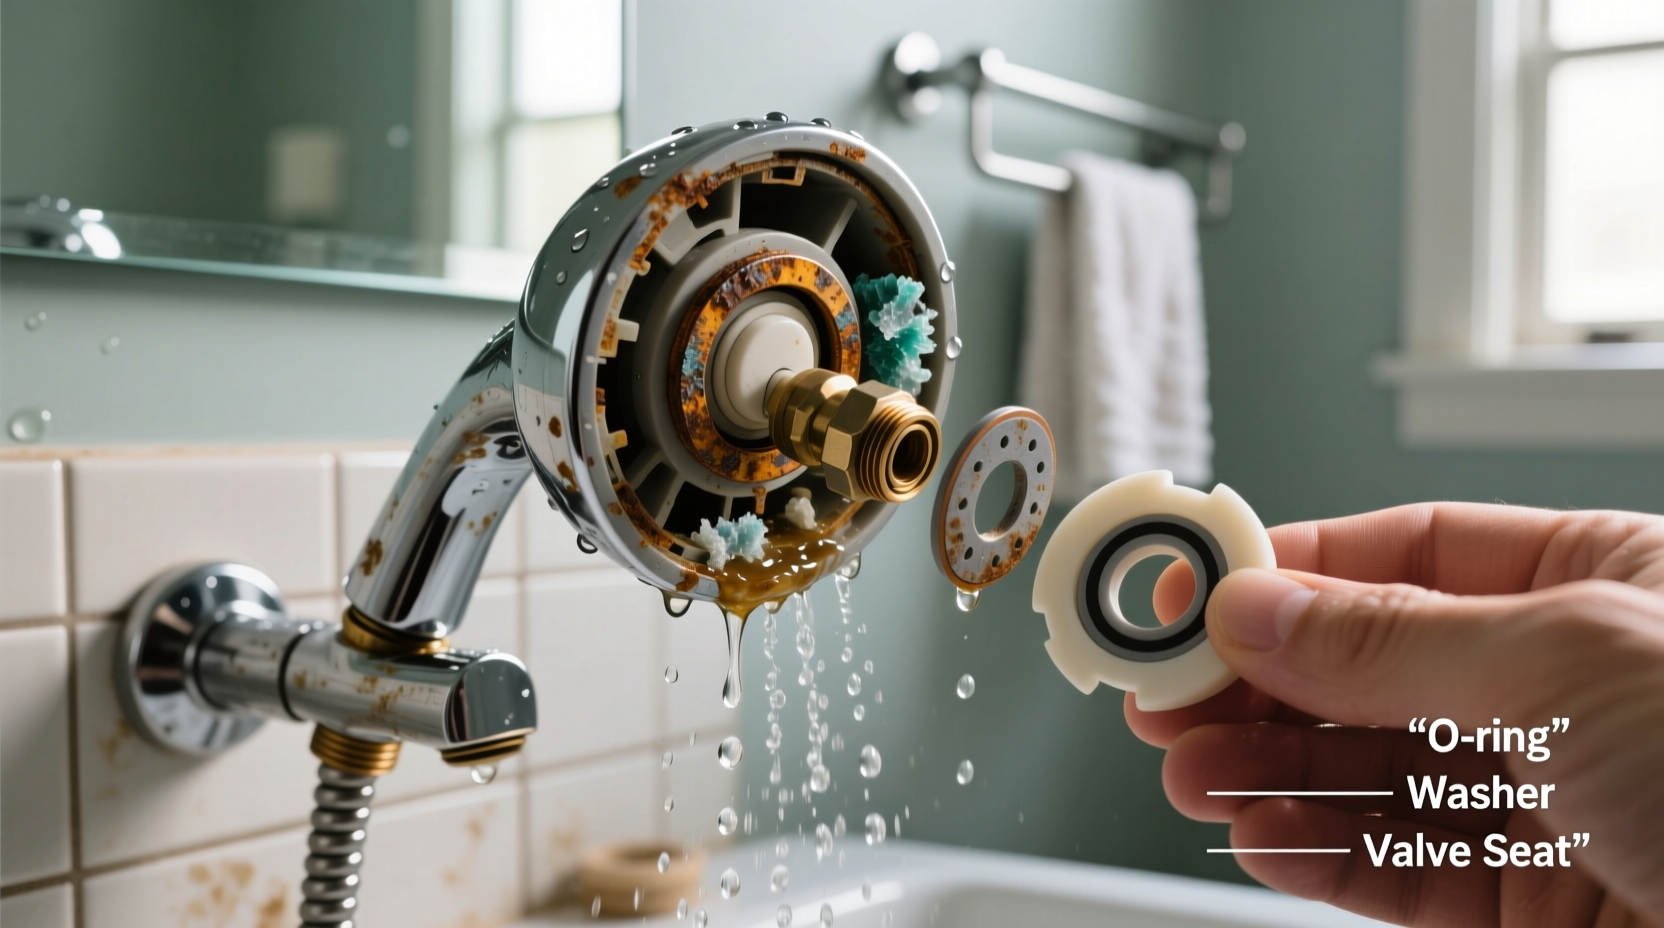
- Worn or Damaged Cartridge/Valve: In many faucets and shower valves, a rubber or ceramic cartridge regulates water flow. Over time, these components degrade, leading to improper sealing and slow seepage.
- Mineral Buildup: Hard water leaves calcium and lime deposits that can interfere with valve seals or block internal channels, preventing full shutoff.
- Loose Connections: A poorly tightened shower head or cracked shower arm fitting can allow water to escape slowly even when the valve is closed.
- Defective Diverter Valve: If your shower includes a tub spout diverter (to switch between tub fill and shower), a worn seal here can redirect water improperly, causing backflow into the shower head.
- Pressure Imbalance: Sudden changes in water pressure—such as someone flushing a toilet—can force water backward through the shower head if check valves are missing or faulty.
How to Diagnose the Leak Source
Before disassembling anything, perform a quick diagnostic routine to pinpoint where the problem originates.
- Observe Timing: Does the drip stop after 30–60 seconds? If yes, it’s likely residual water. If it continues for several minutes, there’s a sealing issue.
- Check the Tub Spout: Turn on the shower and watch the tub spout. If water continues to flow from both the spout and shower head, the diverter isn’t closing fully.
- Inspect for Visible Damage: Look at the shower head connection, shower arm, and wall joint for cracks, corrosion, or looseness.
- Test Water Pressure: High pressure can exacerbate leaks. Install a pressure gauge on an outdoor faucet to check if household pressure exceeds 80 psi.
- Isolate the Fixture: Remove the shower head and cap the shower arm with a plug. Run the shower briefly. If water still leaks from the pipe, the issue lies deeper in the valve body.
“Most post-use shower leaks stem from degraded internal seals rather than the shower head itself. Always inspect the valve cartridge first.” — James Ralston, Master Plumber with 25 years of residential experience
Step-by-Step Guide to Fixing a Leaking Shower Head
Once you've confirmed a mechanical leak, follow this structured repair process. The steps vary slightly depending on whether the issue is at the shower head, diverter, or valve assembly.
Step 1: Shut Off Water Supply
Locate the main water shut-off valve or the dedicated bathroom supply lines. Turn them off and open the shower faucet to release residual pressure.
Step 2: Remove the Shower Head
Use an adjustable wrench wrapped in cloth to avoid scratching. Unscrew the shower head from the shower arm counterclockwise. Inspect the threads for mineral buildup or damaged tape (Teflon tape).
Step 3: Clean or Replace the Shower Head
Soak the shower head in a vinegar solution (1 part vinegar to 1 part water) for 1–2 hours to dissolve mineral deposits. Rinse thoroughly and reinstall with fresh Teflon tape. If dripping persists, replace the shower head with a new model featuring anti-drip technology.
Step 4: Check the Diverter Valve (if applicable)
If your system uses a pull-up diverter on the tub spout, remove it by unscrewing it from the pipe. Examine the rubber seal inside. If cracked or hardened, replace the entire diverter unit ($15–$25 at hardware stores).
Step 5: Access and Replace the Valve Cartridge
For leaks originating behind the wall:
- Remove the handle and faceplate using a screwdriver.
- Expose the valve stem and use a cartridge puller tool to extract the old cartridge.
- Take the old part to a hardware store to match the correct replacement (common brands include Moen, Delta, Kohler).
- Insert the new cartridge, reassemble the trim, and restore water supply.
Step 6: Reinstall and Test
Reattach the shower head securely. Turn the water back on and run the shower for several minutes. Observe for drips after shutdown. Repeat inspection if necessary.
| Issue | Likely Cause | Solution |
|---|---|---|
| Drip stops in under 1 minute | Residual water drainage | No action needed |
| Slow, steady drip after 5+ minutes | Worn valve cartridge | Replace cartridge |
| Water comes from both spout and head | Failed diverter seal | Replace diverter |
| Leak at connection point | Loose fitting or bad tape | Retape and tighten |
| Intermittent leak after flushes | Pressure imbalance | Install pressure regulator |
Preventive Maintenance Tips to Avoid Future Leaks
Regular upkeep significantly reduces the likelihood of recurring leaks and extends the life of your shower system.
- Descale Monthly: Soak removable shower heads in vinegar to prevent clogs and maintain seal integrity.
- Replace Teflon Tape Annually: When reattaching the shower head, always use fresh tape to ensure a watertight seal.
- Monitor Water Hardness: Install a water softener if you live in a hard-water area to reduce scale buildup.
- Upgrade to Quality Fixtures: Choose shower heads and valves with built-in check valves that prevent backflow.
- Listen for Noises: Hissing or knocking sounds after shutoff may indicate pressure issues needing attention.
Mini Case Study: Resolving a Chronic Drip in a 10-Year-Old Bathroom
Sarah, a homeowner in Denver, noticed her master bathroom shower head dripped continuously for up to 10 minutes after each use. Initially dismissing it as normal, she later observed increased water bills and mildew growth near the ceiling tile.
She followed the diagnostic steps outlined above. After ruling out residual drainage and checking connections, she removed the shower head and found heavy mineral deposits. Cleaning helped slightly, but the drip persisted.
Next, she inspected the diverter—no issues there. She then called a plumber who diagnosed a failing ceramic cartridge in the Moen Posi-Temp valve. The original cartridge had been installed for over a decade and showed visible wear.
The plumber replaced the cartridge and recommended installing a whole-house water softener. After the repair, the drip stopped completely, and Sarah reported smoother water flow and quieter operation. Her next water bill dropped by 12%, likely due to eliminating constant seepage.
Frequently Asked Questions
Is a dripping shower head a serious problem?
While a minor drip might seem harmless, a constant leak can waste up to 5 gallons per day—over 1,800 gallons annually. It also increases humidity, promoting mold growth and potential tile or grout damage.
Can I fix a leaking shower head without turning off the main water?
No. Attempting repairs with water still pressurized risks injury and flooding. Always shut off the supply and relieve pressure before starting work.
How often should I replace my shower valve cartridge?
Most cartridges last 7–15 years depending on water quality and usage. Signs like inconsistent temperature, reduced flow, or post-shutdown leaks indicate it’s time for replacement.
Final Checklist Before You Begin Repair
- Confirm the leak persists beyond 60 seconds after shutoff.
- Turn off water supply and relieve pressure.
- Gather tools: adjustable wrench, Teflon tape, vinegar, bucket, screwdriver.
- Identify your shower valve brand and model for correct part matching.
- Inspect both shower head and diverter before opening the wall valve.
- Document disassembly with photos for easier reassembly.
- Test thoroughly after repair before restoring wall coverings or tiles.
Conclusion: Stop the Drip and Protect Your Home
A leaking shower head after shutoff is more than a nuisance—it’s a warning sign that shouldn’t be ignored. Whether caused by worn internal parts, mineral accumulation, or poor installation, the solution often lies in careful diagnosis and precise repair. Most fixes are manageable with basic tools and a bit of patience, especially when approached methodically.
By understanding how your shower system works and maintaining it regularly, you can prevent leaks before they start. Small investments in time and materials today can lead to significant savings in water, energy, and future repair costs.


 浙公网安备
33010002000092号
浙公网安备
33010002000092号 浙B2-20120091-4
Comments
No comments yet. Why don't you start the discussion?