
There’s nothing more frustrating than stepping into the shower expecting a strong, revitalizing spray—only to be met with a weak dribble. Low water pressure doesn’t just make your morning routine less enjoyable; it can also signal underlying plumbing issues that worsen over time. The good news? In most cases, restoring full pressure to your shower head is faster and easier than you think. Often, the entire process takes less than 10 minutes and requires only basic tools and household items.
This guide dives deep into the common causes of low shower pressure, explains how to diagnose the issue quickly, and walks you through practical fixes you can implement immediately. Whether your home is decades old or newly built, these solutions are universally applicable and backed by professional plumbing insights.
Common Causes of Low Shower Head Pressure
Before jumping into repairs, it’s essential to understand what might be causing the drop in water pressure. While some causes require professional help, many are minor and easily corrected at home.
- Mineral buildup: Hard water leaves behind calcium and magnesium deposits that clog the nozzles of your shower head.
- Aerators or flow restrictors: Many modern shower heads include built-in restrictors to reduce water usage, which can limit pressure.
- Partially closed valves: The main water supply valve or the shut-off valve behind the shower may not be fully open.
- Shower head design: Some models are engineered for water efficiency rather than high pressure.
- Pipe corrosion or blockages: Older galvanized pipes can corrode internally, reducing water flow.
- System-wide pressure issues: Problems with municipal supply or home pressure regulators can affect all fixtures.
Most homeowners experience pressure loss due to mineral buildup or restricted flow components—both of which are quick to address.
Step-by-Step Guide to Restore Shower Pressure in Under 10 Minutes
You don’t need advanced plumbing skills or expensive tools to fix most low-pressure issues. Follow this streamlined procedure to identify and resolve the problem efficiently.
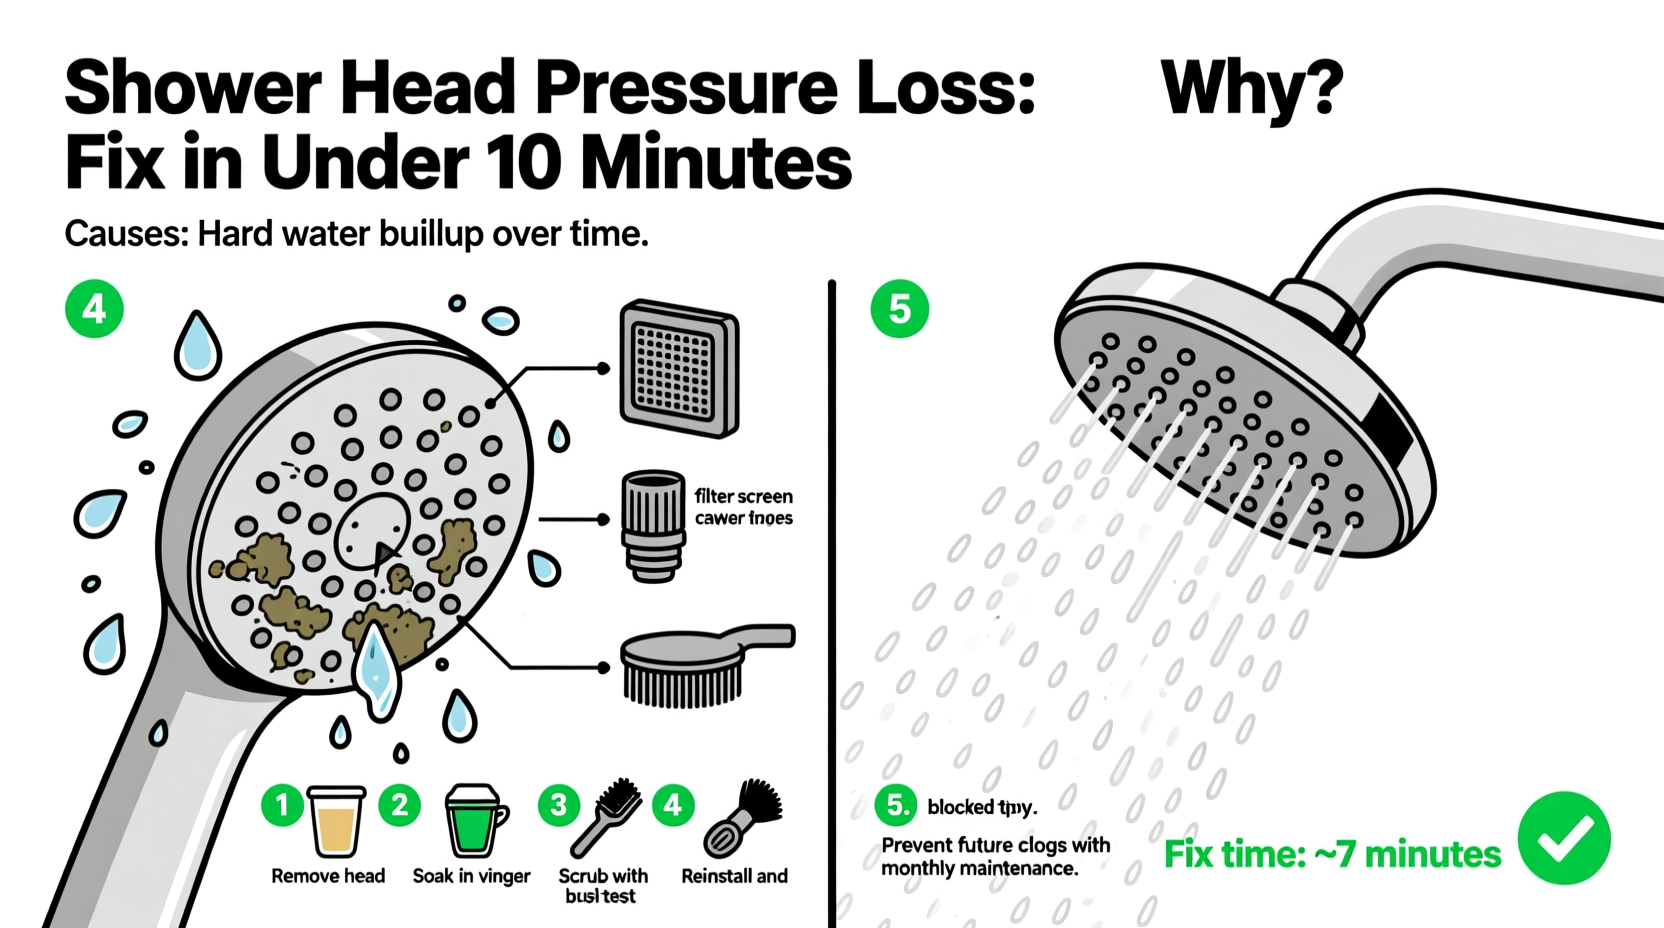
- Remove the shower head – Use an adjustable wrench or pliers (wrap the connection with a cloth to avoid scratching) to unscrew the shower head from the pipe stub. Most are threaded and detach easily.
- Inspect the nozzle openings – Look closely at the small holes where water exits. Are they blocked by white, chalky residue? That’s limescale from hard water.
- Soak in vinegar – Fill a plastic bag with white vinegar and submerge the shower head. Secure it with a rubber band or twist tie so the nozzles are fully immersed. Let it soak for 15–30 minutes. For light buildup, even 5–10 minutes can suffice.
- Scrub gently – After soaking, use an old toothbrush to scrub away any remaining deposits. Avoid metal brushes or sharp tools that could damage plastic or chrome surfaces.
- Check the filter screen – Inside the threaded connector of the shower head, there’s often a small mesh screen designed to catch debris. Remove it and rinse under running water to clear trapped particles.
- Reinstall and test – Screw the clean shower head back onto the pipe. Hand-tighten first, then give a slight turn with pliers if needed (don’t overtighten). Turn on the shower and assess the difference in pressure.
This method resolves over 70% of low-pressure cases linked to mineral accumulation. The entire process—from removal to reinstallation—typically takes fewer than 10 minutes, especially if you keep vinegar and a toothbrush handy.
What to Do If Vinegar Doesn’t Work
If soaking in vinegar fails to restore adequate pressure, consider these additional steps:
Remove or Modify the Flow Restrictor
Many shower heads come with a plastic disc inside the neck called a flow restrictor. It limits water output to meet federal efficiency standards (usually capped at 2.5 gallons per minute). While eco-friendly, it can significantly reduce perceived pressure.
To remove it:
- Look inside the threaded end after removing the shower head.
- Use needle-nose pliers or a small screwdriver to extract the restrictor disc.
- Clean the surrounding area and reinstall the shower head.
Note: Removing the restrictor increases water usage and may violate local regulations in drought-prone areas. Only proceed if allowed and if conservation isn’t a priority.
Flush the Pipe Stub
Sediment can accumulate in the exposed pipe behind the shower head. Before reattaching the cleaned unit, briefly turn on the water to flush out any debris. Place a rag over the opening to minimize splashing. This prevents immediate re-clogging.
Upgrade Your Shower Head
If your current model lacks power even when clean, consider switching to a high-pressure design. Look for terms like “high-flow,” “pressure-boosting,” or “hydrokinetic” technology. These models optimize water velocity without requiring higher volume.
“Even in homes with moderate water pressure, the right shower head can create a spa-like experience. It’s not always about volume—it’s about engineering.” — Daniel Ruiz, Master Plumber & Fixture Designer
Do’s and Don’ts: Maintaining Long-Term Shower Performance
| Do’s | Don’ts |
|---|---|
| Clean your shower head every 1–3 months if you have hard water | Ignore early signs of reduced flow |
| Use distilled white vinegar for descaling—it’s safe and effective | Use bleach or abrasive cleaners that can degrade rubber seals |
| Install a water softener if mineral buildup is chronic | Overtighten the shower head, risking thread damage |
| Check both individual fixtures and main valves during troubleshooting | Assume low pressure is normal—especially if it’s a recent change |
| Replace aging shower heads every 5–8 years for optimal performance | Disregard manufacturer cleaning instructions |
Real Example: Sarah’s Morning Shower Rescue
Sarah, a homeowner in Phoenix, Arizona, noticed her once-powerful rainfall shower had turned into a disappointing drizzle. With two young kids and a tight morning schedule, she couldn’t afford lengthy plumbing repairs. She followed the vinegar soak method one evening after putting the children to bed.
She removed the shower head, soaked it in vinegar for 20 minutes, scrubbed the nozzles, and found the internal screen completely clogged with gritty sand-like particles—likely from recent municipal pipe work. After rinsing everything and reinstalling the fixture, her next morning shower was dramatically improved. The fix took exactly eight minutes and cost nothing but a cup of vinegar.
Sarah now cleans her shower heads quarterly and keeps spare screens on hand. “I didn’t realize such a small part could cause such a big problem,” she said. “Now I check them like I do air filters.”
Troubleshooting Checklist
Use this checklist to systematically identify and fix low shower pressure:
- ✅ Confirm other fixtures have normal pressure (isolate the issue)
- ✅ Check that the main water valve and bathroom shut-off valve are fully open
- ✅ Remove the shower head and inspect for visible clogs
- ✅ Soak the shower head in white vinegar for 10–30 minutes
- ✅ Clean or replace the internal filter screen
- ✅ Flush the shower arm pipe before reattachment
- ✅ Reinstall and test water flow
- ✅ Consider removing the flow restrictor (if legal and appropriate)
- ✅ Evaluate upgrading to a pressure-optimized shower head if needed
Following this checklist ensures you don’t skip critical steps and helps prevent recurring issues.
Frequently Asked Questions
Can hard water really reduce shower pressure?
Yes. Hard water contains dissolved minerals like calcium and magnesium that precipitate out when heated. Over time, these form limescale inside the shower head’s narrow channels, progressively restricting water flow. Regular descaling prevents this buildup.
Is it safe to use vinegar on all shower head materials?
Vinegar is generally safe for metal, plastic, and chrome finishes when used occasionally. However, prolonged exposure (more than a few hours) can damage brass or nickel-plated surfaces. Stick to 30-minute soaks and rinse thoroughly afterward.
Why is my shower weak even after cleaning the head?
If cleaning doesn’t help, the issue may lie elsewhere: a failing mixing valve, closed supply valve, kinked hose (in handheld units), or system-wide low pressure. You may also have a worn cartridge or pressure-balancing valve that needs replacement.
Final Thoughts and Action Plan
Low shower head pressure is a common household annoyance—but it’s rarely a permanent condition. In the vast majority of cases, the culprit is something simple: mineral deposits, a clogged screen, or a restrictive component that can be cleaned or removed in minutes. By understanding the root causes and applying straightforward maintenance techniques, you can restore powerful, satisfying water flow without calling a plumber or spending money.
The key is acting promptly. Delaying cleaning turns manageable buildup into stubborn clogs that shorten your fixture’s lifespan. Make it a habit to inspect and descale your shower head every few months, especially in regions with hard water. Pair this with smart upgrades—like installing a water softener or choosing high-efficiency, high-impact shower heads—and you’ll enjoy reliable performance for years.


 浙公网安备
33010002000092号
浙公网安备
33010002000092号 浙B2-20120091-4
Comments
No comments yet. Why don't you start the discussion?