
A steady drip from your showerhead after you’ve turned off the water may seem minor, but over time it can waste gallons of water, increase your utility bills, and signal underlying plumbing issues. While a small amount of residual water draining is normal, continuous or prolonged leaking points to mechanical failure within the fixture or valve system. Understanding the root causes—and how to fix them—is essential for maintaining an efficient bathroom and preventing water damage.
This guide dives into the most common reasons behind post-shutoff showerhead leaks, explains how internal components contribute to the problem, and provides step-by-step solutions you can perform at home with basic tools. Whether your shower uses a single-handle mixer, dual knobs, or a modern cartridge-based system, the principles of diagnosis and repair remain consistent.
How Shower Valves Work and Why Leaks Happen
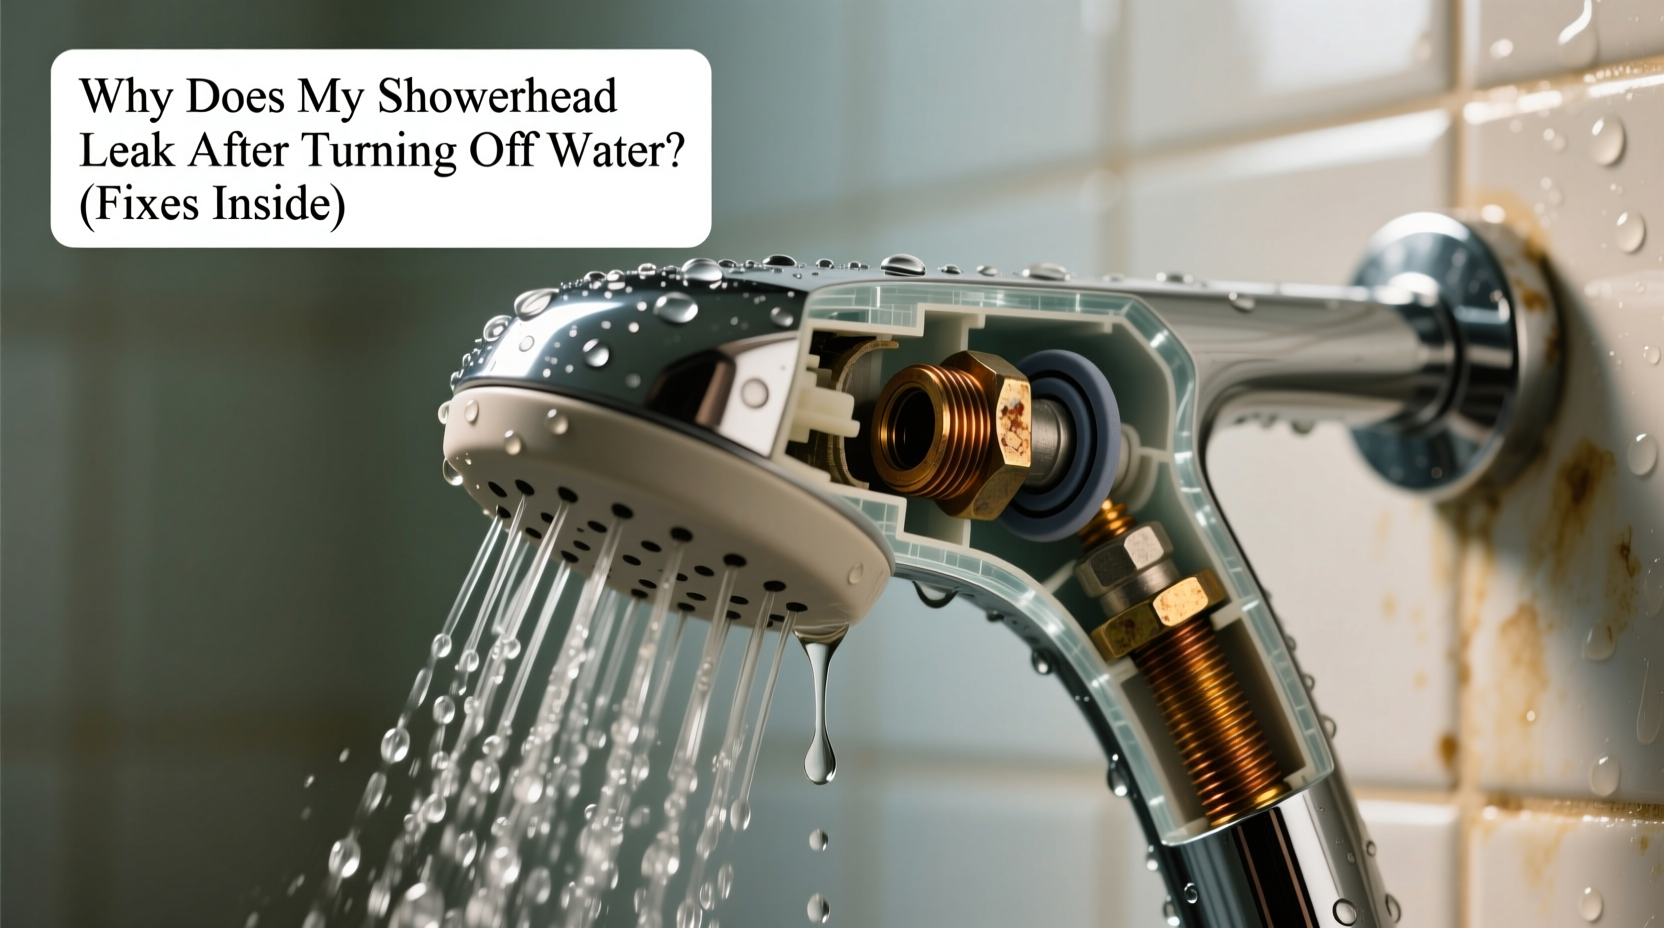
To understand why water continues to escape through the showerhead after shutting off the faucet, it helps to know how a typical shower valve functions. When you turn the handle, the valve opens to allow hot and cold water to mix and flow up through the pipe to the showerhead. Once the handle is returned to the “off” position, a seal—usually made of rubber, ceramic, or metal—should fully block the water passage.
If that seal is compromised, worn, or misaligned, water can seep past it and slowly make its way up the riser pipe until it exits through the showerhead. This delayed leakage often occurs because gravity pulls the residual water upward through capillary action or due to slight pressure imbalances in the plumbing system.
The most frequent culprits include:
- Worn-out valve seats or washers
- Deteriorated O-rings or cartridges
- Mineral buildup obstructing proper sealing
- Improper installation or loose connections
- High water pressure exacerbating weak seals
“Even a pinhole leak in a valve seat can cause persistent dripping. The key is identifying where the failure point lies—before corrosion or mold becomes a secondary issue.” — James Ralston, Master Plumber with 25+ years in residential service
Step-by-Step Guide: Diagnosing and Fixing Internal Leaks
Before replacing parts, confirm the source of the leak. A showerhead that drips immediately after shutoff may be due to internal fixture issues. If the drip starts several seconds later—or only after using the tub spout—it could indicate problems with the diverter or mixing valve.
Follow this timeline to inspect and repair internal components causing the leak:
- Turn off the water supply. Locate the main shutoff valve or individual bathroom isolation valves. Open the shower briefly to relieve residual pressure.
- Remove the showerhead (optional). Unscrew it by hand or use a wrench wrapped in cloth to avoid scratching. Check if the leak persists at the pipe end—if it does, the issue is upstream in the valve body.
- Disassemble the shower handle and trim. Use a screwdriver to remove the handle, then take off the escutcheon plate to expose the valve stem.
- Inspect the cartridge, ball, or compression stem. Pull out the internal mechanism carefully. Look for cracks, warping, or eroded rubber seals.
- Examine the valve seat. Located inside the valve body, this small disc should be smooth. Pitting or grooves mean it needs replacement.
- Clean mineral deposits. Soak parts in white vinegar for 30–60 minutes to dissolve limescale, especially in areas with hard water.
- Replace damaged components. Install new washers, O-rings, or entire cartridges as needed. Match replacements exactly to your model.
- Reassemble and test. Reinstall all parts, restore water supply, and run the shower. Observe for 5–10 minutes after shutdown.
Common Repair Parts and Their Lifespans
Different shower systems rely on distinct internal mechanisms, each with unique failure patterns. Knowing which type you have helps streamline repairs.
| Valve Type | Key Components | Average Lifespan | Failure Signs |
|---|---|---|---|
| Compression (older models) | Rubber washers, brass stems | 5–8 years | Squeaky handles, visible washer wear |
| Cartridge (single-handle) | Plastic/metal cartridge, O-rings | 7–12 years | Leaking without handle movement |
| Ceramic Disk | Ceramic cylinders, inlet/outlet seals | 10–15 years | Low flow, inconsistent temperature |
| Ball Valve (multi-control) | Rotating ball, spring-loaded seals | 5–10 years | Dripping from spout and shower simultaneously |
Regular maintenance, such as cleaning aerators and checking for stiffness in handle operation, can extend the life of these components. In hard water regions, annual descaling significantly reduces premature wear.
Mini Case Study: Resolving a Persistent Drip in a 10-Year-Old Bathroom
In a suburban home built in 2014, the master bathroom shower began dripping consistently for nearly two minutes after each use. The homeowner initially assumed the showerhead was faulty and replaced it twice, but the leak persisted. Upon inspection, a licensed plumber discovered that while the new showerheads were functioning correctly, the internal Moen cartridge had degraded due to unfiltered well water rich in calcium and iron.
The cartridge’s O-rings had cracked, and sediment had lodged between the sealing surfaces. After shutting off the water, flushing the line, and installing a manufacturer-matched replacement cartridge along with updated inlet screens, the leak stopped entirely. Additionally, the homeowner installed a whole-house water softener six months later, which prevented recurrence in other fixtures.
This case underscores that surface-level fixes often fail when internal valve issues are the real cause. Component compatibility and water quality play critical roles in long-term performance.
Checklist: How to Stop Your Showerhead From Leaking After Shut Off
Use this actionable checklist to systematically address and resolve post-shutoff leaks:
- ✅ Confirm the leak isn’t just residual drainage (drips should stop within 10–15 seconds)
- ✅ Remove and clean the showerhead to rule out clogs forcing backflow
- ✅ Shut off water supply and relieve pressure before beginning repairs
- ✅ Disassemble the handle and trim to access the valve core
- ✅ Inspect washers, O-rings, and cartridges for wear or deformation
- ✅ Replace any damaged seals or full valve cartridges as needed
- ✅ Clean the valve seat with fine emery cloth if pitted or corroded
- ✅ Reassemble carefully, ensuring all parts are seated properly
- ✅ Test the system under normal pressure and monitor for 24 hours
- ✅ Consider installing a pressure-reducing valve if household water pressure exceeds 60 psi
FAQ: Common Questions About Showerhead Leaks
Is it normal for a showerhead to drip after being turned off?
A few drops immediately after turning off the water are normal due to residual water in the arm and head. However, continuous dripping for more than 20 seconds usually indicates a failing valve seal or worn internal component that needs attention.
Can high water pressure cause my showerhead to leak?
Yes. Excessive water pressure (above 80 psi) strains seals and accelerates wear on washers and cartridges. Over time, this leads to incomplete shut-off and leakage. Installing a pressure-reducing valve can protect all plumbing fixtures.
Do I need to replace the entire valve if my showerhead leaks?
Not usually. Most leaks stem from replaceable internal parts like cartridges, washers, or O-rings. Full valve replacement is only necessary if the valve body is cracked, severely corroded, or incompatible with modern repair kits.
Prevention Tips for Long-Term Leak-Free Performance
Once the immediate leak is fixed, adopting preventive habits ensures lasting results. Regular care reduces the frequency of repairs and protects both water efficiency and fixture longevity.
- Flush the system annually: Remove the showerhead and run hot water for 30 seconds to clear debris from the pipe.
- Descale monthly in hard water areas: Soak the showerhead in vinegar or use a descaling solution to prevent mineral accumulation.
- Lubricate moving parts: Apply silicone-based grease to O-rings and cartridge stems during reassembly to improve seal integrity and ease of operation.
- Monitor water pressure: Use a gauge on an outdoor spigot to check household pressure. Ideal range is 40–60 psi.
- Upgrade older fixtures: Consider switching to ceramic-disk or thermostatic valves, which offer superior durability and precise control.
“Most shower leaks are preventable with routine maintenance. Think of your plumbing like a car engine—small tune-ups save big repairs down the road.” — Lila Nguyen, Plumbing Systems Engineer
Conclusion: Take Control of Your Home’s Water Efficiency
A leaking showerhead might seem like a minor annoyance, but it reflects deeper dynamics in your home’s plumbing health. By understanding how internal valves operate and what causes them to fail, you gain the power to diagnose issues early and implement lasting fixes. With the right tools, a bit of patience, and attention to detail, most homeowners can resolve these leaks without calling a plumber.
Don’t let a slow drip undermine your comfort or water conservation goals. Address the root cause inside the valve, not just the symptom at the showerhead. Implement regular maintenance, use quality replacement parts, and stay vigilant about changes in water pressure or flow. These small actions compound into significant savings and peace of mind.


 浙公网安备
33010002000092号
浙公网安备
33010002000092号 浙B2-20120091-4
Comments
No comments yet. Why don't you start the discussion?