
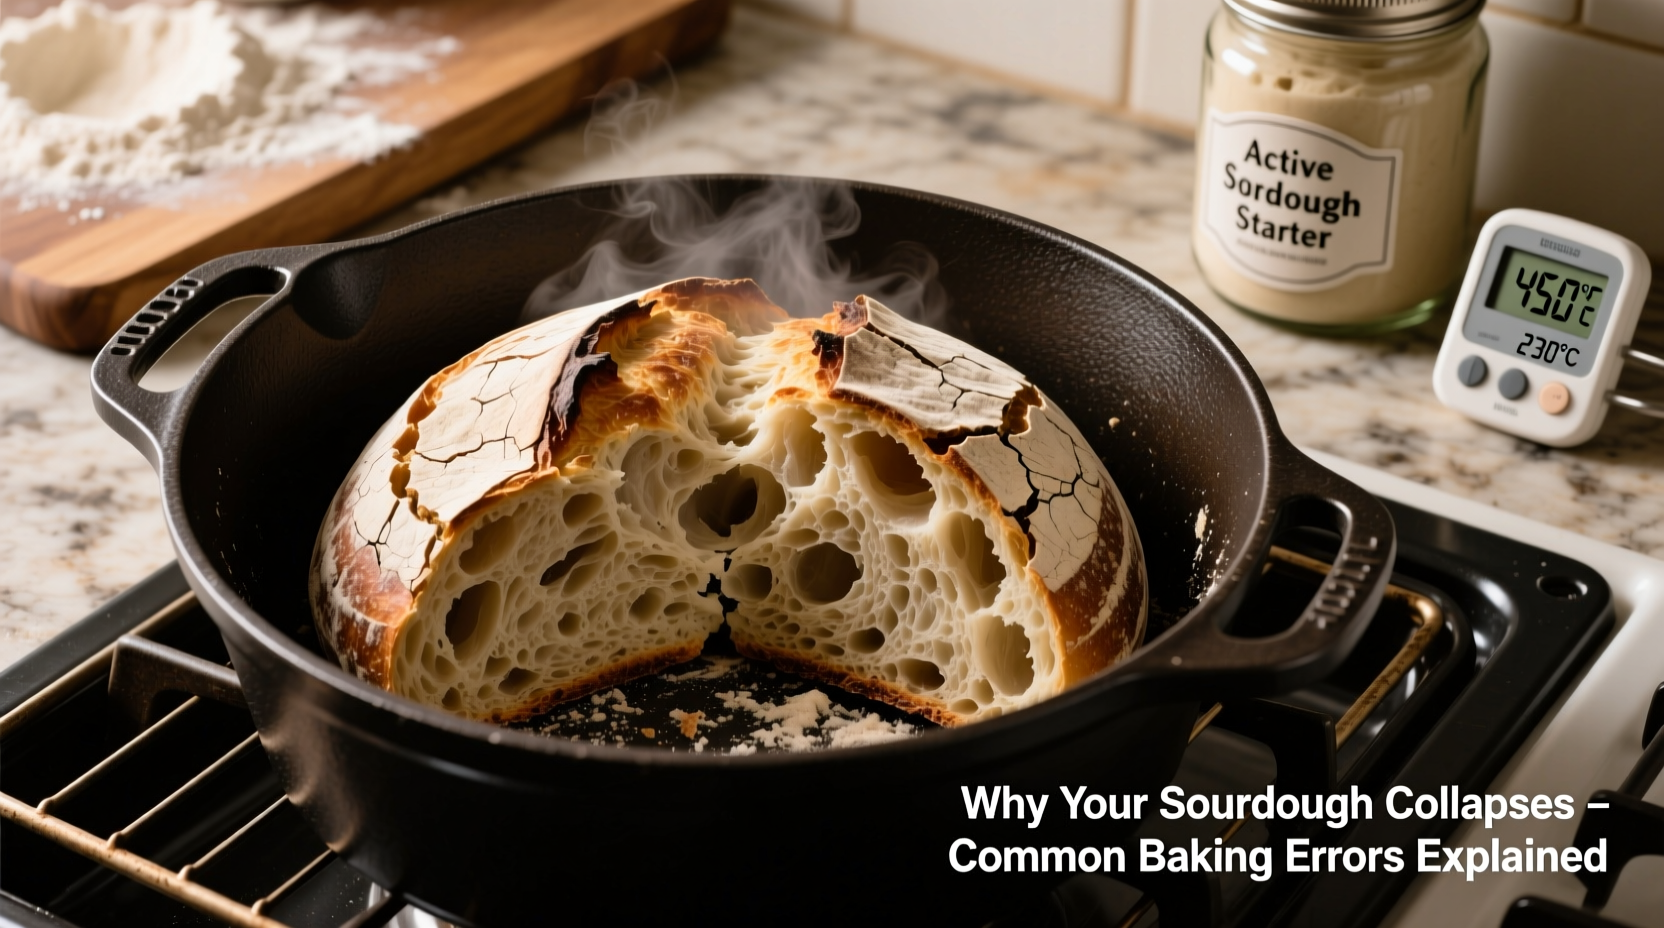
Sourdough baking is both an art and a science. When done right, it produces a crusty, airy loaf with complex flavor that store-bought bread can’t match. But when something goes wrong—especially if your loaf rises beautifully in the proofing basket only to deflate in the oven—the disappointment can be crushing. A collapsed sourdough isn’t just visually unappealing; it often signals deeper issues in fermentation, structure, or technique.
The truth is, most sourdough collapses are preventable. They stem from identifiable mistakes during mixing, fermentation, shaping, scoring, or baking. Understanding these errors—and how to correct them—can transform inconsistent results into reliable success. This guide breaks down the most common reasons sourdough collapses in the oven, backed by practical fixes, expert insights, and real-world examples.
Understanding Oven Spring and Why It Matters
Oven spring refers to the rapid expansion of dough during the first 10–15 minutes of baking. This happens because heat causes trapped carbon dioxide to expand and water to turn into steam, pushing the dough upward. At the same time, yeast has one final burst of activity before dying at around 140°F (60°C). For sourdough, strong oven spring is essential to achieving an open crumb and proper volume.
When a loaf collapses during or immediately after oven spring, it means the gluten structure couldn’t withstand the internal pressure. Either the gas escaped too quickly, or the structure was too weak to hold its shape. This failure point usually traces back to earlier stages in the process—not the oven itself.
Common Causes of Sourdough Collapse
1. Overproofing the Dough
One of the leading causes of collapse is overproofing. When dough proofs too long, the gluten network begins to break down as acids from fermentation accumulate. The bubbles grow too large and thin-walled, making them prone to rupture when exposed to heat.
A simple test to check doneness: gently press your finger into the dough. If the indentation springs back slowly and leaves a slight impression, it’s ready. If it doesn’t spring back at all or feels fragile, it’s overproofed.
2. Underdeveloped Gluten Structure
Strong gluten is what gives sourdough its ability to trap gas and expand without tearing. If you skip stretch-and-folds, mix too briefly, or use low-protein flour, the dough may lack structural integrity.
Dough should feel elastic, smooth, and slightly tacky—not sticky or slack. Autolyse (resting flour and water before adding starter and salt) helps improve gluten development with less mechanical work.
3. Poor Scoring Technique
Scoring isn’t just decorative—it controls where the bread expands. Without proper slashes, pressure builds unpredictably and can cause blowouts or uneven expansion. Too shallow cuts won’t open well; too deep ones can cut through delicate bubble walls.
Use a sharp lame or razor blade at a 30–45° angle, about ½ inch deep. Make decisive, swift cuts. Avoid dragging the blade, which can seal the surface instead of opening it.
4. Lack of Steam During Baking
Steam delays crust formation, allowing the loaf to expand freely during oven spring. Without it, the crust sets too early, restricting rise and increasing the chance of collapse due to trapped pressure escaping violently.
Baking in a Dutch oven creates a sealed environment that traps natural moisture from the dough, mimicking professional steam-injected ovens.
5. Inconsistent Fermentation Temperature
Sourdough is highly sensitive to temperature. Cold environments slow fermentation, while hot ones accelerate it. Fluctuations make timing unpredictable and increase the risk of under- or over-fermentation—even if you follow the same schedule daily.
For consistent results, aim for a stable room temperature between 74–78°F (23–26°C), especially during bulk fermentation and final proof.
“Gluten is the skeleton of your loaf. If it’s weak or damaged, no amount of perfect scoring will save it.” — Daniel Leader, author of *Local Breads* and founder of Bread Alone Bakery
Step-by-Step Guide to Prevent Collapse
Follow this sequence to build resilience into your sourdough process and eliminate common pitfalls:
- Start with active starter: Ensure your levain is peaking—doubled in size, bubbly, and passes the float test. An inactive starter leads to sluggish fermentation and poor gas production.
- Autolyse for 30–60 minutes: Mix only flour and water first. This hydrates the flour and jumpstarts gluten development.
- Mix thoroughly, then develop strength: After adding starter and salt, perform 3–4 sets of stretch-and-folds over 90 minutes during bulk fermentation. Space them 20–30 minutes apart.
- Monitor bulk fermentation closely: Look for 30–50% volume increase, domed surface, and tiny bubbles near the sides. Don’t rely solely on time.
- Shape tightly but gently: Pre-shape into a round, rest 20–30 minutes, then final shape with surface tension. This forms a “skin” that supports rise.
- Proof properly: Final proof should take 1–4 hours at room temp or overnight in the fridge. Cold proofing strengthens structure and reduces overproofing risk.
- Score confidently: Use a sharp blade and make intentional cuts. Practice on spare dough to refine depth and angle.
- Bake with steam: Use a preheated Dutch oven. Cover for the first 20 minutes, then uncover to finish baking and crisp the crust.
Do’s and Don’ts: A Quick Reference Table
| Do’s | Don’ts |
|---|---|
| Use high-protein bread flour (12–13%) for better gluten strength | Use all-purpose flour without adjusting hydration or handling expectations |
| Preheat your Dutch oven for at least 30 minutes | Bake in a cold or insufficiently heated vessel |
| Perform the finger poke test to assess proofing progress | Rely only on recipe timelines regardless of ambient conditions |
| Cool bread completely (1–2 hours) before slicing | Cut into hot bread—steam inside softens crumb and can make it gummy |
| Keep a sourdough journal tracking variables like time, temp, and results | Assume every batch should behave the same despite seasonal changes |
Mini Case Study: From Flat Loaf to Festival Favorite
Sarah, a home baker in Portland, struggled for months with collapsed sourdough. Her loaves would puff up in the oven, then sink dramatically by the 15-minute mark. She followed recipes precisely but saw no improvement.
After reviewing her process, she realized two key issues: First, she was leaving her dough to proof on the counter overnight during summer months (room temp ~82°F), leading to overfermentation. Second, she wasn’t performing stretch-and-folds, assuming mixing by hand was enough.
She adjusted by moving final proof to the refrigerator and implementing four sets of stretch-and-folds during bulk fermentation. Within a week, her loaves gained height, opened evenly, and held their shape. Six months later, she began selling at a local farmers market, where customers praise her “perfect ear” and springy crumb.
Her turnaround came not from changing ingredients—but from mastering timing and structure.
Troubleshooting Checklist
- ✅ Is my starter fully active and at peak ripeness?
- ✅ Did I develop sufficient gluten through folding or kneading?
- ✅ Has the dough increased by 30–50% during bulk fermentation?
- ✅ Does the shaped dough feel taut and hold its form?
- ✅ Is the final proof timed correctly? (Test with jiggle and poke.)
- ✅ Am I scoring deeply enough and at the right angle?
- ✅ Is my oven and baking vessel fully preheated?
- ✅ Am I using steam (e.g., covered Dutch oven) for the first phase of baking?
- ✅ Am I avoiding sudden temperature drops (like opening the oven too early)?
Frequently Asked Questions
Can I rescue an overproofed loaf?
Yes, but with limitations. Gently reshape the dough and refrigerate for 1–2 hours to firm it up and slow fermentation. This won’t restore lost strength but may help stabilize structure. Bake soon after. Results vary, but it’s worth trying rather than discarding.
Why did my bread rise in the oven and then fall?
This typically indicates weak structure unable to support expansion. Common culprits include overproofing, underdeveloped gluten, or excessive hydration for your skill level. Even with great oven spring, if the walls between air pockets are too thin, they’ll burst under pressure.
Does hydration level affect collapse risk?
Absolutely. Higher hydration (above 78%) increases difficulty because wetter dough is harder to strengthen and more prone to spreading. Beginners should start with 70–75% hydration to build control before advancing. Adjust water gradually as skills improve.
Conclusion: Build Confidence Through Consistency
A collapsing sourdough loaf doesn’t mean you’ve failed—it means you’re learning. Every misstep reveals something about fermentation, structure, or environment. The most successful bakers aren’t those who never fail, but those who diagnose problems methodically and adapt.
Focus on building strong gluten, respecting fermentation windows, and creating optimal baking conditions. Track your variables. Celebrate small improvements. With each bake, you’ll gain intuition and precision.


 浙公网安备
33010002000092号
浙公网安备
33010002000092号 浙B2-20120091-4
Comments
No comments yet. Why don't you start the discussion?