
Sourdough baking is as much science as it is art. When your loaf rises beautifully during bulk fermentation only to deflate in the oven—often just as you're about to celebrate a perfect bake—it can be deeply frustrating. The issue typically isn’t your oven or scoring technique alone; it often traces back to two critical factors: hydration levels and proofing accuracy. Understanding how water content and fermentation timing interact with gluten structure and gas retention can transform inconsistent results into reliable success.
A collapsed sourdough doesn’t mean failure—it’s feedback. By tuning your hydration strategy and refining your proofing approach, you gain control over one of the most elusive phases in artisan bread: oven spring. This guide breaks down the mechanics behind collapse, offers actionable adjustments, and provides tools to diagnose and prevent structural failure before it happens.
The Science Behind Oven Collapse
Oven spring—the rapid expansion of dough during the first 10–15 minutes of baking—is driven by trapped carbon dioxide expanding under heat and steam pressure within the dough’s gluten network. If that network lacks strength or integrity, the loaf cannot withstand internal pressure and collapses.
Two primary culprits disrupt this delicate balance: excessive hydration without adequate gluten development, and improper proofing (either under- or over-proofed). Both compromise the dough's ability to retain gas during the crucial moments of heat shock.
High hydration increases extensibility—the stretchiness of dough—but reduces stability if not balanced with sufficient strength-building through mixing, folding, and fermentation. Meanwhile, proofing determines how much gas the dough holds and how resilient its structure remains when exposed to high temperatures.
“Over-hydration without proper gluten maturation is like building a skyscraper on sand—it may look impressive at first, but it won’t stand.” — Dr. Jonathan Yeris, Artisan Baking Researcher, UC Davis Grain Lab
Hydration: How Water Content Affects Structure
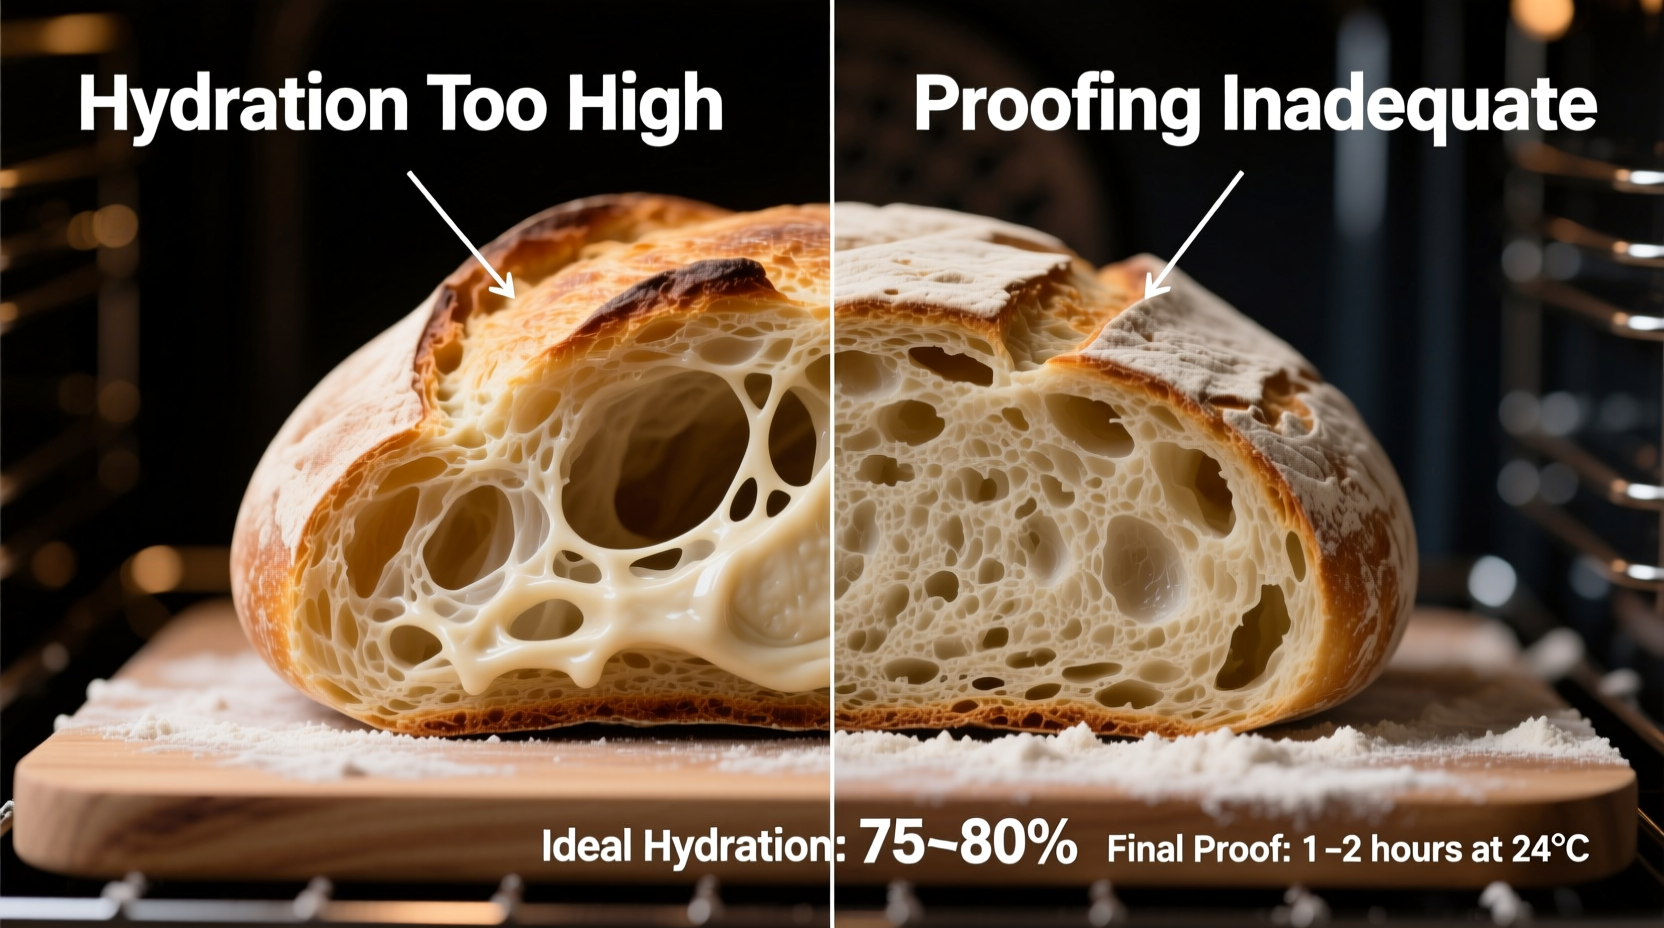
Hydration refers to the ratio of water to flour in your dough, expressed as a percentage. For example, a dough with 750g of water and 1000g of flour has 75% hydration. While higher hydration (75–85%) produces more open crumb and tender texture, it demands advanced handling and strong gluten development.
When hydration exceeds what the flour can effectively absorb or the gluten can support, the dough becomes slack and fragile. During oven spring, this weak structure ruptures instead of expanding evenly, leading to deflation.
Different flours absorb water differently. High-protein bread flour (12–14% protein) supports higher hydration better than all-purpose (10–11%) or whole grain flours, which contain bran that cuts gluten strands. Adjust hydration based on your flour type—not just preference.
Additionally, hydration isn’t just about initial mix-in water. Autolyse (resting flour and water before adding salt and starter) improves water absorption and gluten formation, making high-hydration doughs easier to manage.
Flour Hydration Capacity Comparison
| Flour Type | Recommended Max Hydration | Notes |
|---|---|---|
| All-Purpose Flour | 72% | Limited strength; best for beginners |
| Bread Flour | 78–80% | Higher gluten; ideal for wetter doughs |
| Whole Wheat | 70–74% | Bran interferes with gluten; absorbs more slowly |
| Rye Flour | 65–70% | Very low gluten; requires blending |
Proofing: The Hidden Trigger of Collapse
Proofing is the final fermentation stage where shaped dough rests before baking. It directly influences gas volume, acidity, and dough resilience. Under- or over-proofing both lead to collapse—but for different reasons.
Under-proofed dough hasn't developed enough gas or enzymatic activity. When baked, it expands rapidly but lacks maturity. The tight gluten restricts even expansion, causing uneven bursts and potential blowouts rather than graceful rise.
Over-proofed dough is far more likely to collapse. Excessive fermentation weakens gluten due to acid buildup and enzyme activity. The structure becomes too fragile to hold gas, especially under thermal stress. As soon as heat causes bubbles to expand, the walls rupture, and the loaf sinks.
Many bakers rely solely on time-based proofing schedules, but temperature, starter strength, and room humidity drastically affect fermentation speed. A dough left for 4 hours at 80°F (27°C) behaves very differently than one at 68°F (20°C).
How to Test Proof Readiness
- Finger Poke Test: Gently press the dough with a floured finger. If the indentation slowly springs back halfway, it’s ready. If it springs back quickly, it needs more time. If it doesn’t rebound at all, it’s over-proofed.
- Look for Volume Increase: Properly proofed dough should increase by 1.5 to 2 times its original size.
- Jiggle Test: Gently shake the banneton. A well-proofed loaf will wobble slightly like jelly but still hold shape.
Real Example: From Flat Loaf to Perfect Spring
Sarah, an avid home baker in Portland, struggled for months with her sourdough collapsing after scoring. She used a 78% hydration recipe with bread flour and a robust starter, yet her loaves consistently flattened in the oven despite good oven spring initially.
After reviewing her process, she realized two issues: First, she was proofing overnight (12 hours) at room temperature (~72°F), assuming time equaled readiness. Second, she skipped stretch-and-folds during bulk fermentation, relying on long autolyse alone.
She adjusted by reducing final proof to 3.5 hours at 70°F and introduced four sets of coil folds during bulk fermentation at 30-minute intervals. She also began using a proofing basket with a linen liner to support structure.
The result? Her next loaf rose evenly in the oven, held its shape, and achieved a 30% greater volume. The crumb was airy, the crust glossy and crisp. Sarah learned that time is a guideline—not a rule—and that mechanical strength matters as much as fermentation.
Step-by-Step Guide to Prevent Collapse
Follow this sequence to build a structurally sound sourdough loaf resistant to oven collapse:
- Choose Appropriate Hydration: Begin with 70–75% hydration. Increase gradually as skill improves.
- Autolyse for 30–60 Minutes: Mix flour and water; let rest before adding salt and starter. Enhances hydration and gluten formation.
- Perform Coil Folds or Stretch-and-Folds: Every 30 minutes during the first 2 hours of bulk fermentation. Builds strength without overworking.
- Monitor Bulk Fermentation: Aim for 50–75% volume increase and a bubbly, domed surface. Typically takes 3.5–5 hours at 74°F.
- Shape with Tension: Pre-shape, bench rest for 20–30 minutes, then final shape tightly to create surface tension.
- Final Proof: Refrigerate overnight (retarded proof) or room temp for 2–4 hours. Use the poke test to confirm readiness.
- Score Just Before Baking: Make decisive, shallow cuts (½ inch deep) to control expansion.
- Bake with Steam: Use a Dutch oven or steam pan for the first 20 minutes to delay crust formation and maximize oven spring.
“The key to consistent sourdough is consistency in environment and observation—not rigid recipes.” — Miriam Chen, Professional Artisan Baker & Instructor
Do’s and Don’ts: Hydration and Proofing Checklist
- ✅ Do: Match hydration to your flour’s protein content.
- ✅ Do: Use cold retardation (overnight fridge proof) to improve flavor and control timing.
- ✅ Do: Fold regularly during bulk fermentation to build strength.
- ✅ Do: Bake when the dough passes the jiggle and poke tests.
- ❌ Don’t: Assume proofing time is fixed regardless of ambient temperature.
- ❌ Don’t: Skip pre-shaping—it builds essential tension.
- ❌ Don’t: Over-hydrate without adjusting technique or flour blend.
- ❌ Don’t: Open the oven during the first 20 minutes—temperature drops cause premature crust setting.
FAQ: Common Questions About Sourdough Collapse
Why does my sourdough rise beautifully in the oven and then fall?
This usually indicates over-proofing. The dough enters the oven with maximum gas already present and minimal structural strength. Heat causes immediate expansion, but the weakened gluten network ruptures, leading to collapse. Try shortening your final proof by 30–60 minutes or retarding in the fridge to slow fermentation.
Can I fix over-proofed dough?
Possibly. If caught early, gently reshape the dough and return it to a banneton for refrigeration for 1–2 hours to re-tighten the structure. This won’t fully restore strength but may salvage some oven spring. In the future, reduce proofing time or lower the temperature.
Does high altitude affect sourdough collapse?
Yes. At higher elevations, lower atmospheric pressure allows gases to expand faster, increasing the risk of over-expansion and rupture. Bakers above 3,000 feet often reduce hydration by 2–5%, shorten fermentation times, and use colder dough temperatures to maintain control.
Conclusion: Master Your Dough, Not Just the Recipe
Your sourdough collapsing in the oven isn’t a dead end—it’s a diagnostic signal. Hydration and proofing are not standalone variables; they’re interconnected forces shaping your loaf’s fate. By respecting the limits of your flour, developing gluten intentionally, and learning to read your dough’s physical cues, you shift from guessing to guiding the process.
Great sourdough isn’t about perfection on the first try. It’s about observation, adjustment, and patience. Implement one change at a time—reduce hydration, add folds, adjust proof time—and document the results. Each bake brings deeper understanding.


 浙公网安备
33010002000092号
浙公网安备
33010002000092号 浙B2-20120091-4
Comments
No comments yet. Why don't you start the discussion?