
Sourdough bread is a marvel of natural fermentation—complex in flavor, airy in crumb, and deeply satisfying to bake. But nothing is more disheartening than watching your beautifully proofed loaf collapse before it hits the oven. You've nurtured your starter, kneaded with care, and waited patiently through bulk fermentation, only to see your dough go flat when you transfer it to the baking vessel or score it. The good news? This issue is both common and fixable. Understanding why your sourdough deflates before baking is key to achieving consistent, oven-spring-rich results.
The collapse of sourdough dough just before baking typically stems from structural instability. Whether due to overproofing, poor gluten development, or handling errors, the problem lies in the balance between gas production and dough strength. This guide breaks down the most frequent culprits, provides actionable fixes, and equips you with the knowledge to diagnose and prevent deflation every time.
Understanding Dough Structure and Gas Retention
Sourdough rises because wild yeast and bacteria in your starter produce carbon dioxide during fermentation. For the dough to hold its shape, the gluten network must be strong enough to trap these gases. Think of gluten as an elastic balloon: if it's too weak, over-stretched, or compromised, it bursts under pressure. When this happens before baking, your loaf loses volume and structure.
Several factors influence this balance:
- Gluten development: Proper mixing and folding build a resilient protein matrix.
- Fermentation timing: Under- or over-proofing disrupts gas retention.
- Dough hydration: Higher water content increases extensibility but demands stronger gluten.
- Temperature: Warmer environments speed up fermentation, increasing the risk of overproofing.
- Handling technique: Rough transfers or improper scoring can rupture delicate bubbles.
When any of these elements are out of sync, your dough may appear puffy and promising one moment, then deflate dramatically the next. The key is identifying which factor—or combination—is at play in your kitchen.
Common Causes of Pre-Bake Deflation
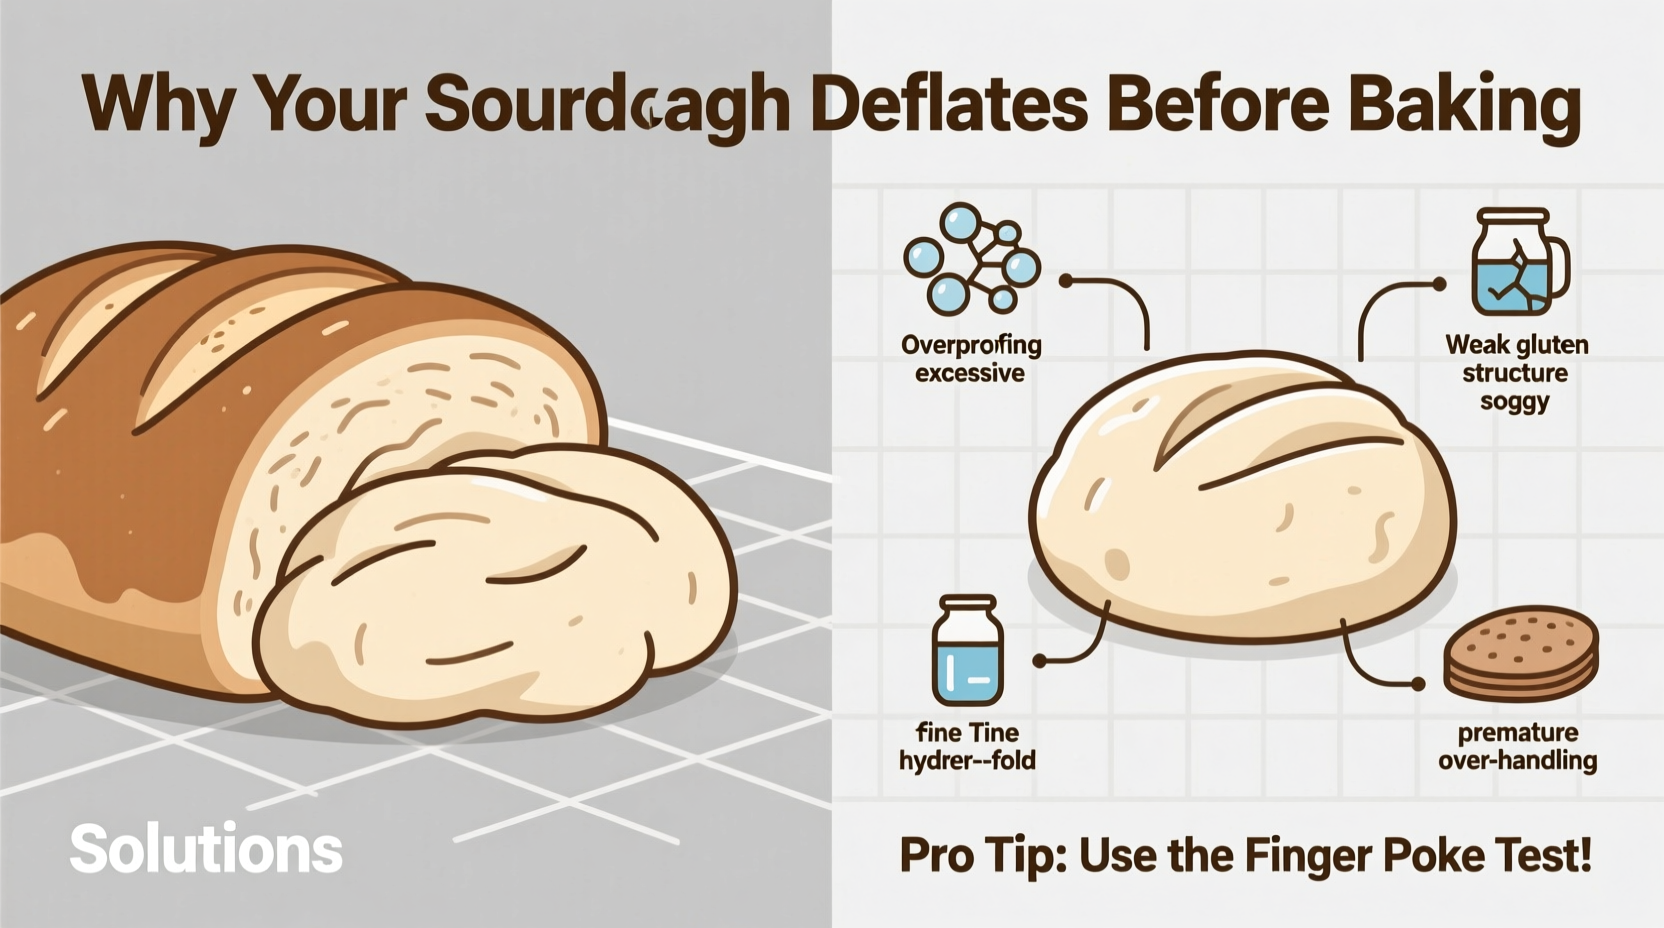
1. Overproofing: The Most Frequent Culprit
Overproofing occurs when dough ferments too long, causing the gluten structure to weaken while gas production continues. The result? A dough that’s full of air but structurally unsound. It may look inflated, but it lacks elasticity and resilience.
Signs of overproofed dough include:
- Dough doesn’t spring back when gently poked—it leaves a permanent dent.
- Surface appears fragile, bubbly, or wrinkled.
- Dough collapses when touched or moved.
Overproofing often happens when ambient temperatures are high, schedules are off, or bakers rely solely on time rather than visual and tactile cues.
2. Weak Gluten Development
If your dough never builds sufficient strength during mixing and bulk fermentation, it won’t be able to support gas expansion. This is especially common in high-hydration recipes (75%+ hydration) when folds are skipped or improperly executed.
Weak gluten manifests as:
- Dough that feels slack, sticky, and tears easily.
- Lack of surface tension after shaping.
- Flat loaves even with proper proofing time.
Autolyse (resting flour and water before adding salt and starter) and regular coil folds during bulk fermentation are essential for building strength without overworking the dough.
3. Excessive Hydration Without Compensation
While wetter doughs create open crumb structures, they also demand more skill. High hydration increases dough extensibility but reduces stability. If your flour has low protein content or you skip strengthening techniques, the dough will struggle to hold its shape.
For example, using all-purpose flour in a 78% hydration recipe without additional folds often leads to spreading and collapse.
4. Poor Shaping Technique
Shaping isn’t just about aesthetics—it’s critical for creating surface tension that contains internal gases. A poorly shaped loaf lacks structural integrity and will spread or deflate when transferred to a banneton or Dutch oven.
Common shaping mistakes:
- Not pre-shaping (bench resting) before final shaping.
- Seams not sealed properly.
- Over-handling, which degasses the dough.
5. Rough Handling During Transfer
Even a well-proofed loaf can collapse if jostled during transfer. Dropping the dough, dragging it across a surface, or using a floured cloth that sticks can all cause sudden deflation.
Use a well-floured linen liner in your banneton and invert smoothly onto parchment paper. Slide the dough into the Dutch oven gently—never shake or stretch it.
“Many home bakers mistake volume for readiness. A dough can be over-inflated and still fail because the structure is exhausted.” — Daniel Leader, author of *Local Breads* and founder of Bread Alone Bakery
Troubleshooting Checklist: Diagnose & Fix Deflation
Use this checklist to identify where things went wrong and how to correct them in your next bake.
- ✅ Did I perform the poke test? (Should spring back slowly, not leave a hole)
- ✅ Was bulk fermentation stopped at 1.5–2x volume increase?
- ✅ Did I perform 3–4 sets of coil folds during bulk fermentation?
- ✅ Did I create tight surface tension during shaping?
- ✅ Is my starter active and peaking at the right time?
- ✅ Did I avoid excessive handling during transfer?
- ✅ Is my flour high-protein (11.5%+)?
- ✅ Was the dough temperature controlled (76–78°F ideal)?
Step-by-Step Guide to Preventing Collapse
Follow this methodical approach to ensure your sourdough maintains its structure until the oven spring kicks in.
- Start with an active starter: Feed your starter 6–12 hours before mixing, ensuring it doubles within 6–8 hours and passes the float test.
- Autolyse for 30–60 minutes: Mix flour and water; rest before adding salt and starter. This hydrates gluten proteins and improves extensibility.
- Perform spaced coil folds: During bulk fermentation, do 3–4 sets of coil folds every 30 minutes. This builds strength gradually without tearing.
- Monitor volume, not time: Ferment until dough is 1.5 to 2 times its original size. Time varies by temperature and flour type.
- Pre-shape and bench rest: After bulk fermentation, pre-shape into a round, then rest for 20–30 minutes uncovered to develop skin.
- Final shaping with tension: Shape tightly, sealing seams underneath. Use minimal flour to avoid slip.
- Proof in a banneton: Place seam-side up in a well-floured basket. For cold proof, refrigerate for 8–16 hours. For room temp, check every hour after 2 hours.
- Poke test before baking: Gently press ½ inch into the dough. If it springs back slowly and leaves a slight indentation, it’s ready. If it doesn’t spring back, it’s overproofed.
- Transfer gently: Use parchment to lift and lower dough into the Dutch oven. Avoid stretching or dropping.
- Score confidently: One decisive cut, ¼ to ½ inch deep, at a 30-degree angle. Hesitation creates drag and weak spots.
Do’s and Don’ts: Managing Proofing and Handling
| Do’s | Don’ts |
|---|---|
| Use the poke test to confirm readiness | Rely solely on recipe time estimates |
| Chill dough overnight for better control | Leave dough at room temperature for >4 hours without monitoring |
| Build strength with coil folds | Knead aggressively like sandwich bread |
| Use rice flour in banneton to prevent sticking | Over-flour the surface, causing slippage |
| Score with a sharp lame or razor | Re-score or hesitate during cutting |
| Handle dough minimally after shaping | Jostle or shake dough during transfer |
Real Example: From Collapse to Consistent Oven Spring
Julia, a home baker in Portland, struggled for months with deflated loaves. Her dough looked perfect at 4 hours—full of bubbles and doubled in size—but always collapsed when she removed the banneton. She assumed she needed more rise time.
After reviewing her process, she realized two issues: her kitchen was warm (82°F), accelerating fermentation, and she wasn’t performing coil folds. She adjusted by shortening bulk fermentation to 3 hours and adding three sets of coil folds at 30-minute intervals. She also began cold-proofing her shaped loaves overnight.
The result? Her next loaf held its shape perfectly, sprung beautifully in the oven, and had a tight, glossy crust. “I was chasing volume,” she said, “but what I really needed was strength and timing.”
Frequently Asked Questions
Can I save a deflated sourdough loaf?
If your dough deflates just before baking, it may already be overproofed. However, you can sometimes rescue it by reshaping gently and allowing a shorter second proof (1–2 hours). Avoid re-refrigerating unless the dough still smells fresh and hasn’t fully fermented. Success depends on how far gone the structure is.
Why does my dough rise fine but collapse when I score it?
Scoring creates a controlled weak point for steam to escape. If the dough collapses upon scoring, it’s likely overproofed—the structure can’t withstand even minor stress. Try reducing proofing time by 30–60 minutes and ensure your blade is sharp for a clean cut.
Does flour type affect deflation?
Absolutely. Low-protein flours (like all-purpose) have less gluten-forming potential, making them prone to collapse, especially at high hydration. For reliable structure, use bread flour (12–13% protein) or add 10–15% whole wheat or rye to boost strength and fermentation activity.
Conclusion: Build Confidence Through Control
Deflated sourdough doesn’t mean failure—it means feedback. Each collapse is a lesson in timing, strength, and technique. By understanding the science behind dough structure and learning to read your dough’s signals, you gain the confidence to adapt and improve.
Focus on consistency: track your room temperature, note fermentation times, and refine your shaping. Small adjustments lead to dramatic improvements. Soon, you’ll pull beautiful, tall loaves from the oven with reliable oven spring and a satisfying crackle.


 浙公网安备
33010002000092号
浙公网安备
33010002000092号 浙B2-20120091-4
Comments
No comments yet. Why don't you start the discussion?