
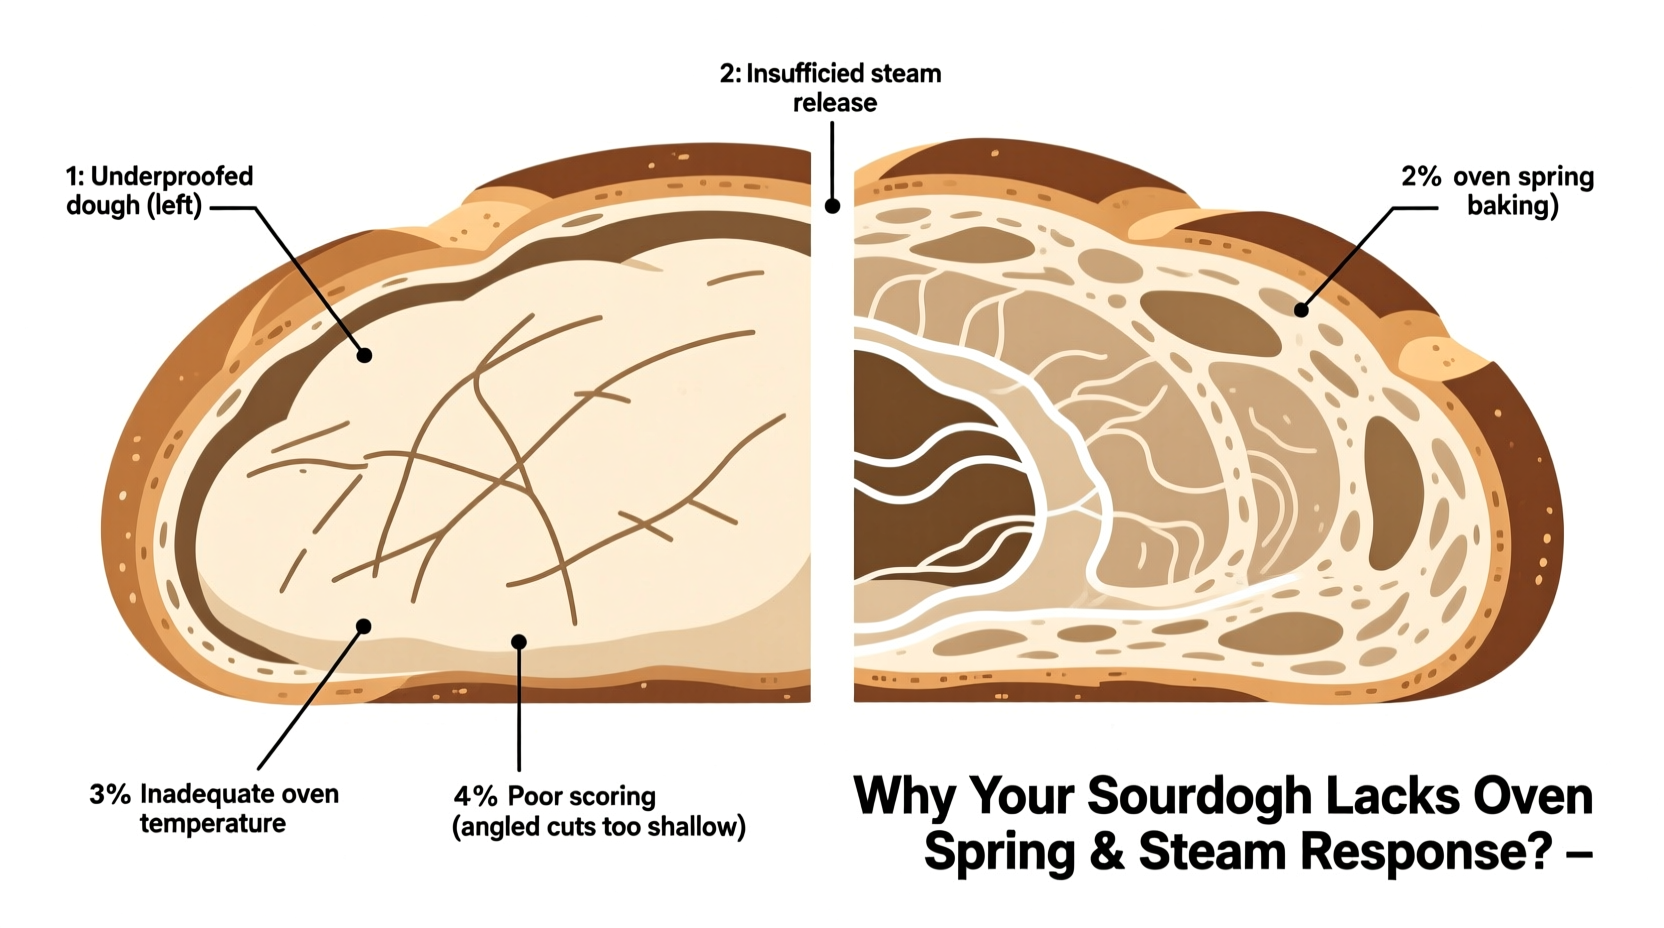
There’s nothing more disappointing than pulling a flat, dense loaf from the oven when you’ve spent hours nurturing your sourdough starter and perfecting your bulk fermentation. You expected an open crumb and a dramatic ear from your scoring—instead, the bread barely rose during baking. The culprit? Poor oven spring. While many variables influence final loaf volume, two of the most critical factors are proper scoring technique and adequate steam in the oven. Understanding how these elements work—and how to optimize them—can transform your sourdough from underwhelming to exceptional.
The Science Behind Oven Spring
Oven spring refers to the rapid expansion of dough during the first 10–15 minutes of baking. This phase occurs because heat activates the yeast one final time before they die off at around 140°F (60°C). Simultaneously, water in the dough turns into steam, creating internal pressure that pushes the structure outward. For this process to be effective, the gluten network must be strong enough to trap gases, and the crust must remain flexible long enough to allow expansion.
If the crust sets too quickly or the dough is overproofed, oven spring is severely limited. This results in a compact crumb, poor volume, and minimal definition in your scoring pattern. Steam delays crust formation, while strategic scoring controls where and how the loaf expands. Without both, even a well-fermented dough can fail.
“Oven spring isn’t just about heat—it’s about timing, tension, and controlled release. The way you score and manage moisture determines whether your loaf breathes or suffocates.” — Daniel Leader, author of *Local Breads* and artisan baker
Why Scoring Matters: More Than Just Aesthetics
Scoring—also known as slashing—is not merely decorative. It serves a functional purpose: to create weak points in the dough’s surface so it can expand predictably during oven spring. Without scoring, gas escapes randomly, often causing blowouts on the sides or bottom of the loaf.
Improper scoring is one of the top reasons bakers experience poor oven spring. Common mistakes include:
- Using a dull blade, which tugs instead of cuts cleanly
- Scoring too shallowly, preventing deep expansion
- Scoring at the wrong angle, reducing lift
- Not adjusting depth based on dough hydration
Mastering the Angle and Depth
The angle of your cut determines how much “ear” (the lifted flap of crust) forms. A shallow angle encourages the dough to split open sideways, lifting the edge and creating that prized blistered effect. Vertical cuts tend to gape open but don’t produce as much lift.
For round boules, a single deep slash or cross pattern works well. For batards, a diagonal or double-chevron pattern allows lengthwise expansion. Always score with confidence—one hesitant pass is better than multiple corrections, which tear the gluten.
Steam: The Invisible Ingredient for Maximum Rise
Steam is essential during the first phase of baking. It keeps the dough’s surface moist and pliable, allowing maximum expansion before the crust hardens. Without steam, the outer layer dries out within seconds, forming a rigid shell that restricts growth.
In professional ovens, steam injectors deliver precise bursts of moisture. Home bakers must simulate this environment using alternative methods. Even small changes in steam levels can dramatically improve oven spring.
Effective Steam Techniques for Home Ovens
- Preheat a Dutch oven: Traps natural moisture released by the dough. Ideal for beginners and requires no extra tools.
- Use a steam pan: Place a metal tray on the oven floor during preheating. Pour 1 cup of boiling water into it right after loading the bread.
- Ice cubes method: Toss 3–4 ice cubes into a preheated cast-iron skillet below the baking stone.
- Spray bottle: Mist the dough and oven walls immediately after loading (avoid heating elements).
Note: Never open the oven during the first 15 minutes if using a steam pan or Dutch oven, as this releases vital moisture.
Common Causes of Poor Oven Spring (and How to Fix Them)
While scoring and steam are crucial, other underlying issues can sabotage oven spring. Consider the following checklist to troubleshoot your process.
✅ Sourdough Oven Spring Checklist
- Is the starter active and peaking at feeding time?
- Was the dough properly developed during mixing and folding?
- Did bulk fermentation end before overproofing?
- Was shaping tight enough to build surface tension?
- Was the final proof timed correctly (not too long)?
- Was the oven fully preheated (ideally 450–500°F / 230–260°C)?
- Was steam applied effectively during bake?
- Was the loaf scored deeply and confidently?
One missed step can cascade into failure. For example, an overproofed loaf has weakened gluten. Even perfect scoring and steam won’t rescue it—the structure collapses under its own weight.
Do’s and Don’ts of Scoring and Steam
| Aspect | Do | Don’t |
|---|---|---|
| Blade Sharpness | Use a fresh razor or lame | Use a dull knife or scissors |
| Scoring Depth | ½ inch deep for hydrated doughs | Too shallow (¼ inch or less) |
| Angle | 30–45° for optimal ear formation | Vertical cuts only |
| Steam Duration | Maintain for first 15–20 minutes | Open oven early and lose steam |
| Oven Temperature | Start at 475°F (245°C), then reduce | Bake at low temps like 375°F (190°C) |
Real Example: From Flat Loaf to Flawless Ear
Sarah, a home baker in Portland, struggled for months with dense sourdough. Her loaves had decent flavor but barely rose in the oven, despite careful feeding of her starter and long fermentation times. She followed recipes precisely but saw no improvement.
After reviewing her process, she realized three key flaws: she was scoring with kitchen shears (which compressed the dough), baking directly on a stone without steam, and opening the oven too soon. She switched to a razor blade, started using a Dutch oven, and resisted peeking until the 20-minute mark.
On her next bake, the difference was immediate. The loaf expanded nearly 30% more, developed a crisp, blistered crust, and showed a clean, defined ear along the slash. Sarah later wrote in her baking journal: “I thought I needed a new recipe. Turns out, I just needed sharper tools and more steam.”
Step-by-Step Guide to Maximizing Oven Spring
Follow this sequence to ensure every element supports optimal rise:
- Feed your starter 8–12 hours before mixing, ensuring it peaks just as you begin.
- Mix and develop dough thoroughly through autolyse, stretch-and-folds, or kneading to build strong gluten.
- Monitor bulk fermentation closely; stop when the dough has risen 30–50% and shows bubbles, not doubled or jiggly.
- Shape tightly to create surface tension—pull edges downward and rotate to seal seams underneath.
- Proof correctly: 1–2 hours at room temp or overnight in the fridge. Test with the poke test—should spring back slowly.
- Preheat oven and vessel (Dutch oven or stone) for at least 45 minutes at 475°F (245°C).
- Score decisively with a sharp blade at a 30–45° angle, ½ inch deep.
- Transfer quickly to hot vessel, cover (if using Dutch oven), and bake covered for 20 minutes.
- Uncover and reduce heat to 425°F (220°C) to finish baking for another 20–25 minutes until deep golden brown.
- Cool completely (at least 2 hours) before slicing to preserve crumb structure.
Frequently Asked Questions
Can I get good oven spring without a Dutch oven?
Yes, but you’ll need to simulate steam. Use a baking stone with a steam pan on the oven floor or spray the oven walls. Results may vary, but proper scoring and temperature help compensate.
Why does my dough deflate when I score it?
This usually indicates overproofing. The gluten structure is too weak to withstand the cut. Try shortening your final proof by 30–60 minutes and ensure your starter is strong.
How do I know if I’m using enough steam?
A glossy, moist crust during the first 10 minutes of baking is a good sign. If the surface looks dry within seconds, increase steam—try adding more water to your pan or using a larger container.
Final Thoughts: Precision Meets Patience
Great sourdough isn’t magic—it’s mechanics. Oven spring depends on a chain of interdependent steps, each requiring attention. Scoring directs expansion; steam enables it. But both rely on foundational strength built during fermentation and shaping.
When your loaf fails to rise, resist the urge to overhaul your entire process. Instead, isolate variables: test your scoring technique one bake, then adjust steam the next. Small, deliberate changes yield clearer insights than sweeping revisions.
Every flat loaf teaches something. With consistent practice and a focus on tension, timing, and thermal dynamics, you’ll start seeing dramatic improvements—not just in height, but in texture, flavor, and confidence.


 浙公网安备
33010002000092号
浙公网安备
33010002000092号 浙B2-20120091-4
Comments
No comments yet. Why don't you start the discussion?