
A collapsing sourdough loaf mid-bake is one of the most disheartening moments for any home baker. You’ve nurtured your starter, shaped the dough with care, waited through hours of fermentation—only to watch it deflate as soon as it hits the oven. While the initial burst of oven spring brings excitement, seeing that beautiful rise reverse into a sunken center can feel like a failure. But it’s not. This issue is far more common than many admit, and it’s almost always fixable.
The root cause lies in structural instability. When a loaf collapses in the oven, it means the gluten network wasn’t strong enough to contain the rapid expansion of gases during baking. The timing of fermentation, the accuracy of scoring, and the integrity of the dough all play critical roles. By understanding what goes wrong—and how to correct it—you can consistently produce loaves that rise proudly and hold their shape.
Understanding Oven Collapse: The Science Behind the Deflation
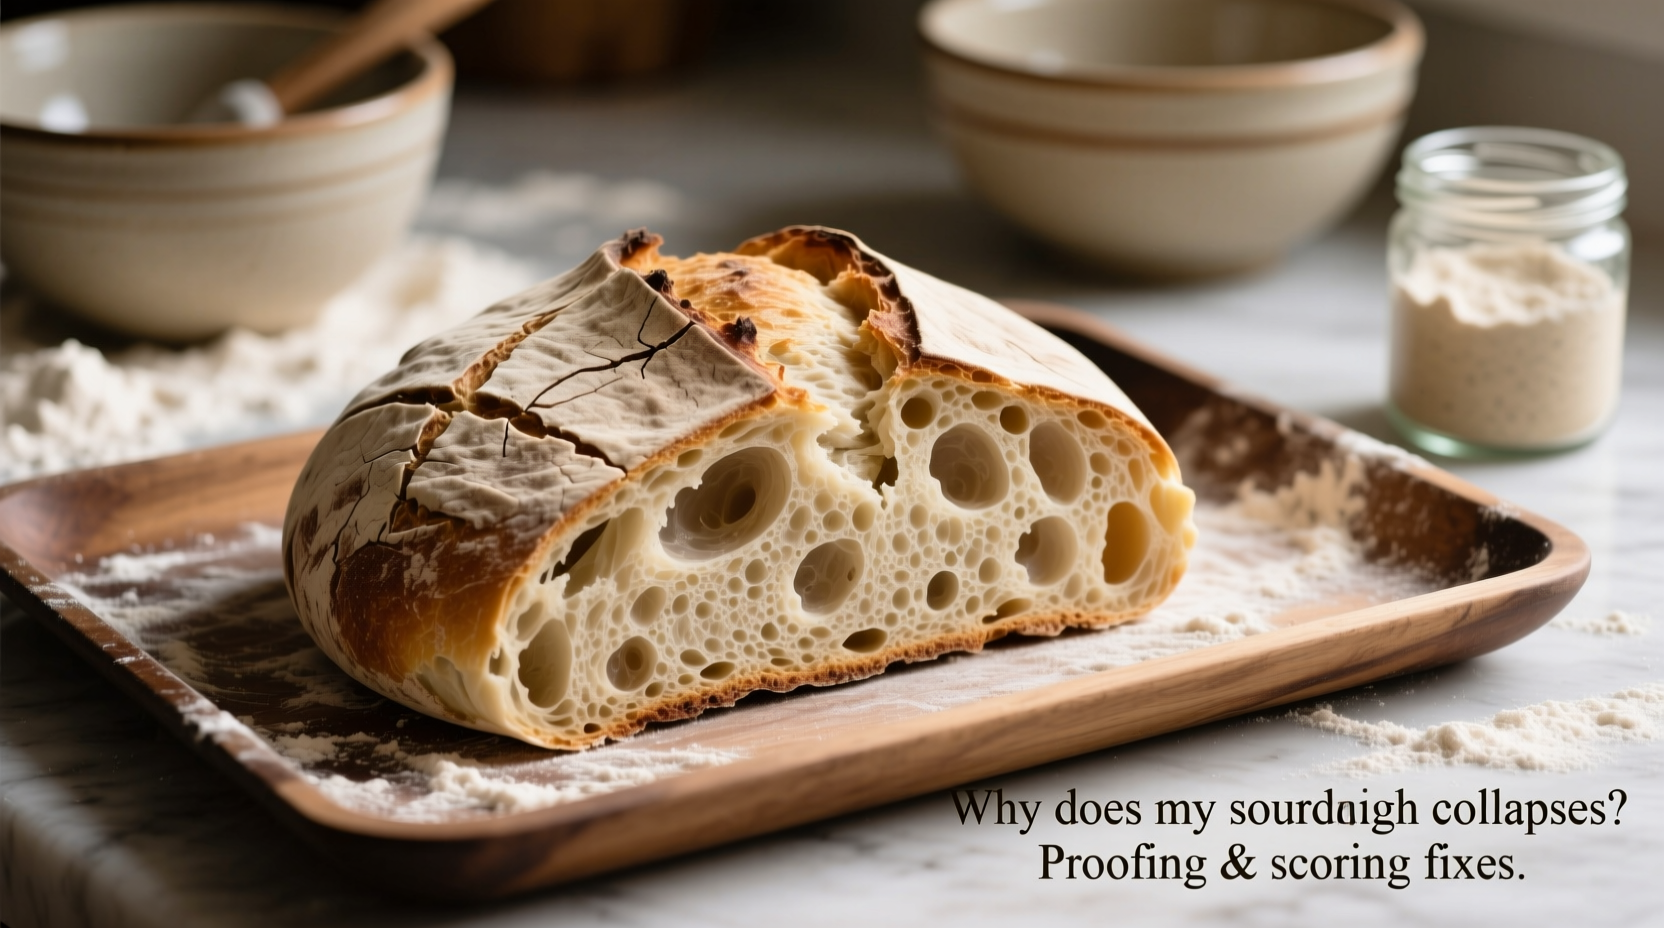
Oven spring occurs in the first 10–15 minutes of baking when trapped carbon dioxide expands rapidly and the yeast has a final burst of activity before dying at around 140°F (60°C). For this expansion to be successful, two things must happen: the crust must remain flexible long enough to allow outward growth, and the internal crumb structure must support the pressure without tearing or collapsing.
When a loaf collapses, it typically happens because:
- The gluten structure is underdeveloped or over-fermented.
- The dough was over-proofed, weakening its ability to trap gas.
- Scoring was too shallow, uneven, or misaligned, causing uncontrolled bursting.
- The surface tension from shaping was compromised or insufficient.
- The oven lacked sufficient steam, leading to premature crust formation.
Unlike commercial yeast breads, sourdough relies entirely on natural fermentation, which introduces variability. A slight shift in temperature, hydration, or time can tip the balance between success and collapse. That’s why precision and observation are essential.
Fixing Proofing Mistakes: Timing, Temperature, and Fermentation Control
Proofing is arguably the most delicate phase in sourdough baking. Under-proofing leads to dense loaves; over-proofing causes collapse. Both extremes compromise the gluten matrix, but over-proofing is the usual culprit behind oven deflation.
Over-proofed dough loses elasticity. The yeast has consumed too much sugar, producing excessive gas that stretches the gluten beyond recovery. Once that structure is damaged, even perfect shaping and scoring won’t save it. During baking, the weakened walls give way, and the loaf caves in.
To avoid this:
- Monitor ambient temperature. Dough ferments faster in warm environments. At 78°F (26°C), bulk fermentation may take only 3–4 hours. At 68°F (20°C), it could take 6–7. Adjust expectations accordingly.
- Use the float test cautiously. While popular, the float test (dropping a small piece of dough in water) is unreliable. It indicates if the dough is gassy, not whether it’s optimally fermented.
- Watch volume, not just time. A properly proofed dough should increase by 1.5 to 2 times its original size. Use a clear container with markings during bulk fermentation to track progress.
- Consider retarded proofing. Refrigerate shaped loaves overnight. Cold slows fermentation, giving you better control and deeper flavor. Just ensure the dough is pre-shaped and bench-rested before final chilling.
One overlooked factor is the maturity of your starter. An underactive starter leads to sluggish fermentation, tempting bakers to extend proofing times unnecessarily. Always feed your starter 4–8 hours before use and confirm it’s peaking with visible bubbles and a domed surface.
“Over-proofing is the silent killer of sourdough. The dough looks ready, but the structure is already failing beneath the surface.” — Daniel Leader, author of *Local Breads*
Mastering Scoring: Precision Cuts for Controlled Expansion
Scoring isn’t just decorative—it’s functional. A well-executed cut guides where the loaf will expand, preventing random blowouts that tear the crust and destabilize the structure. Poor scoring can lead to immediate collapse upon entering the oven.
Common scoring errors include:
- Cutting too shallowly, so the crust resists expansion.
- Using a dull blade, which drags instead of slicing cleanly.
- Scoring at an incorrect angle, reducing lift.
- Making multiple hesitant cuts, weakening the surface.
The ideal scoring technique uses a razor-sharp blade (lame or utility knife) held at a 30–45 degree angle to create a “ear” or lip of dough that lifts open during oven spring. The cut should be swift, confident, and deep enough—usually 1/4 to 1/2 inch depending on dough hydration.
For high-hydration doughs (75%+), a single deep slash often works best. For denser loaves, consider cross or tic-tac patterns to allow even expansion. Avoid intricate designs unless you’re experienced—they can create weak points.
| Scoring Issue | Effect on Loaf | Solution |
|---|---|---|
| Shallow cuts | Crust resists expansion; loaf bursts unpredictably | Score deeper (¼–½ inch) with sharp blade |
| Dull blade | Tearing, dragging, loss of surface tension | Replace blade frequently; use ceramic or metal lames |
| Incorrect angle | Reduced oven spring, flat profile | Hold blade at 30–45° for optimal lift |
| Multiple overlapping cuts | Structural weakness, early collapse | One decisive cut per slash |
Step-by-Step Guide to Preventing Collapse
Follow this sequence to minimize the risk of oven collapse and maximize structural integrity:
- Start with an active starter. Feed 6–8 hours before mixing. It should double in size and pass the float test reliably.
- Mix and autolyse. Combine flour and water, rest 30–60 minutes before adding salt and starter. This improves gluten development.
- Bulk ferment with folds. Perform 3–4 sets of stretch-and-folds during the first half of bulk fermentation to build strength.
- Shape with tension. Pre-shape, rest 20–30 minutes, then final shape. Rotate the dough on the counter to create tight surface tension.
- Proof properly. Use a banneton and refrigerate overnight if possible. If room-temperature proofing, aim for 1.5x volume increase.
- Preheat thoroughly. Heat oven and baking vessel (Dutch oven or combo cooker) for at least 45 minutes at 450–475°F (230–245°C).
- Score confidently. Use a sharp blade at a low angle. One clean cut per slash.
- Bake with steam. Trap steam in a covered pot for the first 20 minutes, then uncover to finish crisping the crust.
This method builds resilience at every stage, ensuring the dough can withstand the stress of oven spring.
Real Example: From Collapse to Confidence
Marie, a home baker in Portland, struggled for months with collapsing batards. Her loaves would rise beautifully in the oven—then sink dramatically by the 12-minute mark. She adjusted hydration, changed flours, and experimented with starters, but the problem persisted.
After reviewing her process, she realized her final proofing was too long. Living in a warm apartment (75°F), her dough was fully proofed in 3.5 hours—but she was leaving it for 5. By then, the gluten had begun to break down. She also discovered she was using a dull blade, causing her scores to tear rather than slice.
She made two changes: reduced final proof to 3.5 hours and began chilling the dough for 15 minutes before scoring. She also replaced her blade weekly. The next bake produced a loaf with a dramatic ear, even oven spring, and no collapse. “I finally understood it wasn’t one big mistake,” she said. “It was two small ones combining to ruin everything.”
Essential Checklist for Collapse-Free Sourdough
Use this checklist before every bake to catch potential issues early:
- ✅ Starter is ripe, bubbly, and at peak volume
- ✅ Bulk fermentation shows 1.5x rise with visible bubbles
- ✅ Dough feels elastic and holds shape after poke test
- ✅ Final proof stops at 1.5x volume (or use cold retard)
- ✅ Surface tension is tight after shaping (dough pulls back slightly when touched)
- ✅ Blade is razor-sharp and chilled dough is easier to score
- ✅ Oven and baking vessel are preheated for at least 45 minutes
- ✅ Steam is trapped for first 20 minutes of bake
Frequently Asked Questions
Can I rescue a collapsing loaf once it starts deflating?
No. Once structural failure begins in the oven, it cannot be reversed. However, you can learn from it. Note the proofing time, scoring depth, and dough feel to adjust future bakes.
Does high hydration always lead to collapse?
Not necessarily. High hydration (78–85%) requires stronger gluten development through proper kneading, folding, and maturation. Many artisan loaves exceed 80% hydration successfully. The key is building strength to support the extra water.
Why did my loaf rise in the oven but still end up dense?
This suggests the oven spring was strong but the internal structure collapsed afterward. Likely causes include over-proofing, insufficient gluten development, or opening the oven too early, which releases steam and halts expansion.
Final Thoughts: Building Resilience, One Loaf at a Time
Sourdough baking is equal parts science and intuition. A collapsing loaf isn’t a sign of failure—it’s feedback. Each bake teaches you more about your environment, ingredients, and technique. The goal isn’t perfection, but progress.
By refining your proofing discipline, mastering scoring precision, and reinforcing dough strength, you’ll transform unpredictable results into consistent success. Remember: every expert baker once watched their loaf fall apart in the oven. What matters is that they kept going.


 浙公网安备
33010002000092号
浙公网安备
33010002000092号 浙B2-20120091-4
Comments
No comments yet. Why don't you start the discussion?