
Photographing trees can be unexpectedly challenging. What appears majestic and dimensional in person often ends up looking flat, lifeless, or two-dimensional in a photo. This isn’t due to poor photography skills alone—it’s frequently a matter of lighting direction, contrast, and the absence of visual cues that signal depth. Understanding how light interacts with form allows photographers and hobbyists alike to transform a dull image into one that breathes with texture, volume, and realism.
The illusion of depth in photography relies on shadows, highlights, perspective, and tonal variation. Trees, with their complex branching structures and layered foliage, are especially sensitive to lighting angles. When lit from the front without variation, they lose dimension. But when illuminated strategically, even a single tree can become a compelling subject full of drama and spatial presence.
Understanding Why Trees Look Flat
A flat appearance occurs when there's minimal contrast between the front and back surfaces of an object. In the case of trees, this typically happens under three conditions: frontal lighting, overcast skies, or midday sun directly overhead. These lighting scenarios eliminate shadows and gradients that help the human eye perceive depth.
Frontal lighting—when the light source is near the camera—illuminates the closest parts of the tree uniformly while casting shadows behind it, out of view. Without visible shadow lines across the trunk or within the canopy, surface contours disappear. The result is a silhouette-like shape lacking volume.
Overcast conditions diffuse sunlight so thoroughly that contrast drops across the entire scene. While soft lighting can be beneficial in portraits, it flattens textures in nature photography. Similarly, harsh overhead sun creates small, indistinct shadows beneath leaves and branches, failing to accentuate structure.
The Role of Light Direction in Creating Depth
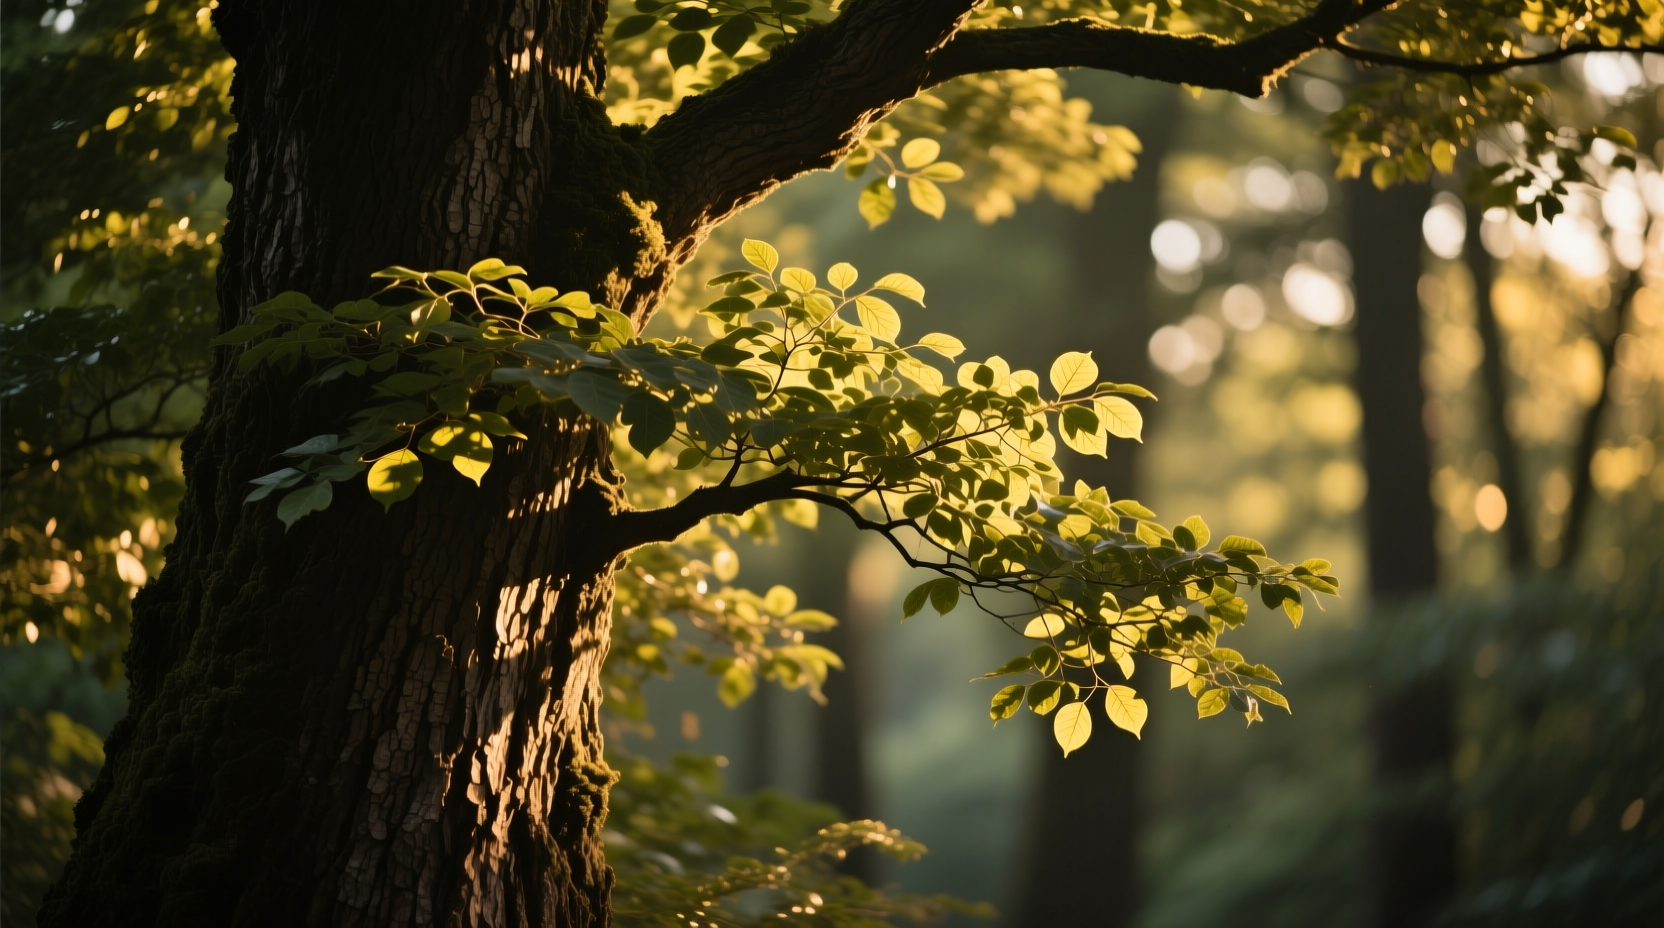
To restore dimension, you must reintroduce directional light that produces visible gradients across the tree’s surface. Side lighting is one of the most effective techniques. When light strikes the tree at a 45–90 degree angle relative to the camera, it casts shadows along one side of the trunk and branches while highlighting the other. These contrasting tones define form and suggest roundness.
Backlighting—placing the light source behind the tree—can also enhance depth by outlining edges with a rim of brightness. This separates the subject from the background and emphasizes layers within the foliage. Some leaves may glow translucently, adding visual complexity.
Top-down lighting, though less common, can work when combined with lower fill light. It mimics natural noon sunlight but risks creating unflattering “raccoon eyes” in dense canopies unless balanced properly.
“Light doesn’t just expose a subject—it sculpts it. A tree isn't just a shape; it’s a network of planes, curves, and voids waiting to be revealed.” — Daniel Reeves, Landscape Photographer & Educator
Strategic Lighting Placement: A Step-by-Step Guide
Whether you're working with natural light or supplemental sources like flashes or reflectors, the goal is to control where highlights and shadows fall. Follow this sequence to add depth deliberately:
- Assess the existing light. Determine its direction, intensity, and color temperature. Note where shadows currently lie on the tree.
- Reposition yourself or wait for optimal conditions. Move around the tree to find angles where side or backlighting naturally occurs. Early morning or late afternoon offers ideal directional sunlight.
- Introduce off-camera lighting if needed. Use a portable flash or continuous LED panel placed to the side or behind the tree. Keep power low to maintain naturalism.
- Bounce light into shadow areas. Deploy a reflector (white, silver, or gold) opposite your main light to soften deep shadows and preserve detail.
- Use flags or blockers to control spill. Prevent unwanted light from washing out background elements or filling critical shadows that contribute to depth.
- Review and refine. Zoom in on your LCD screen to check for tonal separation between trunk, branches, and background. Adjust positioning until depth becomes apparent.
This method works whether photographing urban street trees, forest specimens, or cultivated bonsai. The principles scale across environments.
Do’s and Don’ts of Tree Lighting
| Do | Don’t |
|---|---|
| Shoot during golden hour for warm, angled light | Photograph under harsh midday sun without diffusion |
| Use a polarizing filter to reduce glare and deepen greens | Rely solely on auto white balance in mixed lighting |
| Position lights to emphasize bark texture and branch layering | Place flash directly on-camera |
| Bracket exposures to capture highlight and shadow detail | Ignore the background—ensure it doesn’t compete with the tree |
| Use negative space to frame the tree and enhance depth perception | Crop too tightly—lose environmental context that aids depth |
Real Example: Transforming a Flat Oak Tree Photo
In suburban Chicago, amateur photographer Maria Lopez struggled to capture the grandeur of a 150-year-old bur oak in her backyard. Her initial shots taken at noon showed a dark, blob-like mass against a washed-out lawn. Despite the tree’s impressive size, it looked compressed and lacked presence.
She returned two days later at 6:15 PM, just after sunrise. The sun now hit the tree from the southeast, grazing its northwest side. Instantly, long shadows traced the furrows in the bark, and individual limbs cast distinct silhouettes across the trunk. By crouching low and using a slight wide-angle perspective, she exaggerated the foreground roots, enhancing depth through linear perspective.
Maria then used a white reflector propped on a stand to bounce light into the shadowed side of the trunk. This preserved detail without eliminating contrast. The final image displayed rich tonal variation—from deep blacks in recessed grooves to golden highlights on raised ridges—making the tree appear sculptural and grounded in space.
The difference wasn’t better equipment. It was smarter lighting placement.
Tools and Techniques for Controlled Environments
For studio-style tree photography—such as potted bonsai, fallen branches, or botanical studies—you have greater control over lighting setup. Consider these tools:
- Three-point lighting: Use a key light (main source), fill light (softens shadows), and backlight (adds separation).
- Gobos (go-betweens): Place patterned cutouts between light and subject to simulate dappled sunlight filtering through leaves above.
- Diffusers: Soften harsh lights to avoid hotspots while maintaining directional integrity.
- Colored gels: Introduce subtle warmth or coolness to evoke time of day or mood.
In controlled settings, experiment with cross-lighting—using two side lights from opposite directions. This reveals texture across broad surfaces and enhances three-dimensionality without flattening one side.
Frequently Asked Questions
Can I fix a flat-looking tree photo in post-processing?
Yes, to some extent. Software like Adobe Lightroom or Capture One allows you to enhance local contrast (clarity, texture), dodge and burn specific areas, and adjust gradient filters to simulate lighting direction. However, no amount of editing can fully replace missing shadow detail or recover blown-out highlights. It’s always better to get the lighting right in-camera.
What’s the best time of day to photograph trees for depth?
Golden hour—roughly the first and last 30 to 60 minutes of sunlight—is ideal. The low angle of the sun creates long, expressive shadows and strong side lighting. Blue hour can also work for dramatic silhouettes, especially in urban settings with ambient light.
Do different tree species respond differently to lighting techniques?
Yes. Trees with textured bark (like oaks or sycamores) benefit greatly from side lighting that emphasizes surface relief. Smooth-barked trees (such as birches) rely more on backlighting or rim lighting to create separation. Dense evergreens need careful exposure to retain detail in shadowed interiors, while deciduous trees in leaf show depth through layered branching patterns best revealed by angled light.
Checklist: Achieving Depth in Tree Photography
- ✅ Scout locations at different times to observe changing light patterns
- ✅ Arrive early to set up before optimal lighting windows
- ✅ Position yourself so light hits the tree at a side or oblique angle
- ✅ Use a reflector or fill flash to balance shadows without flattening contrast
- ✅ Check for edge definition—backlight should separate the tree from the background
- ✅ Shoot in RAW format to maximize post-processing flexibility
- ✅ Review histogram and zoom in to assess tonal range and sharpness
Conclusion: Bring Your Trees to Life
A tree is never just a static object—it’s a living sculpture shaped by wind, time, and light. When photographs fail to convey its depth, it’s often because we’ve overlooked how illumination defines form. By rethinking where light comes from and how it moves across bark, branches, and leaves, you unlock the hidden dimensionality in every tree.
You don’t need expensive gear or exotic locations. You need observation, patience, and intentionality in placing light. Whether harnessing the morning sun or shaping artificial beams, every decision about lighting alters perception. Start small: revisit a familiar tree at a new time of day. Notice how shadows shift and surfaces transform. With practice, you’ll see not just trees—but stories written in light and shadow.


 浙公网安备
33010002000092号
浙公网安备
33010002000092号 浙B2-20120091-4
Comments
No comments yet. Why don't you start the discussion?