
A vacuum cleaner that once effortlessly lifted dust and debris now struggles to pick up even light crumbs? You're not alone. Suction loss is one of the most common complaints among vacuum owners—yet it’s often preventable and almost always fixable. The good news: in most cases, weak suction isn’t a sign of permanent damage or the need for a costly replacement. More often than not, it stems from simple, overlooked issues like clogs, dirty filters, or worn parts. Understanding the root causes and knowing how to address them can save time, money, and frustration. This guide breaks down the top reasons behind suction loss and provides practical, step-by-step solutions you can perform at home with minimal tools.
Common Causes of Vacuum Suction Loss
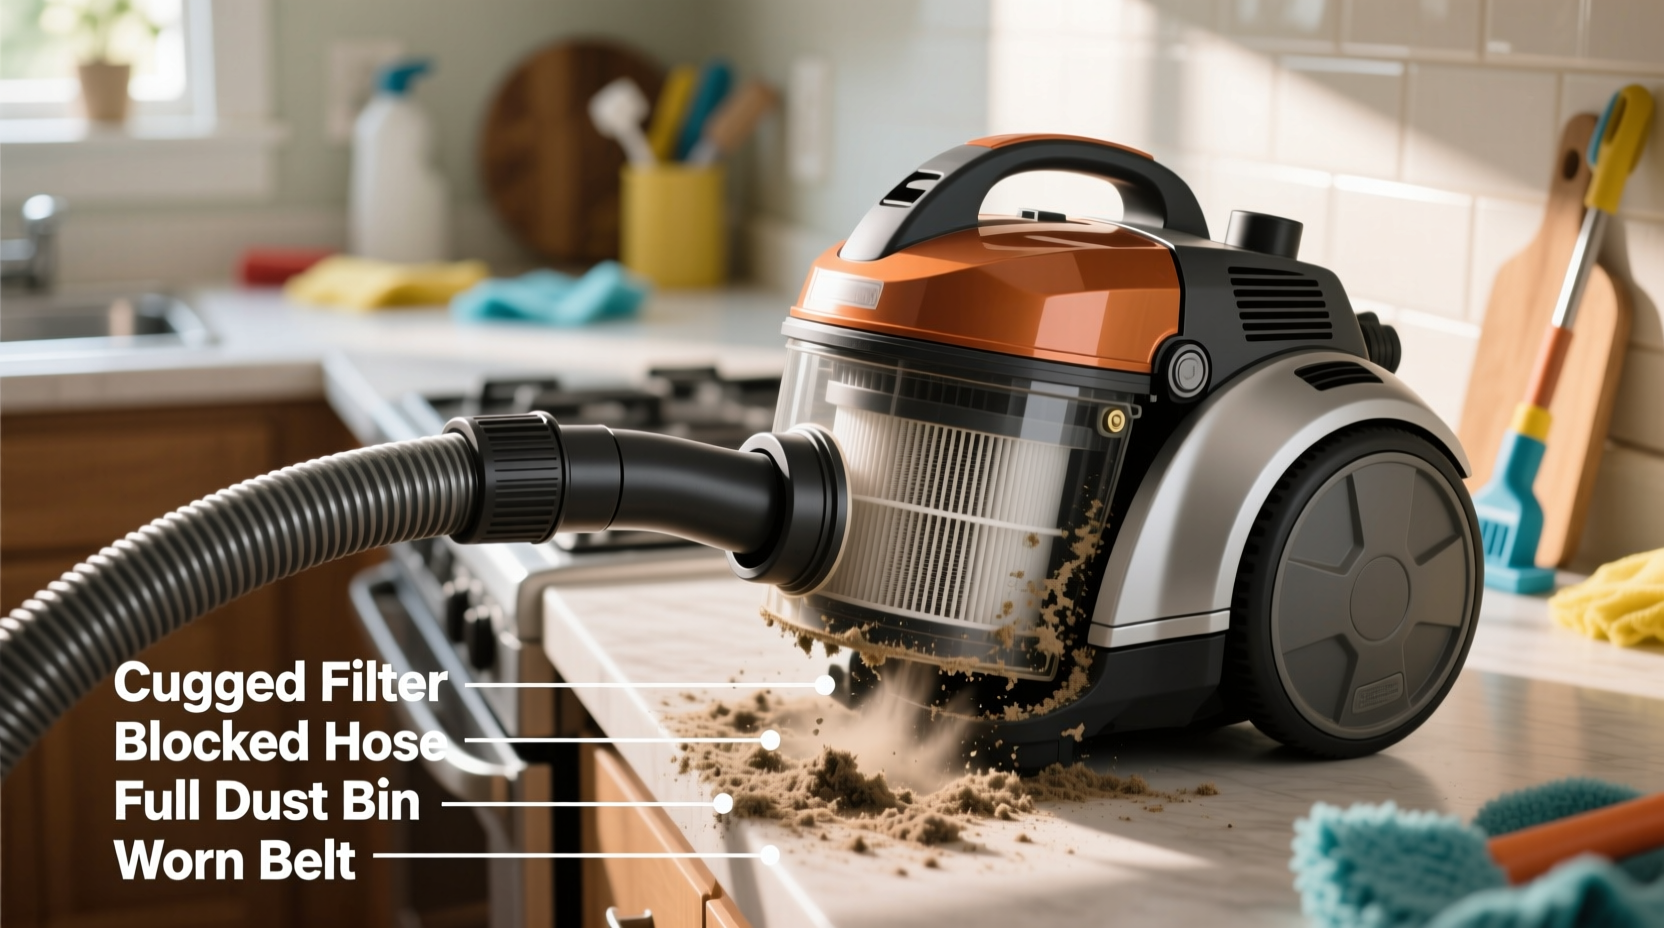
Vacuum suction depends on a well-sealed airflow system. When air can't move efficiently from the brush roll through the hose and into the dustbin or bag, performance drops dramatically. Several mechanical and maintenance-related factors disrupt this flow:
- Clogged hoses or attachments: Hair, string, and debris accumulate over time, especially in wand tubes and crevice tools.
- Full dustbin or bag: A full container restricts airflow, reducing suction immediately.
- Damaged or dirty filters: HEPA or foam filters trap fine dust but lose efficiency when clogged or improperly maintained.
- Blocked brush roll: Yarn, pet hair, or thread wrapped around the roller prevents proper agitation and pickup.
- Cracked housing or leaks: Gaps in the vacuum body, hose connections, or seals allow air to escape instead of creating suction.
- Worn motor or belt: Over time, internal components degrade, especially if the vacuum runs hot due to blockages.
Identifying which factor applies to your situation is the first step toward restoring peak performance.
Step-by-Step Guide to Diagnose and Fix Suction Issues
Follow this logical sequence to pinpoint and resolve the cause of weak suction. Most fixes take less than 30 minutes and require only basic household tools.
- Empty the dustbin or replace the bag. Even if it looks half-full, fine dust can compact and restrict airflow. Remove the bin or bag entirely and rinse it (if washable) with warm water. Let it dry completely—moisture reduces suction and can damage motors.
- Inspect the filter(s). Most vacuums have at least one pre-motor and one post-motor filter. Check your manual for location and type. If the filter is gray or dark brown, it needs cleaning. Foam filters can be rinsed and air-dried; HEPA filters may require gentle tapping or replacement every 6–12 months.
- Check for hose obstructions. Detach the hose from both ends. Shine a flashlight through one end. If you can't see light, there's a blockage. Use a long, flexible object (like a coat hanger with cloth wrapped on the end) to dislodge debris. Alternatively, blow air through the hose using a leaf blower or compressed air.
- Examine the brush roll. Flip the vacuum over and remove the soleplate. Cut away any hair or fibers wrapped around the roller with scissors. Spin the brush by hand—it should turn freely. If it's stiff or makes noise, the bearings may be worn and need replacement.
- Look for air leaks. Inspect all joints: where the hose meets the body, the wand connects to the handle, and around the dustbin. Run your hand near seams while the vacuum is running. If you feel air escaping, tighten fittings or replace cracked parts.
- Test suction at each stage. After each fix, turn the vacuum on and test suction directly at the hose end. Improved airflow indicates you’ve resolved the issue.
This systematic approach eliminates guesswork and ensures no component is overlooked.
Do’s and Don’ts When Maintaining Vacuum Suction
| Do | Don’t |
|---|---|
| Empty the dustbin after every few uses | Wait until the bin is completely full |
| Clean filters monthly (or as recommended) | Run the vacuum with a wet or damp filter |
| Use manufacturer-approved replacement parts | Install generic bags or filters that don’t fit snugly |
| Store the vacuum upright with cord neatly wrapped | Leave the hose kinked or under heavy objects |
| Replace belts every 6–12 months with regular use | Ignore squeaking or burning smells during operation |
Following best practices significantly extends the life of your vacuum and maintains consistent performance.
Real-World Example: How Sarah Fixed Her Dyson in 20 Minutes
Sarah, a pet owner in Portland, noticed her Dyson V8 was struggling to clean her hardwood floors. Despite frequent use, it left behind fine dust and couldn’t pick up small litter pieces. She assumed the battery was failing. Instead of buying a new model, she followed a basic troubleshooting checklist.
First, she emptied the bin—even though it looked only two-thirds full. Next, she removed the HEPA filter and found it coated in fine cat litter dust. After rinsing and drying it overnight, she reassembled the unit. Still, suction felt weak. Then she detached the wand and discovered a wad of fur blocking the elbow joint. Using a bent wire, she cleared the obstruction. On her next test, the vacuum picked up everything in one pass.
Sarah saved over $300 by avoiding an unnecessary replacement—all because she addressed three simple maintenance oversights.
“Over 70% of suction problems we see in service centers are caused by user-maintainable issues like clogs and dirty filters—not hardware failure.” — Mark Reynolds, Certified Appliance Technician with 15 years of experience
Essential Maintenance Checklist for Peak Vacuum Performance
Prevention is far more effective than repair. Use this monthly checklist to keep your vacuum running at full strength:
- ✅ Empty dustbin or replace bag
- ✅ Rinse foam pre-filter and let dry 24 hours
- ✅ Tap out or replace HEPA filter
- ✅ Inspect hose and wand for clogs
- ✅ Clear brush roll of hair and debris
- ✅ Check for cracks or loose connections in housing
- ✅ Verify belt tension (for upright models)
- ✅ Wipe down exterior and charging contacts (cordless models)
Set a recurring calendar reminder to ensure consistency. A few minutes of care each month can extend your vacuum’s lifespan by several years.
Frequently Asked Questions
Why does my vacuum lose suction even after emptying the bin?
Emptying the bin is just one part of the equation. Hidden clogs in the hose, wand, or internal ducts can still block airflow. Additionally, a dirty filter—especially a clogged HEPA filter—can severely reduce suction even with a clean bin. Always check both the airflow path and filtration system if suction remains weak.
Can a bad motor cause suction loss?
Yes, but it’s rare unless other symptoms are present. Signs of motor failure include unusual noises (grinding, screeching), burning smells, or complete loss of power. More commonly, motors overheat due to restricted airflow from clogs or dirty filters. Resolving those issues often restores normal function and prevents further strain on the motor.
How often should I replace my vacuum’s belt?
For upright vacuums with rotating brushes, replace the belt every 6 to 12 months with regular use. If you notice the brush roll isn’t spinning, leaves streaks on carpet, or emits a rubbery smell when running, the belt may be stretched or broken and should be replaced immediately.
Conclusion: Restore Power and Extend Your Vacuum’s Life
Losing suction doesn’t mean your vacuum has reached the end of its life. In nearly every case, the issue traces back to a manageable problem—clogs, dirty filters, or minor wear—that you can fix yourself. By understanding how your vacuum’s airflow system works and performing routine checks, you maintain strong cleaning power and avoid premature replacements. Simple habits like emptying the bin promptly, cleaning filters regularly, and inspecting for blockages pay off in longevity and performance. Your vacuum works hard for you; returning the favor with basic care ensures it keeps delivering results for years to come.


 浙公网安备
33010002000092号
浙公网安备
33010002000092号 浙B2-20120091-4
Comments
No comments yet. Why don't you start the discussion?