
When half your kitchen recessed lights dim and die while the pendant over the island stays bright—or when the living room track lights flicker off but the hallway sconces remain steady—it’s more than an inconvenience. It’s a signal. This isn’t random failure; it’s a diagnostic clue pointing to a specific circuit-level issue. Unlike a single-bulb burnout or a tripped main breaker, a localized outage reveals how your home’s electrical system is segmented—and where stress, aging, or miswiring has taken hold. Understanding why only *one section* fails—while adjacent circuits function normally—is the first step toward a permanent fix, not just temporary patching. This article walks through real-world causes, safe verification methods, and actionable diagnostics you can perform without opening panels (unless you’re qualified), grounded in National Electrical Code principles and field experience from licensed residential electricians.
Understanding Circuit Segmentation: Why “Sections” Exist
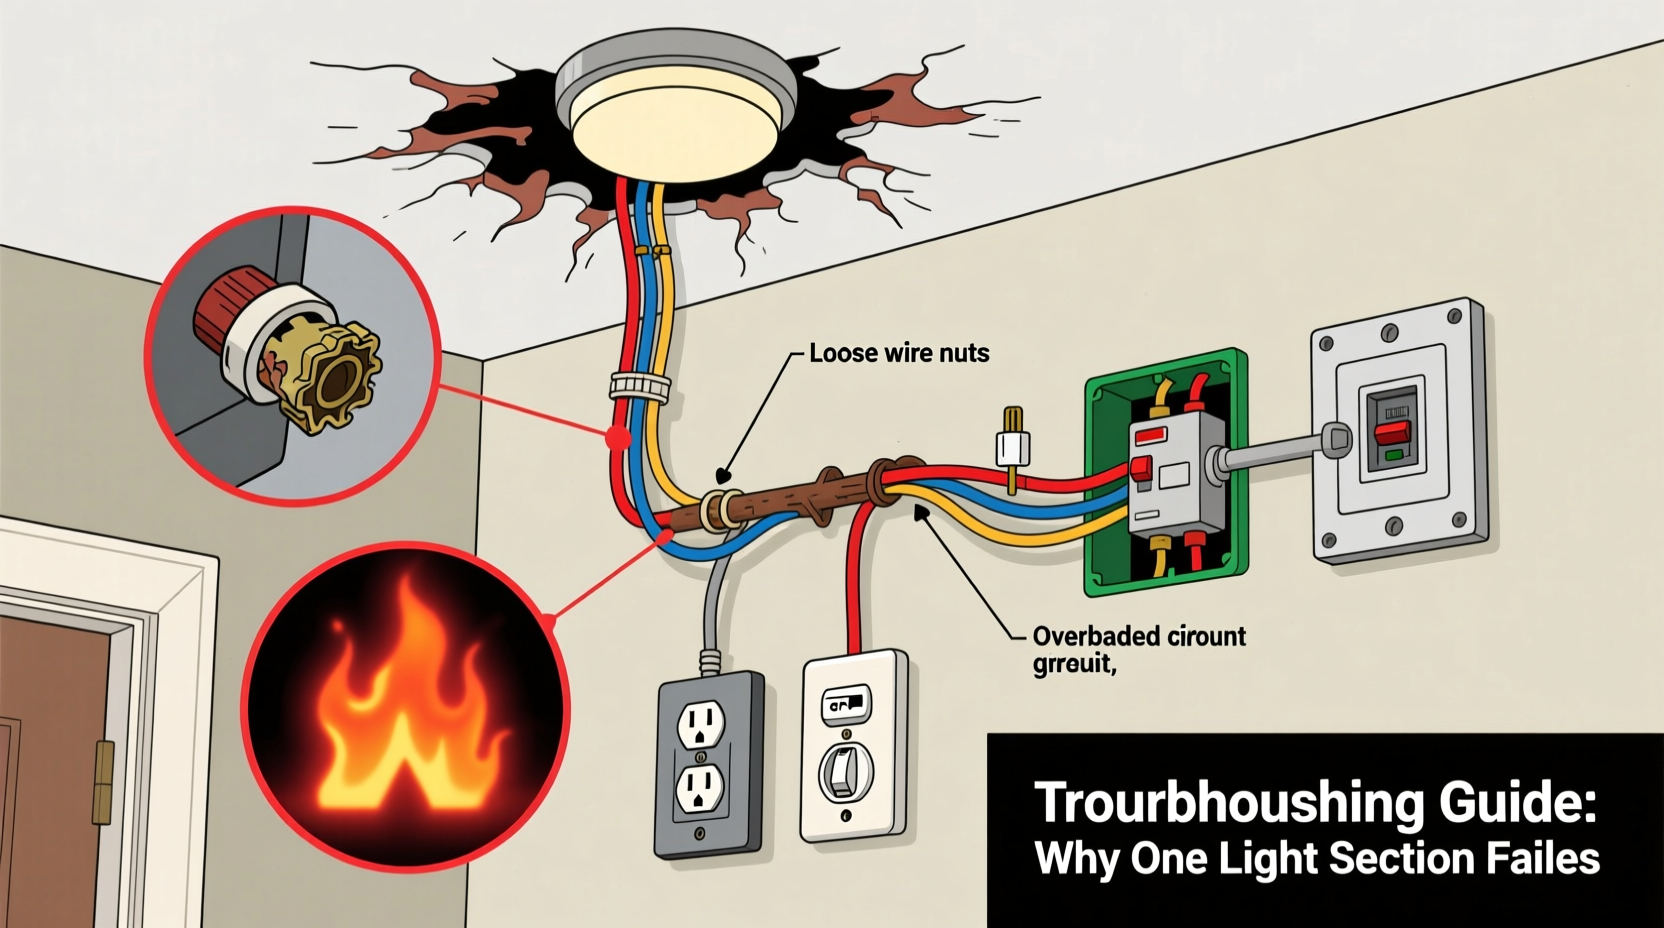
Your home’s lighting isn’t wired as one continuous loop. It’s divided into discrete branch circuits—each protected by its own circuit breaker (or fuse) and typically serving a logical zone: upper-floor bedrooms, garage + exterior lights, kitchen + dining, etc. This segmentation serves two critical purposes: safety (limiting fault current) and functionality (preventing total darkness during a single fault). When only *part* of your lighting goes dark, it almost always means the affected fixtures share a common circuit path—and something along that path has failed. That path includes the breaker, the hot and neutral conductors, wire connections (splices, pigtails, terminal screws), switches, junction boxes, and even the fixture sockets themselves.
Crucially, this isn’t about bulb quality or age. If all bulbs in the dark section are new and identical to those working elsewhere, the problem lies upstream—in the wiring, protection device, or control point. Most homeowners assume “the breaker must be tripped,” but breakers rarely trip partially or intermittently without cause. A breaker that trips repeatedly on the same circuit signals overload, short circuit, or ground fault—not random behavior.
Top 5 Causes—and How to Confirm Each
Below are the most frequent, field-verified reasons for partial lighting outages, ranked by likelihood and severity. Each includes a safe verification method and tells you whether it’s a DIY check or requires professional intervention.
1. Tripped or Failing Circuit Breaker
A breaker may appear “on” but internally be in a tripped or degraded state—especially if it’s old (20+ years), frequently overloaded, or exposed to heat. Thermal-magnetic breakers can develop internal resistance, causing intermittent trips under load. The giveaway? The breaker handle feels loose, wobbles, or doesn’t snap firmly into the “ON” position. Or, the outage occurs only when high-wattage appliances (microwave, toaster oven) run nearby.
Safe verification: Turn the suspect breaker fully OFF, then back ON with firm pressure. Listen for a distinct “click.” Then, test lights. If they return briefly but fade within minutes—or fail again after turning on another load—the breaker is likely failing and must be replaced by a licensed electrician.
2. Loose or Corroded Neutral Connection
This is the most dangerous and commonly overlooked cause. In multi-wire branch circuits (MWBCs)—common in kitchens and older homes—two hot wires share one neutral. If that shared neutral becomes loose at the panel, a junction box, or a switch, voltage imbalances occur. Lights on one leg may dim or go out entirely while those on the other leg glow abnormally bright (risking bulb burnout or fire). You might also notice buzzing from outlets or warm faceplates.
Warning: Neutral faults require immediate professional attention. Do not attempt to tighten neutrals in your panel unless certified. An open neutral can send 240V across 120V devices, destroying electronics and creating shock hazards.
3. Failed Switch or Dimmer
Three-way and four-way switching systems (e.g., stairwell lights controlled from top and bottom) rely on precise traveler wire continuity. A worn-out switch mechanism, carbon tracking inside a dimmer, or overheated terminals can interrupt power to only the downstream fixtures—even if the switch appears functional. This is especially common with LED-compatible dimmers installed before 2018, which often lack adequate low-load handling.
Safe verification: Turn OFF the circuit at the breaker. Remove the switch plate. Check for discoloration, melting, or burnt odor. With power OFF, gently wiggle the switch—does it feel gritty or loose? If yes, replacement is needed. For dimmers, confirm compatibility with your bulb type and wattage load (many require a minimum 25W load; modern LEDs often draw <10W).
4. Degraded Wire Splice or Backstabbed Outlet
Older homes frequently use “backstab” connections—where wires are pushed into spring-clamp holes on the back of outlets instead of wrapped around screws. These loosen over time due to thermal cycling, causing arcing, heat buildup, and intermittent loss of power to downstream outlets and lights. Similarly, wire nuts in junction boxes can oxidize or loosen, especially if oversized or improperly twisted.
Safe verification: Identify the last working outlet or light before the outage. That device likely feeds the dead section. With power OFF, inspect its connections. If wires are backstabbed, replace the outlet with a screw-terminal model and rewire using pigtail connections. If wire nuts show green corrosion or feel loose, cut and restrip the wires, then secure with new UL-listed wire connectors.
5. Fixture Socket or Internal Wiring Failure
Recessed “can” lights contain thermal protectors that shut off power if insulation contacts the housing or airflow is blocked. Track lighting heads develop cracked solder joints. Vintage fixtures have brittle insulation that cracks and shorts when jostled. And LED retrofit kits sometimes fail at the driver board—not the diodes—causing cascading shutdowns if wired in series.
Safe verification: Swap a known-good bulb from a working section into a dead fixture. If it still doesn’t light, the socket or internal wiring is suspect. For recessed lights, ensure at least 3 inches of clearance above the can and no insulation packed directly against it. For track systems, try moving a working head to the dead section’s position—if it works there, the track conductor is fine; if not, the track itself has a break.
Diagnostic Checklist: What to Do First (Before Calling an Electrician)
Follow this sequence—strictly in order—to isolate the issue efficiently and avoid unnecessary service calls:
- Confirm the scope: Note exactly which lights are out—and which remain on. Are they all on the same wall? Same ceiling plane? Controlled by the same switch?
- Check the breaker: Go to your panel. Is the handle in the full “ON” position? Does it feel spongy or resist snapping? Flip it OFF/ON firmly.
- Test voltage (if equipped): Using a non-contact voltage tester, verify power reaches the first fixture in the dead chain. Test both hot and neutral terminals (with power ON, carefully). No hot = upstream issue. Hot present but light off = fixture or socket issue.
- Inspect switches: Operate every switch controlling the dead lights—including three-way partners. Listen for crackling. Feel for warmth after operation.
- Examine accessible junctions: Check ceiling fan boxes, switch boxes, and any visible junction boxes between working and dead lights for scorch marks, melted plastic, or loose wires.
- Rule out GFCI/AFCI: Press the “TEST” button on every GFCI outlet in the house—even in bathrooms or garages. Reset if tripped. AFCI breakers may trip silently; check their status indicators.
Real-World Case Study: The “Half-Kitchen” Outage
In a 1992 split-level home in Portland, OR, the homeowner reported that only the five recessed lights over the kitchen counter went dark—while the island pendant, under-cabinet strips, and dining chandelier remained fully operational. The breaker appeared normal, and all bulbs were new LEDs. A licensed electrician began by mapping: the counter lights shared a 15A breaker labeled “Kitchen Lights.” Voltage testing at the first can showed 120V hot—but zero volts at the second can’s input. Tracing the cable path, he found a junction box behind the refrigerator where a previous owner had spliced the circuit using undersized wire nuts and no strain relief. Moisture from the fridge’s condensation line had corroded the neutral connection. The hot wire remained intact, explaining why voltage was present—but without a complete circuit, no current flowed. After cleaning terminals, replacing connectors, and sealing the box with silicone, the lights restored full function. Crucially, the neutral was not just loose—it was carrying elevated resistance, heating the box to 140°F. Left unaddressed, this would have ignited surrounding wood framing within months.
Do’s and Don’ts: Critical Safety & Effectiveness Guidelines
| Action | Do | Don’t |
|---|---|---|
| Breaker Testing | Turn OFF completely before resetting. Use insulated tools. Verify with voltage tester after. | Tap or force a breaker handle. Assume “on” means functional. |
| Switch Replacement | Turn OFF circuit AND verify with tester. Match amperage/voltage ratings. Tighten screws to 18 in-lbs. | Replace a 15A switch with a 20A unit. Ignore grounding requirements. |
| Wire Connections | Use screw terminals over backstabs. Twist wires clockwise before nutting. Wrap nuts with electrical tape. | Double-tap a breaker terminal. Use aluminum wire with copper-rated devices. |
| LED Compatibility | Verify dimmer supports your bulb’s wattage and protocol (ELV, MLV, TRIAC). Add a bypass capacitor if required. | Assume “dimmable” LED = compatible with any dimmer. Ignore minimum load specs. |
| Panel Work | Hire a licensed electrician for neutral checks, bus bar inspection, or breaker replacement. | Touch neutral bars or bus stabs—even with breaker OFF. Assume the main disconnect kills all power. |
Expert Insight: What Professionals See Most Often
“Over 60% of partial lighting failures I diagnose stem from two things: deteriorated backstab connections in outlets feeding lighting circuits, and thermal degradation in dimmers paired with low-wattage LEDs. Homeowners replace bulbs obsessively but never look behind the switch plate. The real fix is usually a $3 outlet and a $12 dimmer—not a $300 panel upgrade.” — Carlos Mendez, Master Electrician, NECA Certified, 22 years residential service
FAQ: Frequently Asked Questions
Can a bad light bulb cause multiple fixtures to go out?
No—unless they’re wired in series (extremely rare in residential AC lighting). Modern homes use parallel wiring. A single dead bulb affects only itself. If multiple lights fail simultaneously, the cause is upstream: switch, breaker, splice, or shared neutral.
Why do the lights sometimes come back on after waiting 10–15 minutes?
This points strongly to thermal protection. Recessed lights shut off when overheated (often due to insulation contact or poor ventilation). Older dimmers or failing breakers also heat up under load, trip thermally, then reset as they cool. This delay is a red flag—not a quirk.
Is it safe to replace a breaker myself?
No. Panel work involves lethal voltages even with main power off (due to utility feed). Bus bars remain live. Improper torque or mismatched breakers can cause arc flash, fire, or void insurance. Only licensed electricians should install or replace breakers.
Conclusion: Take Control—Safely and Strategically
A partial lighting outage isn’t just an annoyance—it’s your home’s electrical system speaking in code. That one dark section holds precise information about where resistance has built up, where connections have fatigued, or where design assumptions no longer match modern loads. By approaching it methodically—mapping circuits, verifying breakers, inspecting accessible junctions, and respecting the limits of DIY—you transform confusion into clarity. You avoid costly misdiagnoses, prevent escalation to hazardous conditions, and extend the safe service life of your entire system. Most importantly, you reclaim agency: knowing when a flicker is trivial and when it’s urgent, when to grab a screwdriver and when to call a professional. Start today—not with a ladder, but with your breaker panel and a notepad. Label every circuit. Test one switch. Tighten one connection. Small actions, grounded in understanding, build lasting safety and reliability.


 浙公网安备
33010002000092号
浙公网安备
33010002000092号 浙B2-20120091-4
Comments
No comments yet. Why don't you start the discussion?