
It’s a familiar scenario: you walk into a room and notice a puddle forming near your air conditioner. Water dripping from your AC unit indoors isn’t just inconvenient—it can lead to water damage, mold growth, and costly repairs if ignored. While some AC issues require professional help, many causes of indoor water leaks are simple to diagnose and fix on your own. Understanding why your AC is leaking water—and how to respond—can save time, money, and stress.
Air conditioners naturally produce condensation as they cool the air. This moisture typically drains safely out of your home through a designated condensate line. But when that system fails or becomes compromised, water ends up where it shouldn’t be—on your floor, ceiling, or walls. The good news? Most indoor AC leaks stem from preventable or easily repairable issues.
How Air Conditioners Produce Condensation
To understand why leaks happen, it helps to know how the cooling process works. As warm indoor air passes over the cold evaporator coils inside your AC unit, moisture in the air condenses into liquid form—much like water droplets form on the outside of a cold glass. This condensation collects on the coils and drips into a drain pan, which channels the water through a PVC pipe (the condensate drain line) and safely out of your home.
The entire drainage system relies on gravity and proper maintenance. When any part of this system gets blocked, damaged, or misaligned, water backs up and spills into your living space. Common trouble spots include clogged drain lines, dirty filters, frozen coils, or a cracked drain pan.
Common Causes of Indoor AC Water Leaks
Not all leaks are created equal. The location and timing of the leak often point to the root cause. Here are the most frequent culprits behind indoor AC water dripping:
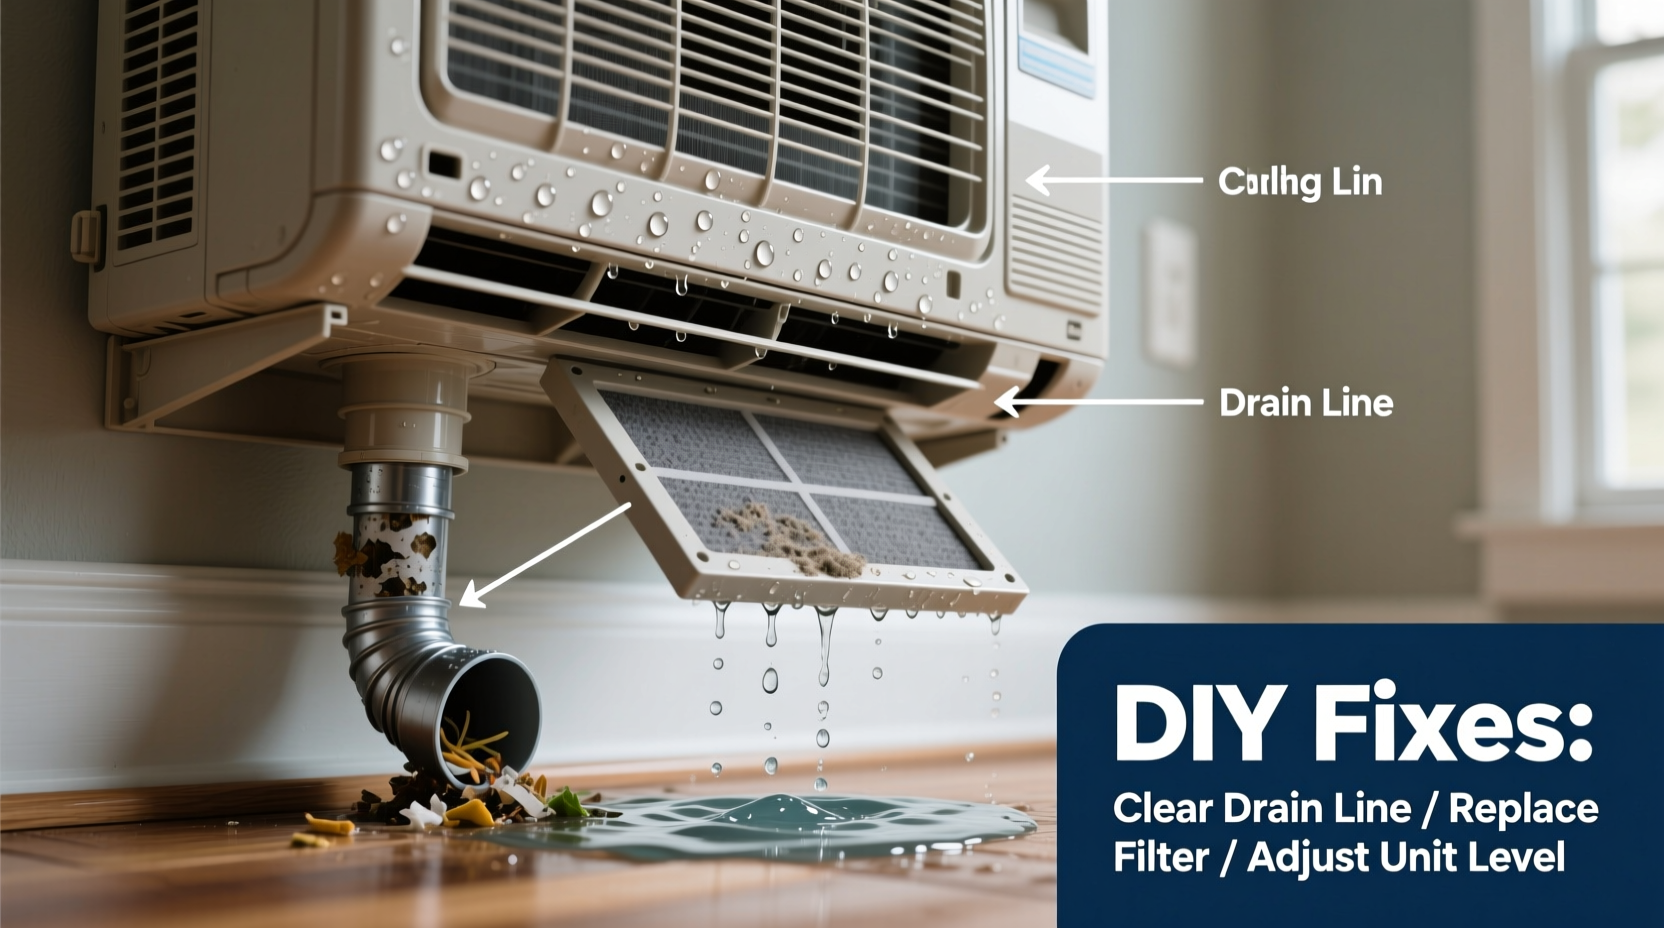
1. Clogged Condensate Drain Line
This is the number one reason for indoor AC leaks. Over time, algae, mold, dust, and debris accumulate inside the drain line, restricting or completely blocking water flow. When the line is clogged, water backs up into the drain pan and eventually overflows into your home.
2. Dirty Air Filter
A neglected air filter restricts airflow across the evaporator coils. Without sufficient airflow, the coils become too cold and freeze over. Once the ice melts—often during a system shutdown—the excess water overwhelms the drain pan, causing leakage. A dirty filter also reduces efficiency and increases energy bills.
3. Damaged or Cracked Drain Pan
The drain pan, usually made of metal or plastic, sits beneath the evaporator coils to catch condensation. Over time, especially in older units, the pan can corrode, crack, or warp. Even a small crack can allow water to escape before it reaches the drain line.
4. Frozen Evaporator Coils
Frozen coils are both a cause and a symptom of underlying issues. Low refrigerant levels, poor airflow (from dirty filters or blocked vents), or mechanical failures can cause the coils to freeze. When the ice thaws, more water than normal enters the drain system, leading to overflow.
5. Improper Installation or Unit Tilt
AC units must be installed with a slight backward tilt (toward the exterior for window units, or toward the drain for central systems). If the unit is level or tilted inward, water cannot drain properly and may pool inside. This is especially common with window-mounted ACs after seasonal installation.
6. Pump Failure (in High-Rise or Baseline Units)
In homes where gravity drainage isn’t possible, a condensate pump is used to push water upward and out. If the pump fails or its float switch gets stuck, water accumulates and spills into the surrounding area.
“Over 70% of service calls for indoor AC leaks are due to clogged drain lines or neglected filters—both easily preventable with routine maintenance.” — James Rutherford, HVAC Technician with 18 years of field experience
Detailed DIY Fixes You Can Try Today
Before calling a technician, try these practical solutions. Many of them take less than 30 minutes and require only basic tools.
Step-by-Step: Clearing a Clogged Drain Line
- Turn off the power to your AC unit at the thermostat and circuit breaker.
- Locate the condensate drain line—usually a white PVC pipe near the indoor air handler.
- Disconnect the line from the unit (use a towel to catch residual water).
- Use a wet/dry vacuum to suction out the blockage. Attach the vacuum hose securely to the pipe and run for 30 seconds.
- Alternatively, flush the line with a mixture of 1 cup distilled vinegar and 1 cup warm water. Let it sit for 30 minutes to dissolve algae and sludge.
- Reconnect the line and restore power.
- Test the system by running the AC and checking for proper drainage.
Replacing or Cleaning the Air Filter
Check your air filter monthly during peak cooling season. If it looks dark gray or feels clogged, replace it. For reusable filters, wash gently with mild soap and water, then let dry completely before reinstalling. Use the correct size and type specified in your unit’s manual.
Inspecting and Cleaning the Drain Pan
After turning off the power, remove access panels to expose the drain pan. Look for cracks, rust, or standing water. Clean the pan with a soft brush and a solution of vinegar and water. If the pan is damaged, consider replacing it—most pans are inexpensive and model-specific.
Checking Unit Level (for Window ACs)
Use a carpenter’s level to verify your window unit is tilted slightly outward (about ¼ inch from back to front). This ensures water drains outside. Adjust the support brackets or shims under the unit as needed. Never seal the back of the unit completely—some airflow is necessary for drainage.
Testing the Condensate Pump
If your system uses a pump, unplug it and remove the cover. Check for debris in the reservoir. Manually lift the float switch—if the pump doesn’t activate, it may need replacement. Refill the reservoir with water to test operation after cleaning.
DIY Maintenance Checklist to Prevent Future Leaks
- ✅ Replace or clean air filter every 1–3 months
- ✅ Flush condensate drain line with vinegar quarterly
- ✅ Inspect drain pan for cracks or corrosion twice a year
- ✅ Verify proper unit tilt (especially window ACs) before each season
- ✅ Check refrigerant lines for ice buildup during operation
- ✅ Test condensate pump function annually
- ✅ Schedule professional HVAC inspection once per year
| Issue | DIY Fixable? | Tools Needed | Time Required |
|---|---|---|---|
| Clogged drain line | Yes | Vacuum, vinegar, screwdriver | 20–30 minutes |
| Dirty air filter | Yes | Replacement filter or sink | 5 minutes |
| Cracked drain pan | Sometimes | Wrench, new pan | 30–60 minutes |
| Frozen evaporator coils | Diagnose only | None (wait for thaw) | Several hours |
| Low refrigerant | No | Professional required | N/A |
| Failed condensate pump | Yes | Screwdriver, multimeter | 30 minutes |
Real-World Example: How One Homeowner Fixed a Persistent Leak
Sarah, a homeowner in Austin, Texas, noticed water pooling beneath her upstairs air handler every time she ran the AC. She initially assumed the unit was old and needed replacement. Instead, she followed a step-by-step diagnostic process: first changing the filter (which was heavily caked with dust), then checking the drain line.
Using a shop vac, she cleared a thick sludge from the condensate pipe. After flushing it with vinegar, she monitored the system. The leak stopped immediately. Later, an HVAC technician confirmed that low airflow from the dirty filter had led to minor coil freezing, which worsened the drainage issue. With regular filter changes and biannual line cleaning, Sarah has had no further problems—saving over $500 in potential service fees.
Frequently Asked Questions
Is it safe to run my AC if it’s leaking water?
No. Continued operation can lead to electrical hazards, water damage, or mold growth. Turn off the unit and investigate the cause. If you suspect frozen coils, turn off the cooling function but leave the fan on to help melt ice safely.
Can I use bleach to clean the drain line?
Yes, but sparingly. A diluted bleach solution (1/4 cup bleach per gallon of water) can sanitize the line and kill algae. However, frequent use may degrade PVC over time. Vinegar is a gentler, eco-friendly alternative for routine maintenance.
Why does my window AC only leak when it’s hot outside?
Higher temperatures increase humidity and condensation. If your drain path is partially blocked or the unit isn’t tilted correctly, the increased water volume can overwhelm the system. It’s a sign that preventive maintenance is overdue.
When to Call a Professional
While many leaks are DIY-friendly, certain issues require expert attention. Call a licensed HVAC technician if you encounter:
- Visible refrigerant leaks (hisssing sounds or oily residue)
- Recurring clogs despite regular cleaning
- Electrical issues with the condensate pump
- Signs of mold in ductwork or insulation
- Unusual noises or reduced cooling performance
Professionals have specialized tools like borescopes to inspect internal components and can perform pressure tests to detect refrigerant loss. They’ll also ensure your system complies with safety codes and operates efficiently.
Conclusion: Stay Cool and Leak-Free
An AC unit dripping water inside your home doesn’t have to mean disaster. In most cases, the cause is manageable with basic tools and a little know-how. By understanding how your cooling system handles condensation and taking proactive steps—like changing filters, clearing drain lines, and checking unit alignment—you can prevent most leaks before they start.
Regular maintenance not only stops water damage but also extends your AC’s lifespan, improves air quality, and lowers energy bills. Don’t wait for a flood to act. Take 30 minutes this weekend to inspect your unit. Your home—and wallet—will thank you.


 浙公网安备
33010002000092号
浙公网安备
33010002000092号 浙B2-20120091-4
Comments
No comments yet. Why don't you start the discussion?