
There’s nothing more disappointing than watching your bread rise beautifully through the viewing window—only to return later and find a sunken, dense mess. A collapsing loaf in the middle of the baking cycle isn’t just frustrating; it can make you question whether your bread machine is broken or if you’ve done something wrong. The truth is, this issue is common and almost always fixable. Understanding the science behind dough structure, yeast activity, and moisture balance allows you to diagnose and correct the problem with confidence.
Bread machine baking automates most steps, but it doesn’t eliminate the need for proper ingredient ratios, machine calibration, and environmental awareness. When a loaf collapses mid-bake, it typically means the internal structure couldn’t support itself during the final expansion phase. This article breaks down the root causes and provides actionable solutions so you can consistently produce tall, golden, and airy homemade bread.
Understanding Why Bread Machine Loaves Collapse Mid-Bake
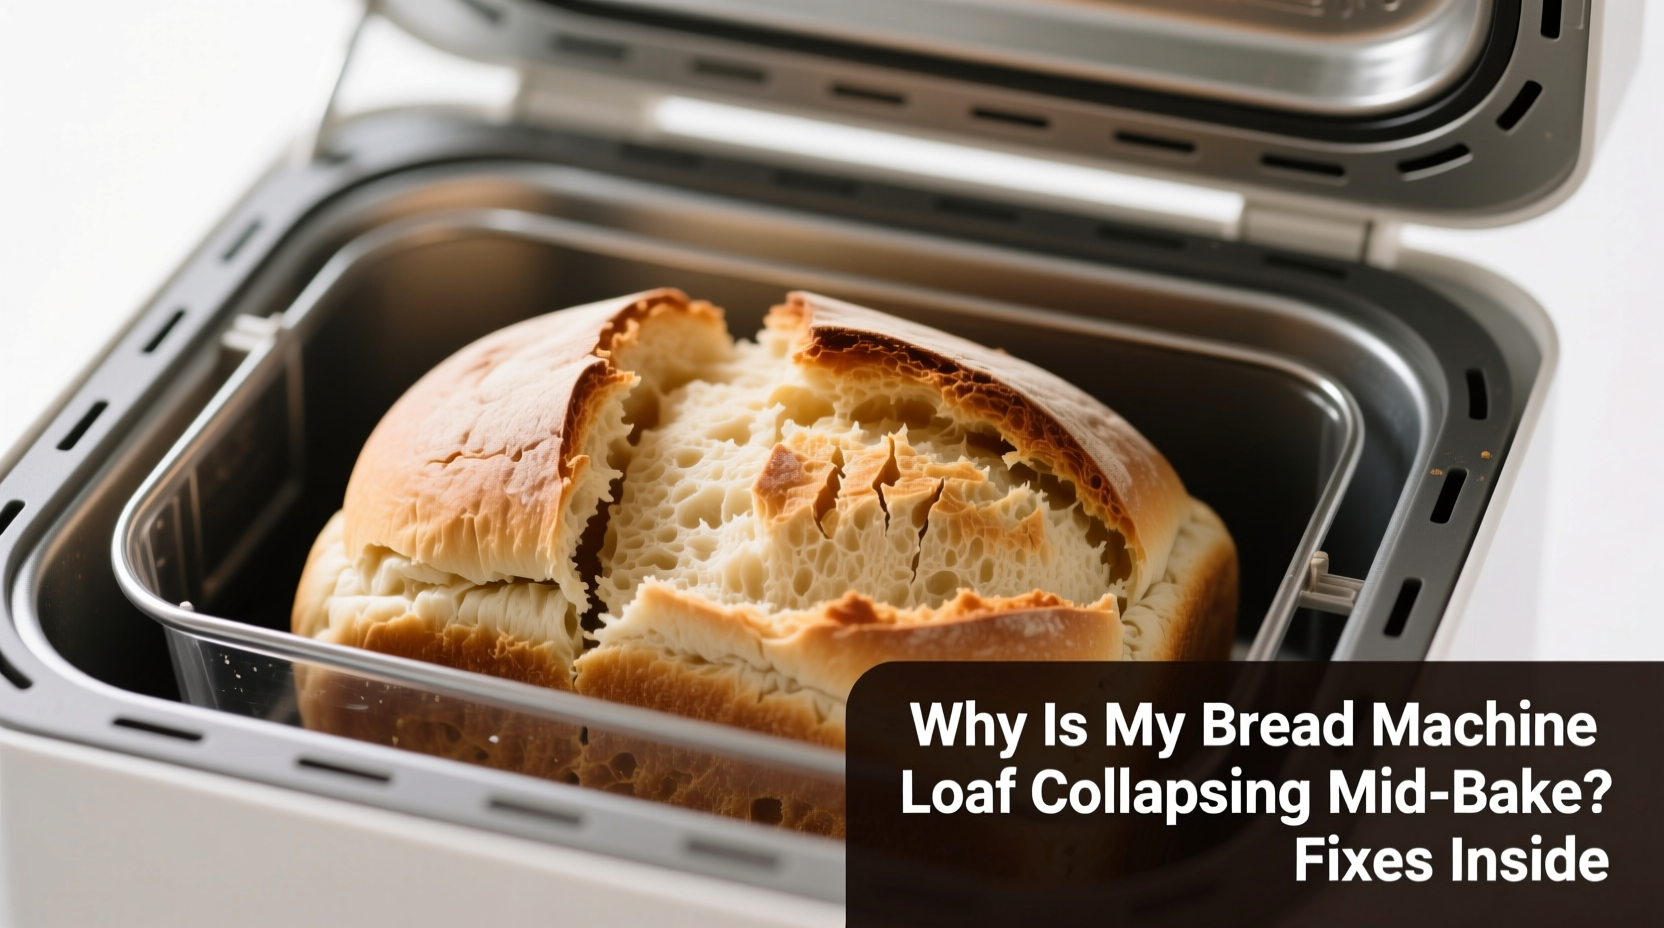
A collapsing loaf usually occurs during the second rise or early baking phase when steam and heat cause the dough to expand rapidly. If the gluten network is weak, the crust forms too late, or excess gas builds up, the loaf may rise too quickly and then cave in under its own weight. Unlike oven-baked bread, where you can adjust temperature or add steam manually, bread machines operate on fixed cycles. That makes precision in ingredients and settings even more critical.
The main factors contributing to collapse include:
- Excess moisture – Too much liquid prevents proper gluten development and leads to a soggy, unstable crumb.
- Overactive yeast – Too much yeast or warm ingredients can trigger rapid fermentation, causing over-proofing before baking begins.
- Weak flour – All-purpose flour lacks sufficient protein for strong gluten formation compared to bread flour.
- Inaccurate measuring – Volume-based measuring (cups) often results in inconsistent flour-to-liquid ratios.
- Old or degraded ingredients – Expired yeast or rancid flour compromise dough strength.
- Machine-specific quirks – Some models have uneven heating elements or poorly timed kneading phases.
Addressing these issues systematically increases your chances of success. Let’s explore each factor in depth and how to correct it.
Common Causes and Practical Fixes
1. Moisture Imbalance: Too Much Liquid
One of the most frequent culprits behind collapsed loaves is excessive water or milk. While hydration is essential for gluten development, too much liquid creates a slack dough that expands uncontrollably and then collapses. Bread machines use sealed environments, so moisture doesn’t evaporate as it would in an oven. Even a quarter-cup extra can destabilize the entire structure.
To fix this:
- Use chilled liquids instead of room temperature ones—they slow fermentation and prevent premature rising.
- Measure liquids precisely using a clear measuring cup at eye level.
- If your kitchen is humid, reduce liquid slightly since flour absorbs ambient moisture.
2. Flour Type and Quality Matter
All-purpose flour typically contains 10–11% protein, while bread flour has 12–14%. Higher protein means more gluten, which gives dough the elasticity to trap gas and maintain shape. Using all-purpose flour may work for quick mixes but often fails under prolonged fermentation cycles.
“Switching from all-purpose to bread flour improved my loaf height by nearly 30%—no other changes.” — Mark Reynolds, Home Baker & Kitchen Science Enthusiast
For best results:
- Replace at least half of the all-purpose flour with bread flour.
- Consider adding vital wheat gluten (½ to 1 tsp per cup of flour) for extra lift.
- Store flour in airtight containers away from light and heat to preserve freshness.
3. Yeast Overactivity and Timing Issues
Instant yeast is convenient, but overdosing—even by half a teaspoon—can cause explosive fermentation. Combine that with warm tap water or butter straight from the fridge, and your dough might peak before the bake cycle starts.
Solution: Use the exact amount specified in your machine’s manual. Most standard 1.5-lb loaf recipes require only 1½ to 2 teaspoons of instant yeast. Also, ensure ingredients are cool (not cold) when added. Warmth accelerates yeast activity, especially in machines with preheat functions.
4. Improper Ingredient Order
Bread machines rely on a specific loading sequence to prevent yeast from contacting liquid too soon. The general rule: liquids first, then dry ingredients, with yeast placed last in a small well on top of the flour.
If yeast touches water prematurely, it activates early, leading to over-proofing. Always follow your manufacturer’s recommended order—usually outlined on the lid or in the manual.
Do’s and Don’ts: Quick Reference Table
| Action | Do | Don't |
|---|---|---|
| Liquid Measurement | Use precise measuring tools; start with slightly less | Estimate by pouring freely or use warm liquids |
| Flour Choice | Use bread flour or blend with vital wheat gluten | Rely solely on low-protein cake or all-purpose flour |
| Yeast Handling | Place yeast in a dry well on top of flour | Mix yeast directly into water or milk |
| Cycle Selection | Choose “basic” or “wheat” based on dough type | Use “rapid” cycle for heavy whole grain recipes |
| Storage | Keep yeast and flour sealed and cool | Leave ingredients in open bags near stove or sink |
Step-by-Step Guide to Prevent Collapsing Loaves
Follow this systematic approach to troubleshoot and perfect your bread machine baking process:
- Check Expiry Dates: Verify that your yeast is fresh (within 6 months of opening if refrigerated). Test it by mixing ½ tsp yeast, 1 tsp sugar, and ¼ cup warm water. It should foam within 10 minutes.
- Weigh Ingredients: Use a kitchen scale for accuracy. Standard 1.5-lb loaf ratios:
- Flour: 3½ cups (about 420g)
- Liquid: 1¼ cups (300ml)
- Yeast: 1½ tsp (7g)
- Salt: 1½ tsp
- Sugar/Fat: As per recipe, but limit to 2 tbsp each unless making sweet bread.
- Load Correctly: Pour milk or water into the pan first. Add flour until it covers the liquid. Make a small indentation and add yeast. Then add salt, sugar, and butter/oil separately, keeping them away from yeast.
- Select Appropriate Cycle: Use “Basic” for white or enriched doughs. Choose “Whole Wheat” for denser blends. Avoid “Rapid” cycles unless your model compensates with stronger kneading.
- Monitor Early Rise: After 45 minutes, peek through the window. The dough should be smooth and rounded, not foamy or overflowing. If it’s already high, cancel and restart with cooler ingredients.
- Let It Cool Completely: Never remove bread immediately after baking. Trapped steam weakens structure. Wait at least 20–30 minutes before handling.
Real Example: Sarah’s Sourdough Starter Mishap
Sarah had been experimenting with sourdough in her bread machine. She replaced commercial yeast with active starter and increased hydration for an artisanal texture. On her third attempt, the loaf rose dramatically halfway through baking—then deflated into a pancake-shaped mass.
After reviewing her process, she realized three mistakes: she used 100% starter by volume without adjusting flour, skipped salt (thinking it would harm the culture), and chose the “French” cycle, which has a longer proof time. The combination led to excessive acidity, poor structure, and over-proofing.
Her fix: She reduced starter to ½ cup, added back 1 tsp salt, compensated with extra flour, and switched to the “Basic” cycle. The next loaf rose evenly and held its shape—proving that even small imbalances can derail results.
Frequently Asked Questions
Can I open the lid during the cycle to check the dough?
Minimize opening the lid, especially during the first hour. Temperature drops can disrupt rising. If necessary, do it quickly and only after the first knead cycle completes.
Why does my loaf rise high but still collapse?
This usually indicates over-proofing or weak gluten. The dough expands beyond its structural limits and can’t sustain volume when exposed to heat. Reduce yeast, lower hydration, or switch to higher-protein flour.
Is there a difference between bread machine yeast and instant yeast?
No. Bread machine yeast is simply instant yeast labeled for marketing purposes. Regular instant yeast works perfectly. Active dry yeast can be used but may require slight adjustments in timing.
Final Checklist Before Baking
Run through this checklist every time you load the pan:
- ✅ Are all ingredients fresh and properly stored?
- ✅ Is the yeast foaming when tested (if uncertain)?
- ✅ Have I measured liquids and flour accurately (preferably by weight)?
- ✅ Am I using bread flour or a blend with vital wheat gluten?
- ✅ Did I place yeast on top of flour, isolated from liquids?
- ✅ Is the correct cycle selected for my recipe type?
- ✅ Has the machine been cleaned recently, especially around the heating element?
Conclusion: Bake with Confidence
A collapsing bread machine loaf doesn’t mean failure—it’s feedback. Each batch teaches you more about ingredient interactions, machine behavior, and environmental influences. By controlling moisture, selecting the right flour, managing yeast activity, and following precise procedures, you’ll transform inconsistent results into reliable success.
Don’t let one sunken loaf discourage you. Adjust one variable at a time, take notes, and track improvements. Soon, you’ll pull out perfectly domed, golden-crusted bread with a tender crumb—proof that patience and precision pay off.


 浙公网安备
33010002000092号
浙公网安备
33010002000092号 浙B2-20120091-4
Comments
No comments yet. Why don't you start the discussion?