
A well-seasoned cast iron skillet should be smooth, non-stick, and ready to sear, fry, or bake without food clinging to its surface. But if you’ve recently seasoned your pan only to find it tacky or sticky to the touch, you’re not alone. This frustrating issue affects both beginners and experienced cooks. The stickiness isn’t just unpleasant—it indicates a flawed seasoning layer that won’t protect your skillet or deliver reliable cooking performance.
The root causes are often simple: too much oil, improper heating, using the wrong type of fat, or skipping crucial cooling steps. Seasoning cast iron isn’t complicated, but it demands precision. When done incorrectly, polymerized oil can become gummy instead of hard and slick. Understanding where things go wrong—and how to fix them—is key to restoring your skillet’s integrity and achieving that coveted glass-like finish.
How Cast Iron Seasoning Works: The Science Behind the Shine
Seasoning is the process of baking a thin layer of oil onto cast iron at high heat until it undergoes polymerization—a chemical reaction that transforms liquid oil into a durable, plastic-like coating. This coating bonds to the metal, creating a natural non-stick surface that improves with use.
For this to work, three conditions must be met:
- Thin oil application: Excess oil cannot fully polymerize and instead pools, leading to sticky residue.
- Sufficient heat: Most oils require temperatures above 375°F (190°C) to begin polymerizing effectively.
- Oxygen control: While some oxygen is present in home ovens, minimizing exposure helps prevent incomplete curing.
When any of these factors are off, the result is a soft, sticky layer rather than a hard, slick one. Many people assume more oil equals better protection, but the opposite is true. A successful seasoning layer is nearly invisible—smooth, matte, and non-tacky.
“Less is more when it comes to oil. One micron-thin layer properly cured outperforms five thick, gummy coats.” — Dr. Rebecca Tran, Materials Scientist & Cookware Researcher, University of Illinois
Top 5 Reseasoning Errors That Cause Sticky Skillets
Mistakes during reseasoning are the most common reason for a sticky pan. Below are the top errors—and how to avoid them.
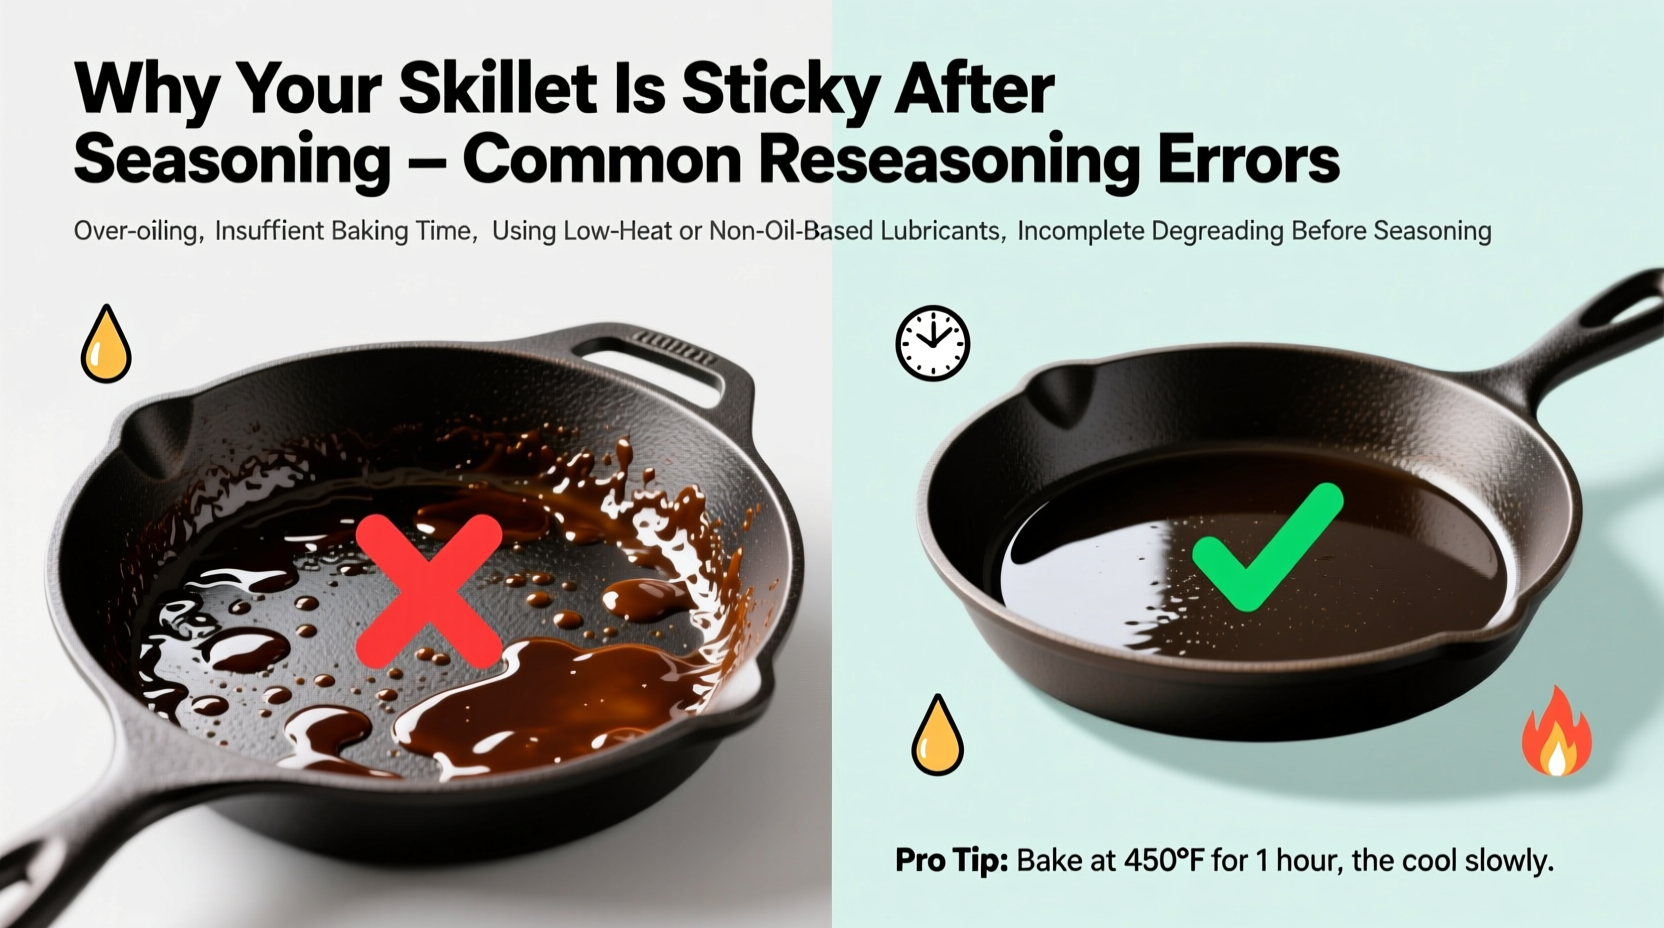
1. Applying Too Much Oil
This is the number one mistake. Pouring or brushing on a generous coat of oil may seem like reinforcing protection, but excess oil cannot fully polymerize. Instead, it carbonizes unevenly or remains semi-liquid, leaving behind a sticky film.
2. Using Oils with Low Smoke Points
Oils like olive oil, butter, or unrefined coconut oil break down before reaching polymerization temperature. They smoke early, burn quickly, and leave behind gummy residues rather than forming a stable layer.
Stick to high-smoke-point fats such as:
- Flaxseed oil (excellent but brittle over time)
- Grapeseed oil
- Crisco or vegetable shortening
- Canola oil
- Safflower oil
3. Inadequate Oven Temperature or Time
Some home cooks try to “save energy” by seasoning at lower temperatures or for shorter durations. However, seasoning requires sustained heat—at least 450–500°F (230–260°C)—for 1 hour to ensure full polymerization. Lower temps slow or halt the process, resulting in incomplete curing.
4. Skipping the Cooling Phase
Rushing to use the skillet immediately after removing it from the oven prevents the seasoning from fully hardening. As the pan cools slowly, the polymerized layer stabilizes. Opening the oven door too soon or placing the hot pan on a cold surface can cause microfractures in the seasoning.
5. Not Cleaning the Pan Properly Before Seasoning
If old seasoning is flaking, greasy, or contaminated with soap residue, new layers won’t adhere properly. A clean base is essential. Always strip and degrease the skillet before starting fresh.
Step-by-Step Guide to Fixing a Sticky Cast Iron Skillet
If your skillet feels sticky, don’t panic. The good news is that the damage is reversible. Follow this detailed process to remove the flawed seasoning and rebuild it correctly.
- Strip the Sticky Layer
Place the skillet upside down in a self-cleaning oven during the clean cycle, or use a lye-based oven cleaner in a well-ventilated area. Alternatively, heat it on the stovetop until smoking, then scrub with steel wool and hot water. Rinse and dry thoroughly. - Dry Completely
Heat the skillet on the stove over medium heat for 5–10 minutes until all moisture evaporates. Let it cool slightly. - Apply Oil Sparingly
Dab a few drops of high-smoke-point oil onto a paper towel. Wipe the entire surface—including handle and underside—with a thin, even layer. Immediately take a second clean towel and buff aggressively until no visible oil remains. - Bake Upside Down
Place the skillet upside down on the middle rack of your oven. Put a sheet of aluminum foil or a baking sheet on the lower rack to catch any drips. Bake at 475°F (245°C) for 1 hour. - Cool Gradually
Turn off the oven and let the skillet cool inside for 2–3 hours. Do not open the door. This allows the polymerized layer to stabilize. - Repeat if Necessary
Apply 2–3 additional thin layers, repeating steps 3–5. Each layer builds durability without risk of stickiness.
Do’s and Don’ts of Cast Iron Reseasoning
| Do’s | Don’ts |
|---|---|
| Use a high-smoke-point oil (e.g., canola, grapeseed) | Use olive oil, butter, or low-heat fats |
| Wipe oil on, then wipe it all off | Leave a visible oily film |
| Bake at 450–500°F for at least 1 hour | Bake below 400°F or for less than 45 minutes |
| Let the pan cool slowly in the oven | Remove the pan immediately and set on cold counter |
| Build multiple thin layers over time | Try to season in one thick coat |
| Store in a dry place with light oil coating | Store damp or uncovered in humid areas |
Real Example: How Sarah Fixed Her Sticky Skillet
Sarah, a home cook in Portland, repurposed her grandmother’s vintage cast iron skillet after finding it in the attic. Excited to restore it, she scrubbed it clean, applied a generous coat of olive oil, and baked it at 350°F for 45 minutes. When she pulled it out, the skillet looked dark and glossy—but felt sticky.
Every time she tried to cook, eggs stuck and cleanup became a chore. Frustrated, she researched the issue and realized her mistakes: olive oil has a low smoke point, 350°F wasn’t hot enough, and she’d used too much oil.
She stripped the pan using the oven’s self-clean cycle, then reseasoned it with Crisco shortening, wiping it down until nearly dry. She baked it at 475°F for an hour and let it cool overnight in the oven. After two more rounds, the skillet developed a smooth, non-stick surface. Now, she uses it weekly for pancakes, searing steaks, and even baking cornbread.
“It wasn’t the skillet that failed—it was my method. Once I learned to trust the process and use less oil, everything changed.” — Sarah M., Home Cook & Cast Iron Enthusiast
Frequently Asked Questions
Why does my skillet still feel sticky after cooling?
If the pan remains sticky after cooling, the oil didn’t fully polymerize. This usually means too much oil was applied, the temperature was too low, or the oil type wasn’t suitable. Strip the layer and reseason with a thinner coat and higher heat.
Can I fix a sticky skillet without an oven?
Yes. Heat the skillet on the stovetop over medium-high heat for 5–10 minutes to dry it completely. Apply a tiny amount of oil and buff until invisible. Then heat it upside down on the burner for 15–20 minutes until it smokes lightly. Let it cool naturally. Repeat 2–3 times. This method works best for maintenance, not full restoration.
How many seasoning layers do I need?
Most skillets perform excellently after 3–4 properly applied layers. Additional layers add durability but aren’t necessary for non-stick function. Focus on quality, not quantity.
Essential Checklist for Perfect Seasoning
Follow this checklist every time you reseason to ensure success:
- ☐ Clean and fully dry the skillet (no rust, grease, or residue)
- ☐ Choose a high-smoke-point oil or fat
- ☐ Apply oil with a paper towel, then buff until almost dry
- ☐ Place skillet upside down in oven
- ☐ Set oven to 475°F (245°C)
- ☐ Bake for 1 hour
- ☐ Turn off oven and let skillet cool inside for 2+ hours
- ☐ Test surface: should be smooth and non-tacky
- ☐ Repeat 2–3 times for optimal results
Conclusion: Building Confidence Through Consistency
A sticky cast iron skillet isn’t a lost cause—it’s a learning opportunity. The process of seasoning teaches patience, attention to detail, and respect for material science. By avoiding common pitfalls like over-oiling or under-heating, you reclaim the skillet’s potential and extend its lifespan for generations.
Great seasoning isn’t about speed or shortcuts. It’s built layer by thin layer, with care and consistency. Whether you’re reviving a family heirloom or maintaining a daily workhorse, the principles remain the same: less oil, proper heat, and time to cure.


 浙公网安备
33010002000092号
浙公网安备
33010002000092号 浙B2-20120091-4
Comments
No comments yet. Why don't you start the discussion?