
Peeling paint in ceiling corners isn't just an eyesore—it's a warning sign. Whether you're dealing with flaking edges above your kitchen cabinets or bubbling near the bathroom doorway, this common household issue often stems from either moisture intrusion or inadequate surface preparation. While it may seem minor, ignoring peeling paint can lead to structural damage, mold growth, and recurring cosmetic problems. Understanding the root cause is essential for a lasting repair. This guide breaks down the science behind paint failure, helps you identify whether humidity or poor prep is to blame, and walks you through effective solutions.
The Science Behind Paint Adhesion Failure
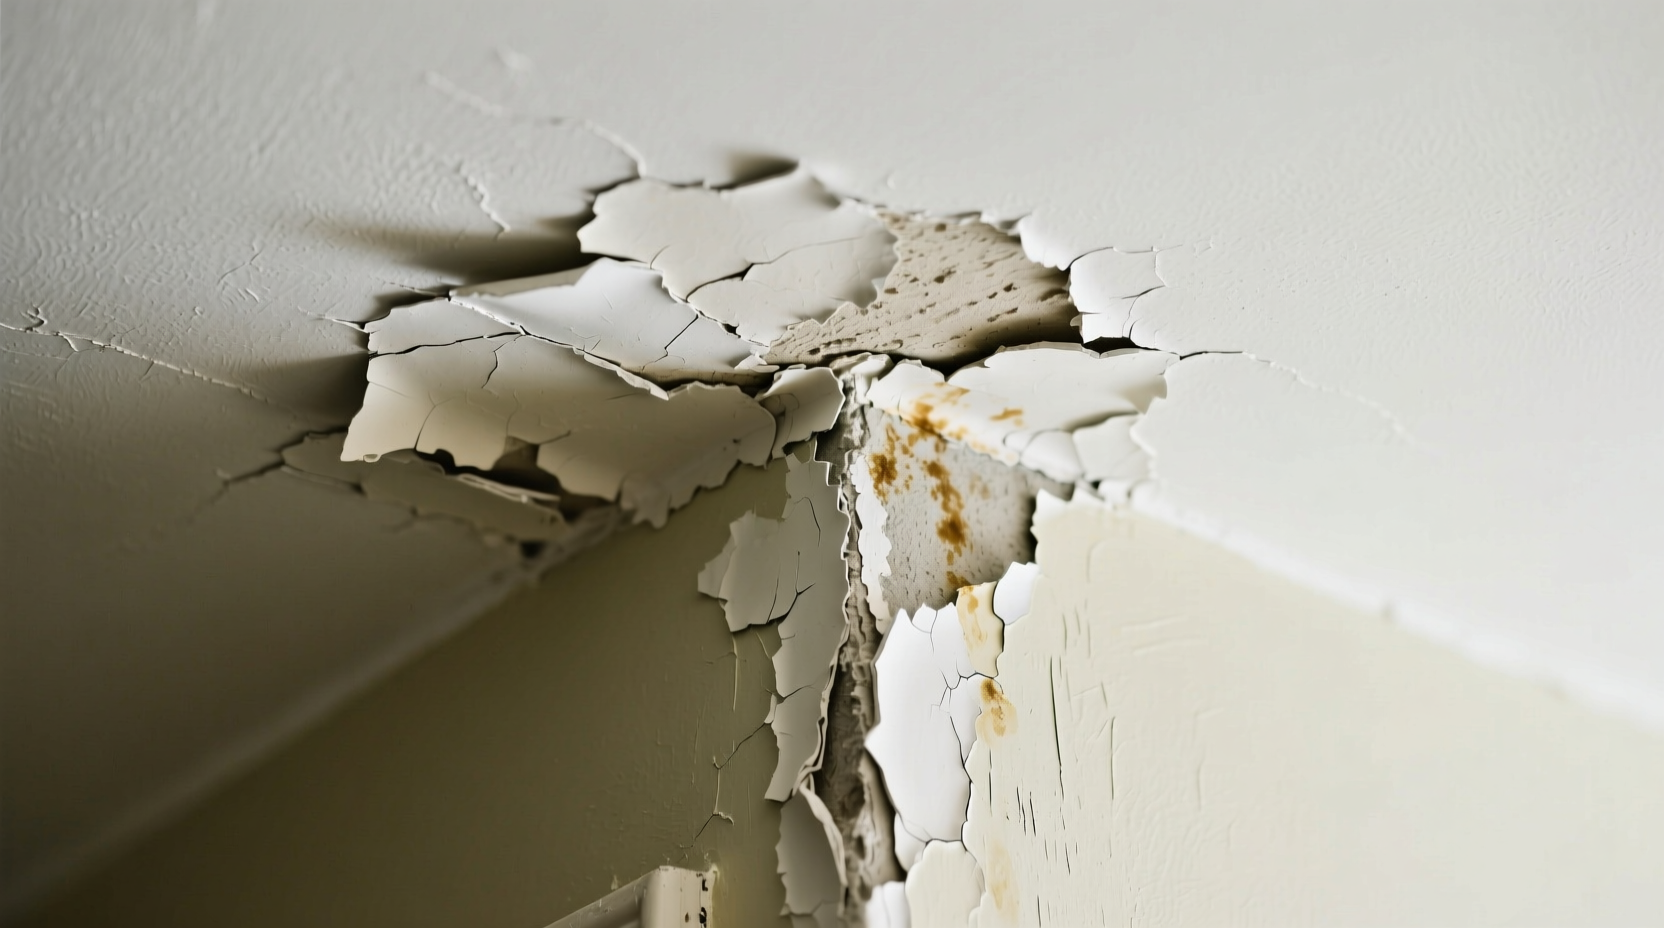
Premium paint doesn’t fail without reason. When paint begins to peel—especially in the corners where walls meet ceilings—it’s usually due to compromised adhesion. Paint adheres best to clean, dry, properly primed surfaces. In corners, multiple challenges converge: shadow areas that stay damp longer, junctions of different materials (drywall, wood trim, plaster), and reduced airflow. These factors make corners vulnerable to early coating breakdown.
Two primary culprits dominate: moisture and improper surface prep. But they aren’t mutually exclusive. In many cases, both are at play. Moisture weakens the bond between paint and substrate over time, while poor prep ensures that bond was never strong to begin with.
“Paint is only as good as the surface it’s applied to. A corner might look clean, but invisible contaminants like dust, grease, or residual joint compound can sabotage adhesion.” — James Ralston, Master Painter & Restoration Specialist
Humidity: The Silent Destroyer of Ceiling Paint
Excess indoor humidity is one of the most common reasons for paint peeling in ceiling corners, especially in kitchens, bathrooms, laundry rooms, and basements. Warm, moist air rises and accumulates at the ceiling level. In corners, where airflow is restricted, condensation forms more easily—particularly during temperature shifts.
When water vapor repeatedly condenses on a painted surface, it seeps beneath the paint film, causing it to swell, blister, and eventually detach. Over time, this process degrades the underlying drywall paper facing, weakening the entire system.
Signs Humidity Is the Culprit
- Peeling occurs near bathrooms, kitchens, or poorly ventilated rooms
- Visible water stains or yellowish discoloration around the peeling area
- Musty odor or presence of mold/mildew nearby
- Peeling worsens during winter when indoor humidity is higher
- Adjacent walls feel cool or slightly damp to the touch
How to Reduce Humidity Impact
- Install exhaust fans in bathrooms and kitchens, venting directly outdoors.
- Run fans during and 20 minutes after showers or cooking.
- Use a dehumidifier in basements or high-moisture zones.
- Ensure attic ventilation is adequate to prevent warm air buildup.
- Seal gaps around windows and doors to minimize cold spots that encourage condensation.
Poor Surface Preparation: The Hidden Flaw
Even in low-humidity environments, paint can peel if the surface wasn’t properly prepared before application. This is especially true in corners, which are often rushed during painting projects. Contractors may skip cleaning, sanding, or priming steps, assuming the drywall finish is “paint-ready.” But factory-applied finishes and joint compound residues can inhibit bonding.
Common prep mistakes include:
- Failing to clean dust and debris from corners after construction or repair
- Skipping primer on new drywall or patched areas
- Painting over grease, smoke residue, or old gloss finishes without deglossing
- Using low-adhesion paints (e.g., flat latex) on unsealed substrates
Without proper mechanical and chemical bonding, paint sits loosely on the surface. Over time, natural expansion and contraction from temperature changes stress the weak bond, leading to cracking and peeling—starting in the structurally weakest points: the corners.
Real Example: The Case of the New Construction Home
A homeowner in Portland noticed paint peeling in ceiling corners within six months of moving into a newly built house. No leaks were found, and humidity levels were normal. An inspection revealed that the drywall joints had been finished with heavy taping compound but never sanded smooth or primed before painting. The paint had adhered to a dusty, uneven layer of joint compound. Within months, micro-cracks formed, allowing ambient moisture to penetrate and lift the coating. The fix required sanding, priming with a bonding agent, and repainting—a costly correction that could have been avoided with proper prep.
Differentiating Between Humidity and Poor Prep
Telling the two causes apart requires observation and testing. Here’s a practical comparison to help determine the dominant factor:
| Factor | Humidity-Related Peeling | Poor Prep-Related Peeling |
|---|---|---|
| Location | Near bathrooms, kitchens, exterior walls | Random corners, even in dry rooms |
| Pattern | Bubbling, blistering, soft substrate | Crisp edges, paint lifts in sheets |
| Substrate Condition | Soft, discolored drywall; possible mold | Firm but dusty or powdery underneath |
| Timing | Worsens seasonally or after steam use | Appears soon after painting, regardless of season |
| Touch Test | Area feels cool or damp | Dry to touch, no moisture signs |
If both moisture and prep issues are present, addressing only one will result in temporary fixes. A comprehensive approach is necessary for long-term success.
Step-by-Step Repair Guide: Fix It Right the First Time
Whether the cause is humidity, poor prep, or both, follow this professional-grade repair process to restore your ceiling and prevent recurrence.
- Assess and Dry the Area: Confirm no active leaks. Use a fan or dehumidifier to dry the corner completely over 24–48 hours.
- Remove Loose Paint: Scrape away all peeling and bubbled paint using a 5-in-1 tool. Sand edges to create a feathered transition.
- Clean the Surface: Wipe with a TSP (trisodium phosphate) solution or degreaser to remove dust, grease, and contaminants. Rinse and let dry.
- Repair Substrate if Needed: If drywall is damaged, apply joint compound, let dry, then sand smooth. For persistent moisture, consider replacing with moisture-resistant drywall (green board).
- Prime with Bonding Agent: Apply a high-quality primer such as Zinsser Bullseye 1-2-3 or an oil-based bonding primer. This seals the surface and enhances adhesion.
- Paint with Mildewcide-Infused Paint: Use a premium ceiling paint with mildew resistance, especially in high-humidity areas. Apply two coats for durability.
- Improve Ventilation: Install or upgrade exhaust systems to reduce future moisture accumulation.
Prevention Checklist: Stop Peeling Before It Starts
To avoid future peeling, integrate these practices into your home maintenance routine:
- ✅ Clean ceiling corners annually with a damp cloth to remove dust and grime
- ✅ Prime all bare drywall, patches, and repairs before painting
- ✅ Use paint + primer combos or separate bonding primers in high-risk areas
- ✅ Ensure bathroom and kitchen exhaust fans are functional and vent outside
- ✅ Monitor indoor humidity with a smart hygrometer
- ✅ Avoid using non-breathable paints (e.g., vinyl) on ceilings in humid climates
- ✅ Insulate attic spaces properly to minimize condensation on ceiling joists
Frequently Asked Questions
Can I just paint over peeling corners?
No. Painting over loose or failing paint leads to premature re-peeling. You must remove all compromised coating, clean the surface, prime, and repaint. Skipping prep results in a short-lived fix and wasted materials.
Is peeling paint always a sign of a leak?
Not necessarily. While roof or plumbing leaks can cause peeling, chronic condensation from daily activities (showering, cooking) is a more common culprit. Check for stains, soft drywall, or dripping sounds to rule out leaks.
What type of paint should I use on ceilings in humid areas?
Choose a washable, mildew-resistant ceiling paint with a matte or ultra-flat finish. Brands like Benjamin Moore Aura Bath & Spa or Sherwin-Williams Duration Home offer formulations designed for high-moisture environments.
Conclusion: Take Action Before Minor Issues Become Major Repairs
Peeling ceiling paint in corners is more than a cosmetic flaw—it’s a symptom of deeper environmental or procedural issues. Whether driven by unchecked humidity or overlooked surface preparation, the solution lies in accurate diagnosis and thorough correction. By understanding the conditions that lead to paint failure, homeowners can make informed decisions that protect their interiors and extend the life of their finishes.
Don’t settle for quick fixes that fail within months. Invest time in proper drying, cleaning, priming, and ventilation. The result will be a seamless, durable ceiling that stands up to daily living and seasonal changes. Your home deserves more than a patchwork appearance—give it a foundation of quality craftsmanship.


 浙公网安备
33010002000092号
浙公网安备
33010002000092号 浙B2-20120091-4
Comments
No comments yet. Why don't you start the discussion?