
Every year, as December approaches, thousands of homeowners face the same quiet frustration: the lights stay dark. Not because the bulbs are burnt out or the outlet is dead—but because the timer refuses to activate. Whether it’s a sleek digital unit with an LCD screen or a vintage mechanical dial timer that’s been in your garage since 2003, failure to turn on isn’t random—it’s diagnostic. And most often, it’s fixable without calling an electrician or buying a replacement. This guide walks through the full spectrum of causes—not just the obvious ones—and delivers actionable, tested solutions grounded in electrical safety, device design, and real-world seasonal use patterns.
Understanding How Christmas Light Timers Actually Work
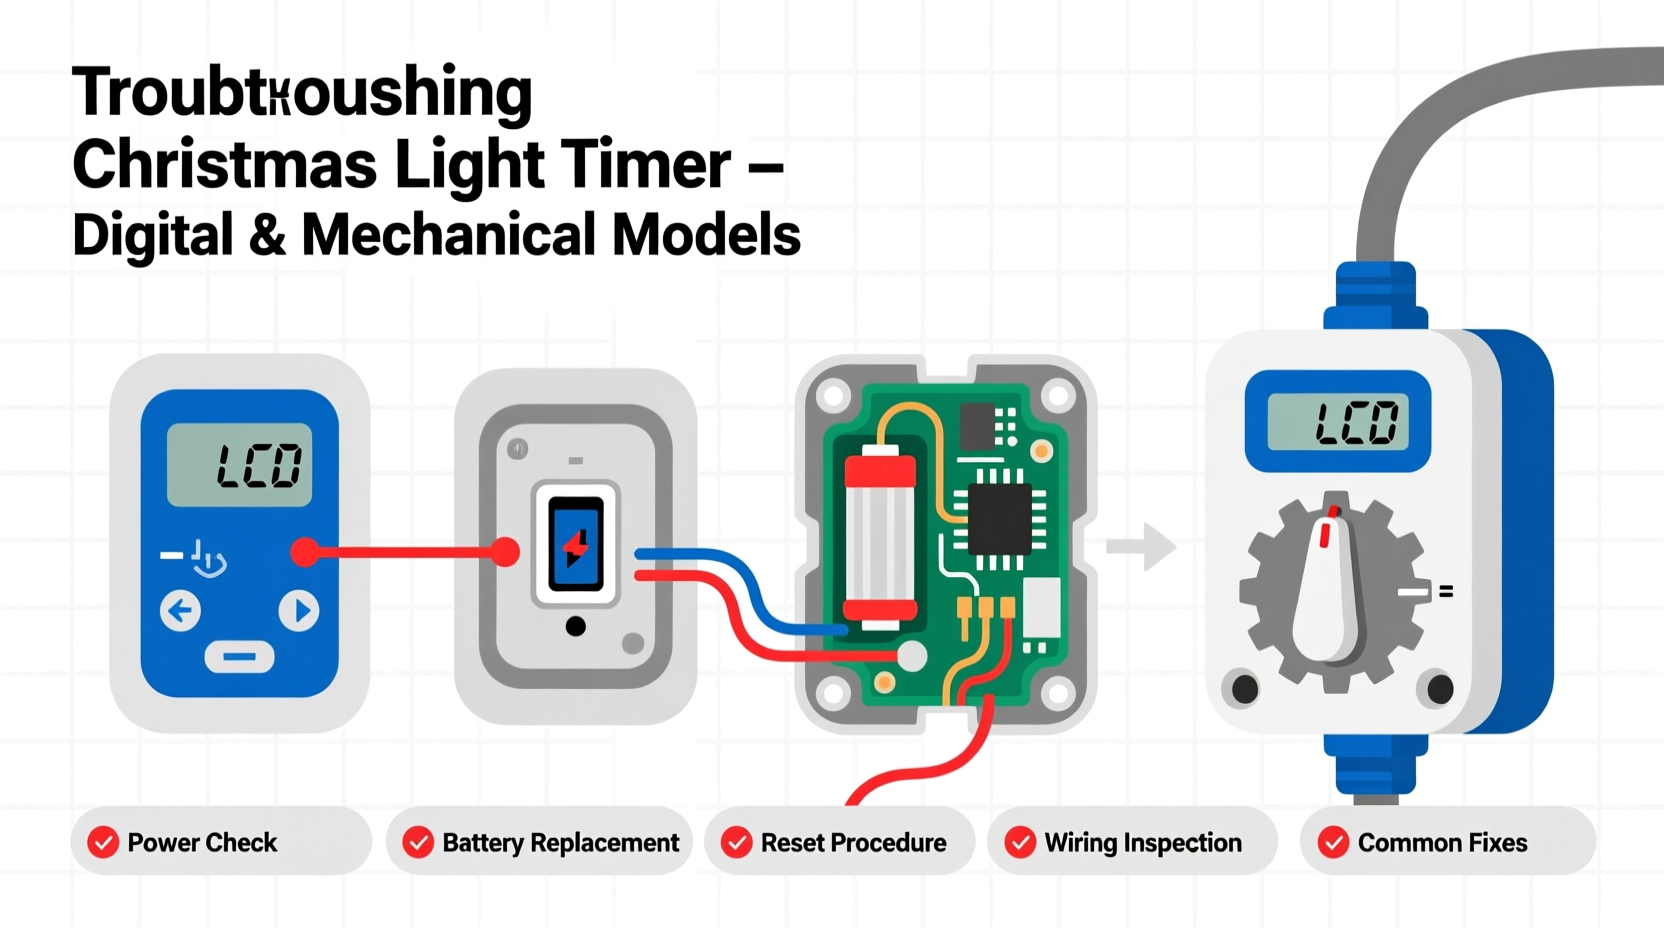
Before troubleshooting, it helps to understand what a timer does—and doesn’t do. A Christmas light timer is not a switch that “decides” when to power on. It’s an automated relay controller that opens or closes an electrical circuit based on pre-set conditions. Mechanical timers use rotating cams and spring-loaded contacts; digital timers rely on microcontrollers, internal clocks (often quartz-crystal), and programmable logic. Both types require three things to function: consistent line voltage, correct time/date settings (for digital units), and physical integrity of internal components (switches, gears, capacitors). When any one of those fails—or is misconfigured—the result is silence where there should be illumination.
Crucially, many users assume the timer is faulty when the issue lies upstream: a tripped GFCI outlet, a shared circuit overloaded by other holiday devices, or even a seasonal power surge that corrupted memory in digital units. Understanding this hierarchy—power source → timer → lights—is essential to efficient diagnosis.
Step-by-Step Diagnostic Flow for All Timer Types
Follow this sequence before replacing anything. It’s designed to eliminate the most common causes first—without tools, without disassembly, and in under five minutes.
- Verify outlet functionality: Plug a known-working device (e.g., phone charger) into the same outlet. If it doesn’t power on, check your home’s GFCI outlets (especially outdoors and in garages) and circuit breakers.
- Check the power cord and plug: Inspect for visible damage, fraying, or bent prongs. Wiggle the plug gently while it’s inserted—if lights flicker, the connection is loose or corroded.
- Test the timer independently: Bypass the timer entirely. Plug lights directly into the outlet. If they illuminate, the timer is the point of failure. If they don’t, the issue is with lights, wiring, or the outlet.
- Reset the timer: For digital models, unplug for 60 seconds, then reconnect. For mechanical timers, rotate the dial fully clockwise and back to “ON” or “AUTO” position—this re-engages the cam mechanism.
- Confirm load compatibility: Check the timer’s maximum wattage rating (usually printed on the base or side). Add up the total wattage of all connected lights. Overloading—even by 10%—can cause internal relays to fail silently or trip thermal protection.
Digital Timer Failures: Memory, Power, and Programming Traps
Digital timers offer precision—but introduce complexity. Their most frequent failure modes aren’t hardware-related but stem from silent corruption or subtle user error.
The internal clock relies on a small backup battery (often a CR2032 coin cell) to retain time and programming during brief outages. If that battery is depleted—common after 12–18 months—the timer may appear powered (LED lit), yet fail to execute schedules. You’ll see the display, but no output. Similarly, a brownout or lightning-induced voltage spike can scramble firmware, freezing the microcontroller in a non-responsive state.
Programming errors are equally common. Many users set start/stop times correctly but overlook the mode selection. Units often have “ON/OFF,” “DAILY,” “WEEKLY,” and “COUNTDOWN” modes. Selecting “WEEKLY” without assigning days means the timer waits indefinitely. Others forget to enable the “TIMER ON” toggle—a separate soft button that must be activated after scheduling.
A real-world example illustrates this: In December 2023, a homeowner in Portland, Oregon, reported her new digital timer wouldn’t activate her roofline lights. She’d programmed 5:00 PM to 11:00 PM daily, confirmed the display showed “DAILY” mode, and verified the outlet worked. What she missed was the tiny “Timer Active” icon—dimmed and unlit—because she’d accidentally pressed the “SET” button twice during programming, which toggled the master enable off. A single press of the “TIMER” button restored function instantly.
Mechanical Timer Troubleshooting: Gears, Springs, and Seasonal Wear
Mechanical timers are simpler—but more vulnerable to environmental stress. Their rotating dial is driven by a synchronous AC motor that relies on stable 60Hz line frequency. During utility grid fluctuations (common during winter storms), the motor can lose sync, causing the timer to run fast, slow, or stop entirely. Unlike digital units, mechanical timers have no reset button—only physical intervention.
Common failure points include:
- Dust and moisture ingress: Especially in uncovered garage or porch installations, dust accumulates inside the housing, increasing friction on gear trains. Humidity causes oxidation on copper contacts, raising resistance and preventing clean switching.
- Spring fatigue: The main drive spring weakens over 3–5 seasons. You’ll notice the dial rotating sluggishly or stopping mid-cycle—often at the same time each day.
- Cam wear: Repeated contact cycling wears down the plastic cam lobes. A worn lobe may not lift the switch arm high enough to close the circuit, resulting in “no power” despite the dial pointing to “ON.”
For immediate testing: manually rotate the dial to the “ON” segment and hold it there for 10 seconds. If lights illuminate, the issue is timing accuracy—not relay failure. If they still don’t turn on, the internal switch contacts are likely pitted or disconnected.
| Issue | Digital Timer Indicator | Mechanical Timer Indicator | First Action |
|---|---|---|---|
| Power loss during outage | Blank or erratic display; time resets to default (e.g., 12:00) | Dial stopped; no movement | Replace backup battery (digital); manually advance dial past current time (mechanical) |
| Contact failure | Display works, but no output; relay click absent | Dial rotates, but no “click” at ON/OFF positions | Test with multimeter continuity mode; replace if open circuit |
| Overload protection tripped | Flashing “ERR” or “OL” on display | No visible sign—timer feels warm near base | Reduce load by 20%; wait 5 minutes before retrying |
| Time drift (±15+ mins/day) | Consistent time loss/gain despite fresh battery | Dial rotation visibly inconsistent over 24 hours | Replace quartz crystal (digital); replace motor assembly (mechanical) |
Expert Insight: What Electricians See Most Often
“Ninety percent of ‘broken’ timers we service aren’t defective—they’re misconfigured or mismatched,” says Carlos Mendez, lead technician at HolidayLight Pro, a national holiday lighting service with 17 years of field experience. “We see people plug a 1,200-watt LED string into a 600-watt-rated timer thinking ‘LEDs use less power, so it’s fine.’ But the timer’s rating is about *current handling*, not just wattage. That overload stresses the relay contacts until they weld shut—or fail open. And yes, that happens more often with cheap imported units lacking proper UL certification.”
“The most reliable fix isn’t technical—it’s procedural. Set a calendar reminder every October to test your timers *before* decorating. Plug them in, set a 1-minute test schedule, and verify output. Catch issues early, and you avoid the 8 p.m. panic on December 1st.” — Carlos Mendez, Lead Technician, HolidayLight Pro
Preventive Maintenance Checklist
Extend your timer’s life—and avoid next-year repeats—with this seasonal checklist:
- ✅ Before storage (January): Wipe exterior with dry microfiber cloth; remove batteries from digital units; store in original box with silica gel packet.
- ✅ Before first use (November): Inspect cord and housing for cracks; test on a simple lamp load (not full light string); verify time/date accuracy against smartphone clock.
- ✅ Mid-season (December 15): Check for warmth at base—excessive heat signals overload or failing relay; listen for relay clicks at scheduled times.
- ✅ After holidays: Clean mechanical timer contacts with 91% isopropyl alcohol and cotton swab (power off, unplugged); for digital units, update firmware if manufacturer provides OTA updates.
FAQ
Can I use a smart plug instead of a Christmas light timer?
Yes—but with caveats. Smart plugs work well for basic on/off control via app or voice, but lack the robust surge protection and outdoor-rated housings of dedicated light timers. Most consumer smart plugs are rated for indoor use only and max out at 1,800 watts—fine for LEDs, risky for incandescent strings. Also, they depend on Wi-Fi stability; if your router drops, so do your lights. For reliability and weather resistance, purpose-built timers remain superior for outdoor displays.
Why does my timer work fine indoors but fail on my porch?
Temperature and humidity are the culprits. Most mechanical timers operate reliably between 32°F–104°F (0°C–40°C). Below freezing, lubricants thicken and gears bind; above 104°F, plastic components warp. Digital timers suffer capacitor degradation in sustained cold—causing erratic booting or display dropout. Always choose timers explicitly rated for outdoor use (look for UL 943 Class A or IP44 rating) and install them in covered, ventilated locations—not directly exposed to rain or snow.
My mechanical timer makes a loud buzzing sound. Is that dangerous?
Yes—immediately unplug it. Buzzing indicates the internal relay is chattering: attempting to close but failing due to low voltage, contact pitting, or coil weakness. This creates arcing, overheating, and fire risk. Do not continue using it. Replace with a new outdoor-rated timer.
Conclusion
Your Christmas light timer isn’t magic—it’s engineering with limits. When it stops working, it’s rarely broken beyond repair. More often, it’s signaling a mismatch (load vs. rating), a configuration oversight (a forgotten “enable” toggle), or environmental strain (cold, moisture, dust) that simple maintenance resolves. You don’t need specialized tools or electrical training to restore function—just methodical observation, awareness of how these devices actually operate, and respect for their design boundaries. This season, take ten minutes before hanging a single bulb to test, reset, and verify. That small investment prevents hours of frustration later—and ensures your lights shine exactly when they should: on time, every time.


 浙公网安备
33010002000092号
浙公网安备
33010002000092号 浙B2-20120091-4
Comments
No comments yet. Why don't you start the discussion?