
A coffee maker should simplify your mornings, not create puddles on your countertop. If you've noticed water pooling beneath your machine, especially after brewing, you're not alone. Leaking from the bottom is a surprisingly common issue across drip coffee makers, single-serve units, and even espresso machines. While it might seem like a sign of irreversible damage, most leaks stem from preventable or repairable causes—many of which you can diagnose and resolve at home without calling a technician.
Understanding the internal mechanics of your coffee maker is key. These appliances rely on precise water pathways, seals, valves, and containers to function safely. When any component fails, becomes clogged, or degrades over time, pressure builds or flow redirects improperly, leading to leaks. The good news? Most of these issues are manageable with basic tools, patience, and a methodical approach.
Common Causes of Bottom Leaks in Coffee Makers
Before grabbing a towel and throwing in the towel, identify what’s really causing the leak. Misdiagnosis leads to wasted effort. Here are the most frequent culprits behind a coffee maker leaking from the base:
- Clogged or cracked water reservoir tube: Over time, mineral deposits from hard water can block the internal tubing, forcing water to back up and escape through weak points.
- Worn or damaged O-rings and gaskets: Rubber seals around the pump, heating element, or reservoir degrade with heat and age, losing their ability to contain pressurized water.
- Loose or misaligned internal connections: Vibration or improper reassembly after cleaning can loosen hose fittings or valve joints.
- Cracked drip tray or overflow pan: Though designed to catch minor spills, a cracked tray can allow water to seep through into the base housing.
- Malfunctioning solenoid valve or pump: This critical component regulates water flow. If stuck open or leaking internally, it can cause continuous dripping into the chassis.
- Mineral buildup in the boiler or heating chamber: Scale restricts proper expansion and drainage, increasing internal pressure until water escapes via the weakest seal.
Each of these issues requires a different diagnostic path and solution. Jumping straight to disassembly without narrowing down the cause could lead to further damage.
Step-by-Step Guide to Diagnose and Fix the Leak
Follow this structured process to pinpoint and resolve the source of the leak. Work slowly and document each step to avoid missing subtle clues.
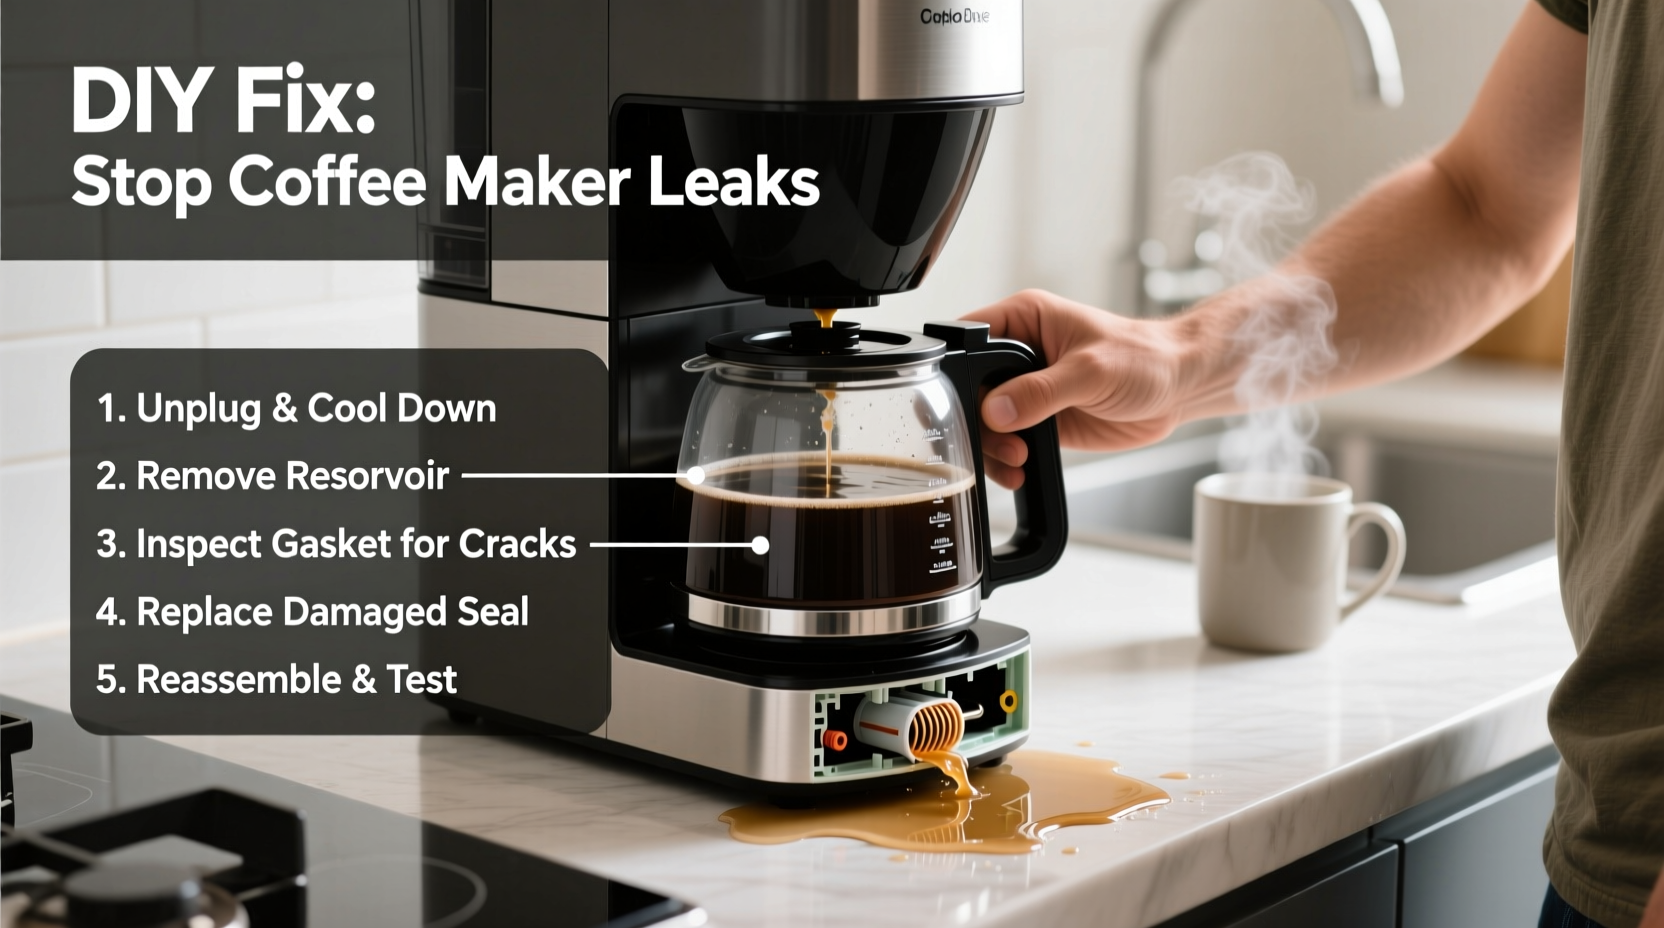
- Unplug and cool down the unit. Never work on a hot or powered appliance. Allow at least 30 minutes for complete cooling.
- Empty all water and removable parts. Remove the carafe, filter basket, water reservoir (if detachable), and drip tray. Dry them thoroughly.
- Inspect the drip tray and housing. Look for cracks, warping, or signs of overflow. Clean the tray and reinstall it. Run a test brew with only water. Observe where the leak emerges.
- Determine the leak timing:
- If it leaks only during brewing, the issue is likely in the internal tubing, pump, or valve.
- If it leaks when filling the reservoir, suspect the reservoir seal or inlet tube.
- If it leaks constantly or when idle, there may be a cracked reservoir, failed gasket, or internal tank breach.
- Disassemble the base (if comfortable). Use a screwdriver to remove the bottom panel. Look for visible moisture, mold, or corrosion. Trace wet areas to their origin.
- Check internal hoses and connections. Ensure all tubes are securely attached and free of cracks. Re-seat loose connectors.
- Inspect O-rings and gaskets. Focus on the pump outlet, heating element cover, and reservoir neck. Replace any that are brittle, cracked, or flattened.
- Descale the machine. Even if not the direct cause, scale exacerbates leaks. Use a vinegar solution or commercial descaler as outlined later.
- Reassemble and test. Put everything back carefully. Plug in and run a water-only cycle. Monitor for recurrence.
This methodical approach increases your chances of a permanent fix while minimizing risk of collateral damage.
Essential Maintenance Checklist to Prevent Future Leaks
Prevention is always better than repair. Incorporate these practices into your routine to extend your coffee maker’s life and avoid leaks altogether.
- Descale every 1–3 months, depending on water hardness and usage frequency.
- Wipe down the exterior and drip tray weekly with a damp cloth.
- Remove and rinse the water reservoir monthly to check for algae or sediment.
- Inspect rubber gaskets every 6 months for signs of wear.
- Never use abrasive cleaners or submerge the main unit in water.
- Replace carbon filters (if applicable) as recommended by the manufacturer.
- Store the machine in a dry, ventilated area—avoid humid cabinets under sinks.
Do’s and Don’ts When Repairing a Leaking Coffee Maker
| Do’s | Don’ts |
|---|---|
| Use manufacturer-approved replacement parts when available. | Force components that don’t fit—this can crack plastic housings. |
| Take photos during disassembly to aid reassembly. | Ignore persistent mold or musty smells—they indicate trapped moisture. |
| Apply food-safe silicone lubricant to new O-rings for better sealing. | Use plumber’s tape or household adhesives on internal parts. |
| Run multiple vinegar cycles if heavy scaling is suspected. | Operate the machine while leaking—this risks electrical damage. |
| Contact customer support for model-specific diagrams or guidance. | Assume all coffee makers are built the same—designs vary widely. |
Real-World Example: Fixing a Keurig K-Classic Leak
Sarah, a teacher from Portland, noticed her Keurig K-Classic was leaving small puddles every morning. Initially, she assumed it was user error—perhaps overfilling the reservoir. But after replacing the drip tray and cleaning the needle, the leak persisted.
She followed the diagnostic steps: unplugged the unit, removed the bottom panel, and discovered a dark stain near the pump assembly. Upon closer inspection, she found the O-ring connecting the pump to the internal tubing had split. A quick search online revealed the part number, and she ordered a $5 replacement kit.
After replacing the O-ring and descaling the machine with a vinegar solution, Sarah ran a test brew. No leaks. Six months later, the machine continues to perform flawlessly. Her experience underscores how a small, overlooked seal can cause significant issues—and how DIY repair can save both money and waste.
“Most coffee maker leaks aren’t due to catastrophic failure. They’re usually a single degraded seal or a simple blockage. With basic tools and attention to detail, 70% of repairs can be done at home.” — Mark Reynolds, Appliance Repair Technician with 18 years of experience
How to Descale Your Coffee Maker Properly
Scale buildup is one of the silent contributors to leaks. As minerals accumulate in narrow channels, they restrict flow, increase pressure, and stress seals. Regular descaling prevents this.
For drip coffee makers:
- Mix equal parts white vinegar and water (or use a commercial descaler).
- Pour the solution into the water reservoir.
- Place a clean carafe on the warming plate.
- Run a full brew cycle without coffee.
- Discard the solution and repeat with clean water 2–3 times to flush out vinegar residue.
- Wipe the carafe and reservoir with a soft cloth.
For single-serve pod machines:
- Remove the pod holder and wash separately.
- Fill the reservoir with descaling solution.
- Run the solution through multiple brew cycles (without a pod).
- Rinse thoroughly with 3–5 cycles of clean water.
- Reassemble and test with a normal brew.
Frequency depends on usage and water quality. Homes with hard water should descale monthly; those with soft or filtered water can stretch to every 3 months.
Frequently Asked Questions
Can I still use my coffee maker if it’s leaking?
No. Using a leaking coffee maker poses electrical hazards, especially if water reaches internal circuitry. Unplug it immediately and stop using it until the issue is resolved.
Where can I find replacement parts for my coffee maker?
Check the manufacturer’s website or authorized parts retailers like AppliancePartsPros, RepairClinic, or Amazon. Enter your model number to find compatible seals, pumps, or tubing. Some brands offer free exploded diagrams to help identify components.
Is it worth repairing an older coffee maker?
It depends. If the machine is under five years old and the fix involves a $5 O-ring or simple cleaning, absolutely. For units over seven years with recurring issues, consider replacement—modern models are more energy-efficient and often include better leak prevention features.
Conclusion: Take Control Before the Drip Becomes a Flood
A leaking coffee maker doesn’t have to mean the end of its life. In most cases, the problem stems from something small—a worn seal, a clogged tube, or accumulated scale—that you can address with basic tools and informed effort. By understanding how your machine works, following a logical repair process, and maintaining it regularly, you can restore reliable performance and avoid unnecessary expense.
Don’t let a little water undermine your morning ritual. Take action today: unplug the unit, investigate the source, and apply the solutions outlined here. Whether you’re tightening a loose hose or replacing a dried-out gasket, each step brings you closer to a dry countertop and a perfectly brewed cup.


 浙公网安备
33010002000092号
浙公网安备
33010002000092号 浙B2-20120091-4
Comments
No comments yet. Why don't you start the discussion?