
A soupy espresso puck isn’t just messy—it’s a clear signal that something has gone wrong in your extraction. When you pull back the portafilter after brewing, instead of seeing a firm, dry disc of spent coffee grounds, you’re greeted with a wet, sludgy mess that sticks to the basket like oatmeal. This inconsistency doesn’t just affect cleanup; it reflects poor extraction, uneven saturation, or incorrect technique—each leading to flat, sour, or bitter shots. The good news? A soupy puck is fixable. With the right understanding of grind size, dose, tamping, and machine variables, you can diagnose the root cause and dial in a balanced, flavorful espresso consistently.
Understanding the Espresso Puck: What a Healthy One Looks Like
The espresso puck—the compacted bed of used coffee grounds after brewing—should be firm, cohesive, and relatively dry. It should release cleanly from the basket when knocked out, leaving minimal residue. A well-extracted puck often cracks slightly in the center, indicating even water penetration and proper channeling resistance.
In contrast, a soupy puck feels wet, mushy, and may ooze liquid when pressed. It clings stubbornly to the sides of the basket, requiring scraping or rinsing. This condition usually points to under-extraction, where water passed through too quickly or failed to interact properly with the coffee particles.
“Consistency in puck formation starts before the shot begins. Every variable—from dose to distribution—affects the final texture.” — Luca Moretti, Head Roaster at EspressoLab Rome
Common Causes of a Soupy Espresso Puck
A soupy puck rarely stems from a single mistake. Instead, it's typically the result of multiple small errors compounding. Below are the most frequent culprits:
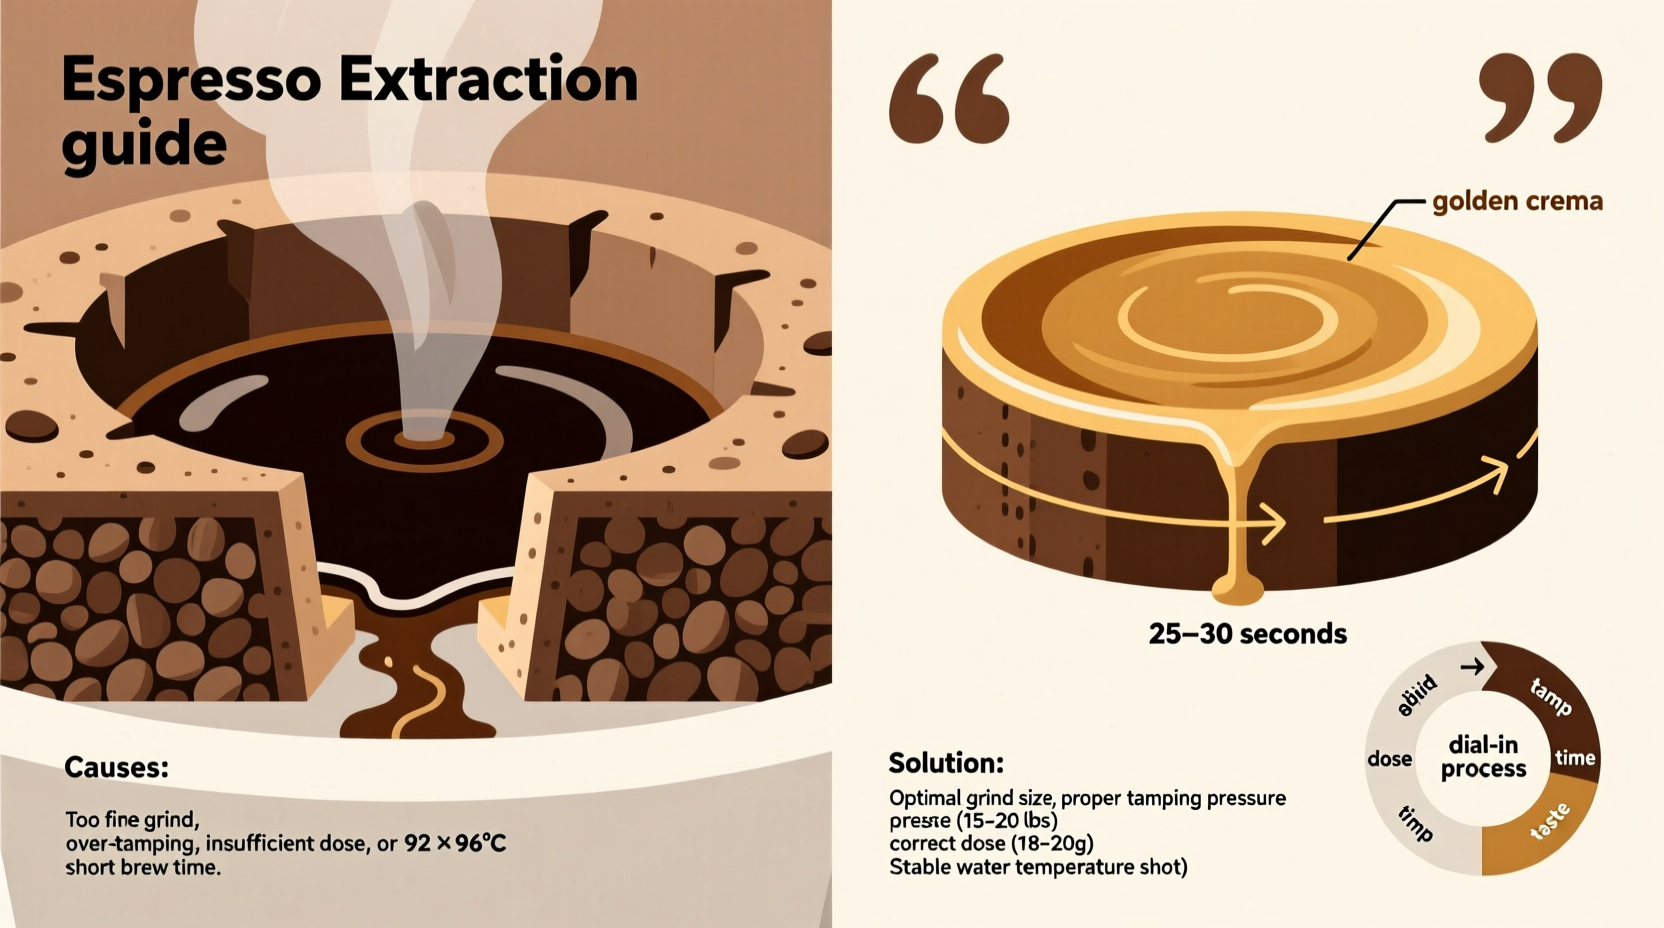
1. Grind Size Too Coarse
If your grinder is set too coarse, water flows through the coffee bed too rapidly. The short contact time prevents full extraction, leaving behind saturated but unextracted grounds. These retain excess water, resulting in a soggy, soupy puck.
2. Inconsistent Tamping
Uneven tamping creates channels—paths of least resistance—where water rushes through without extracting flavor. The rest of the puck remains under-saturated, while the channeled areas become over-wetted. This imbalance leads to a patchy, wet puck.
3. Poor Distribution Before Tamping
Clumping or uneven dispersion of grounds in the basket causes density variations. Some areas receive more water than others, again promoting channeling and inconsistent drying. Without even distribution, no amount of perfect tamping will save the shot.
4. Incorrect Dose for Basket Size
Overfilling or underfilling the basket disrupts the ideal coffee-to-water ratio and pressure dynamics. An undersized dose leaves too much space for water to bypass, while an oversized one may prevent proper compression, both contributing to poor puck integrity.
5. Low Brew Temperature or Pressure
Espresso machines operating below 90°C (194°F) fail to extract oils and solids efficiently. Cooler water doesn’t emulsify coffee compounds effectively, leading to incomplete extraction and higher retained moisture in the puck.
Step-by-Step Guide to Dialing In the Perfect Shot
Dialing in espresso is not a one-time task—it’s a continuous process of refinement based on bean freshness, humidity, and equipment behavior. Follow this sequence to achieve repeatable results:
- Start with Fresh Beans: Use coffee roasted within the past 7–21 days. Stale beans release gas unevenly, affecting extraction stability.
- Select the Right Dose: Match your dose to the basket. For a standard 18g double basket, use 17.5–18.5g. Weigh each dose for consistency.
- Distribute Evenly: Use a tool like a Weiss Distribution Technique (WDT) stirrer or a simple tap-and-level method to break up clumps and ensure uniform particle spread.
- Tamp with Consistent Pressure: Apply 15–20kg (30–45 lbs) of downward force evenly. Use a calibrated tamper and keep your wrist locked to avoid tilting.
- Set Initial Grind Setting: Begin with a medium-fine grind—similar to table salt—and adjust based on shot time.
- Brew and Measure: Target a 1:2 ratio (e.g., 18g in → 36g out) over 25–30 seconds. Use a scale with timer function for precision.
- Evaluate the Result: Taste the shot and inspect the puck. If sour, go finer. If bitter, go coarser. If soupy, revisit grind and distribution.
- Adjust One Variable at a Time: Only change grind size between attempts. Wait 30 seconds after adjusting your grinder to let burrs stabilize.
This methodical approach eliminates guesswork and builds muscle memory. Over time, you’ll develop an intuitive sense of how each variable influences the final shot.
Do’s and Don’ts for Puck Integrity and Extraction Quality
| Do | Don't |
|---|---|
| Weigh your input (dose) and output (yield) | Guess your dose or rely on volume measures |
| Distribute grounds evenly using WDT or tapping | Just dump grounds and tamp immediately |
| Purge group head before each shot | Insert portafilter directly without flushing |
| Use a level, calibrated tamper | Tilt or rock the tamper during compression |
| Clean baskets regularly with a blind filter and detergent | Let old coffee oils build up in the basket |
| Store beans in an airtight container away from light | Keep coffee next to the espresso machine where heat cycles degrade freshness |
Real Example: Fixing a Home Barista’s Soupy Puck Problem
Mark, a home barista in Portland, struggled for weeks with inconsistent shots. His puck was always soupy, and his espresso tasted weak despite using fresh single-origin beans. He assumed the issue was his budget-friendly semi-automatic machine.
After recording his process, he noticed three key flaws: he wasn’t weighing doses (using a scoop), tamped at an angle, and never distributed the grounds. His grinder was also set too coarse to avoid over-extraction bitterness he’d experienced earlier.
He adjusted as follows:
- Began dosing 18g precisely using a digital scale.
- Adopted WDT with a needle tool to disperse clumps.
- Invested in a calibrated tamper and practiced vertical tamping.
- Fined the grind incrementally until shot time reached 28 seconds for a 36g yield.
Within two days, his puck became firm and dry. The espresso gained sweetness and body, with a clean finish. The soupy mess disappeared—not because of new gear, but because of disciplined technique.
Essential Tips for Preventing a Soupy Puck
Checklist: Dial-In Routine for Consistent Shots
Print or bookmark this checklist to follow before every session:
- ✅ Check bean freshness (roasted within 3 weeks)
- ✅ Weigh dose (match to basket capacity)
- ✅ Break up clumps with WDT or fork
- ✅ Distribute evenly in portafilter
- ✅ Tamp flat with consistent pressure
- ✅ Purge group head for 5 seconds
- ✅ Insert portafilter and start shot immediately
- ✅ Record time, yield, and taste notes
- ✅ Inspect puck for evenness and dryness
- ✅ Clean basket after each use
Frequently Asked Questions
Can a dirty portafilter cause a soupy puck?
Yes. Built-up coffee oils and fines clog the basket’s perforations, disrupting water flow and causing uneven extraction. This leads to parts of the puck remaining wet while others channel. Regular cleaning with a dedicated espresso detergent and a soft brush prevents this.
Does water quality affect puck texture?
Absolutely. Hard water leaves mineral deposits in the machine and alters extraction chemistry. Soft or distilled water lacks essential minerals needed to pull flavor. Use filtered water with balanced mineral content (around 150 ppm total hardness) for optimal extraction and cleaner pucks.
Should the puck be completely dry after brewing?
Not necessarily bone-dry, but it should be firm and crumble easily when touched. A slight dampness is normal, especially with high-moisture-content beans. However, if liquid squeezes out when pressed, the shot was likely under-extracted due to coarse grind or insufficient pressure.
Making the Perfect Shot a Daily Habit
Dialing in the perfect espresso isn’t about perfection on the first try—it’s about building a repeatable process grounded in observation and adjustment. A soupy puck is not a failure; it’s feedback. It tells you the water moved too fast, the grounds weren’t prepared evenly, or the temperature lagged. Each variable you control—grind, dose, distribution, tamping, and machine maintenance—contributes to the final outcome.
Great espresso isn’t reserved for cafes with $10,000 machines. It’s achievable in any kitchen where attention to detail meets consistency. By treating each shot as data, not just a drink, you refine your skills with every pull. Over time, the signs become second nature: the sound of the stream, the crema’s color, the puck’s texture—all aligning into a harmonious result.
“The best baristas aren’t those with the fanciest gear, but those who listen to what the coffee tells them.” — Diego Campos, World Brewers Cup Judge


 浙公网安备
33010002000092号
浙公网安备
33010002000092号 浙B2-20120091-4
Comments
No comments yet. Why don't you start the discussion?