
A soupy espresso puck—wet, soggy, and dripping after extraction—is one of the most frustrating signs of poor shot quality. It’s not just messy; it indicates inconsistent extraction, channeling, or improper technique. For home baristas and café professionals alike, a dry, firm puck should be the standard outcome of a well-executed shot. When water pools in the portafilter basket instead of being absorbed by compacted coffee, flavor suffers, bitterness creeps in, and crema thins out.
The root causes are often subtle but fixable. From grind size and tamping pressure to machine maintenance and distribution methods, several variables influence how water interacts with the coffee bed. Understanding these factors—and adjusting them systematically—can transform your espresso from mediocre to exceptional.
Understanding the Ideal Espresso Puck
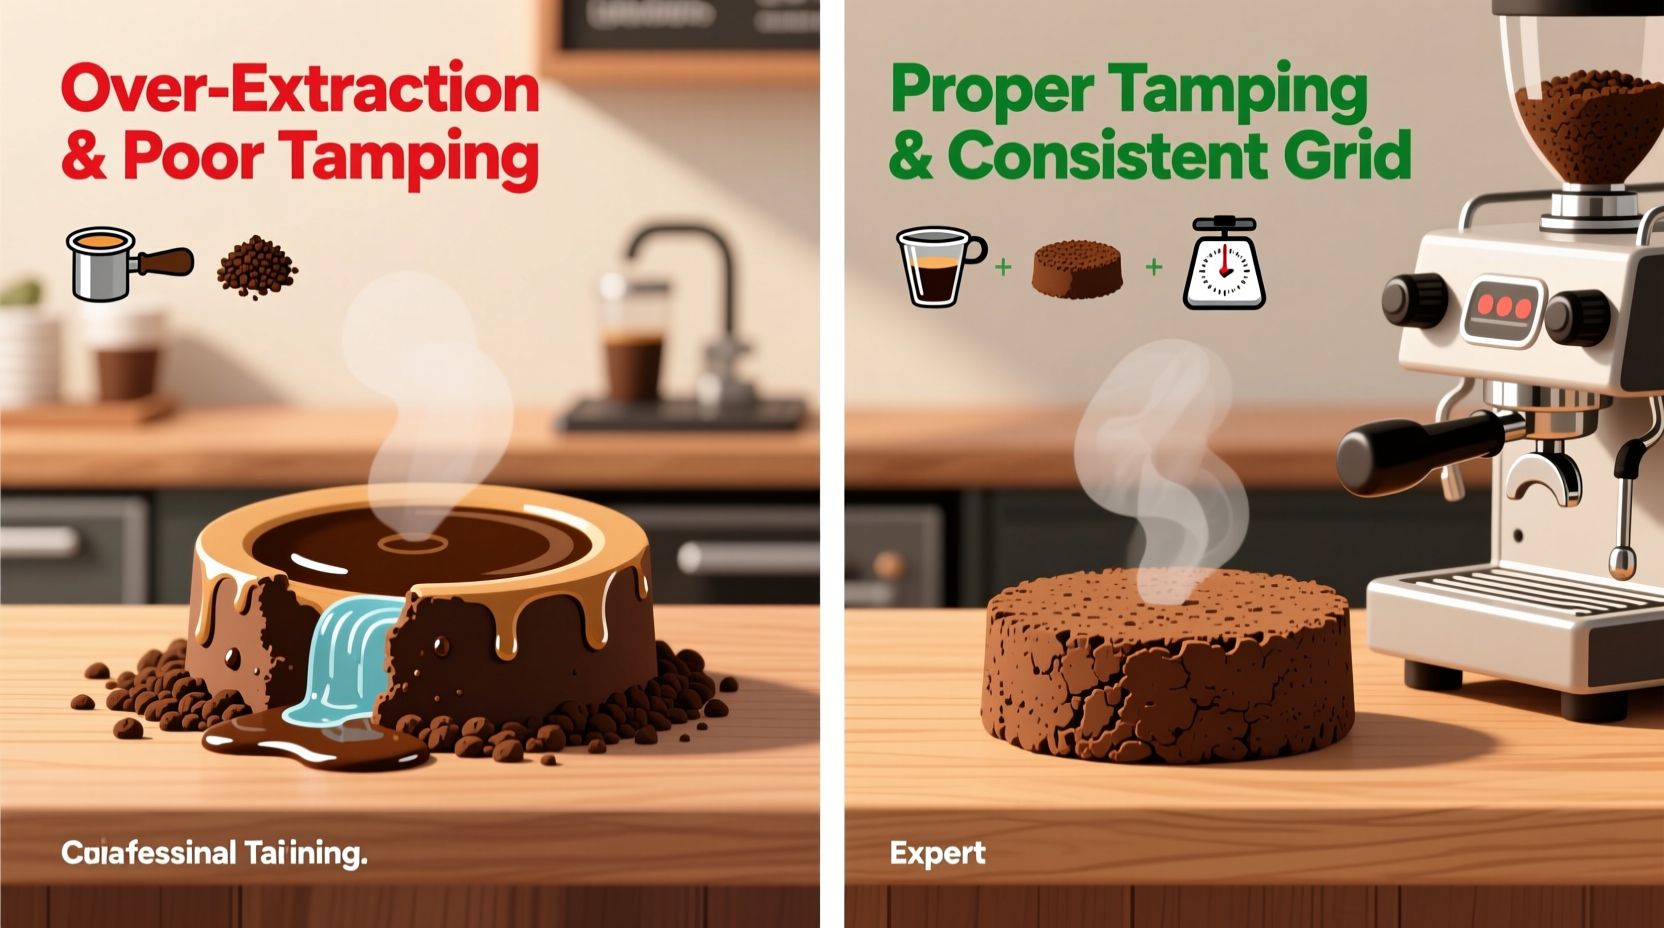
After pulling a shot, the spent coffee grounds should form a cohesive, dry puck that holds its shape when removed from the portafilter. A properly extracted puck feels firm to the touch, may have slight radial cracks, and shows no signs of excessive moisture. It detaches cleanly from the basket walls without sticking or crumbling.
In contrast, a soupy puck appears wet, sludgy, and uneven. Water remains pooled at the bottom of the basket, and the grounds resemble mud rather than a solid cake. This condition typically points to incomplete drainage, over-extraction in certain zones, or—more commonly—channeling, where water finds paths of least resistance through the coffee bed instead of flowing evenly.
“An ideal puck tells you everything about your shot. If it’s soupy, your water didn’t move uniformly through the coffee.” — Luca Moretti, Head Roaster at Terra Specialty Coffee
Common Causes of a Soupy Espresso Puck
A soupy puck rarely stems from a single error. Instead, it’s usually the result of multiple small oversights compounding during preparation. Below are the most frequent culprits:
1. Incorrect Grind Size
Too fine a grind can cause over-extraction and clog the coffee bed, trapping water. While counterintuitive, an overly fine setting restricts flow so much that pressure builds and forces water to bypass channels, leaving pockets of saturated grounds behind. Conversely, too coarse a grind leads to fast, under-extracted shots where water rushes through without proper absorption.
2. Uneven Tamping
Tamping at an angle or applying inconsistent pressure creates density variations in the coffee bed. High spots allow faster flow; low spots become dense zones where water stalls. This imbalance results in some areas drying out while others remain waterlogged—hence the soupy center.
3. Poor Distribution Before Tamping
Pouring coffee directly into the basket and tamping without distributing leads to clumping and voids. These inconsistencies create preferential pathways for water, undermining even saturation. Without uniform particle placement, no amount of perfect tamping will save the shot.
4. Worn or Dirty Portafilter Baskets
Over time, baskets accumulate oils and residue that block tiny perforations. This reduces drainage efficiency and traps water post-extraction. Additionally, dented or warped baskets prevent even contact with the group head seal, leading to leaks and uneven pressure distribution.
5. Machine Pressure and Flow Issues
If your machine delivers inconsistent pressure—either due to pump failure, scale buildup, or faulty pressure profiling—you risk uneven extraction. Low pressure fails to push water through effectively; erratic spikes encourage channeling. Both scenarios leave behind a wet mess.
Step-by-Step Guide to Achieving a Dry, Even Puck
Fixing a soupy puck requires methodical adjustments. Follow this sequence to isolate and correct issues:
- Dose accurately: Use a scale to measure 18–20g of coffee (depending on basket size). Consistency starts here.
- Distribute evenly: Tap the portafilter gently or use a tool like a Weiss Distribution Technique (WDT) stirrer to break up clumps and level the surface.
- Tamp correctly: Apply 30–40 pounds of pressure using a calibrated tamper. Ensure the base is flat and your wrist stays neutral.
- Check basket hygiene: Soak baskets weekly in a solution of Cafiza or Urnex Full Circle to dissolve oils and remove buildup.
- Adjust grind incrementally: If shots are too slow and pucks soupy, coarsen the grind slightly. Monitor changes over three consecutive shots.
- Inspect machine performance: Backflush daily (if using a dual boiler), descale monthly, and verify pump pressure with a blind basket test.
- Evaluate flow rate: Aim for 2 oz (60ml) in 25–30 seconds. Deviations suggest grind or dose imbalances.
Do’s and Don’ts: Espresso Puck Health Checklist
| Do | Don’t |
|---|---|
| Use a distribution tool like a WDT needle or leveling tool | Tap the portafilter only on one side, causing uneven settling |
| Backflush your machine regularly with detergent | Ignore gasket wear or group head corrosion |
| Weigh both dose and yield for consistency | Rely solely on time to judge shot quality |
| Clean baskets thoroughly after each use | Use steel wool or abrasive pads that scratch basket surfaces |
| Replace worn rubber gaskets every 3–6 months | Assume all machines behave the same regardless of age or model |
Expert Tips from Working Baristas
Seasoned baristas develop routines that prioritize repeatability and cleanliness. Their insights go beyond textbook advice, reflecting real-world experience.
- Pre-infusion matters: Machines with soft pre-infusion gradually increase pressure, allowing coffee to bloom evenly before full pressure hits. This minimizes channeling and improves puck integrity.
- Rotate baskets: Have multiple baskets on hand and rotate them weekly. Deep cleaning one while using another ensures none get neglected.
- Feel the puck: After knocking out the puck, press a fingertip lightly on the surface. A dry, firm texture indicates good extraction. Stickiness or moisture means something went wrong.
- Watch the tail: A soupy puck often correlates with a runny, pale blonde stream at the end of the shot. Cutting the shot earlier can help preserve puck structure and taste.
Mini Case Study: Fixing Puck Issues at Home
Mark, a home barista in Portland, struggled with soupy pucks despite using freshly roasted beans and a high-end semi-automatic machine. His shots pulled inconsistently—sometimes bright and sour, other times bitter and slow. The pucks were always damp, often collapsing into mush upon ejection.
He began troubleshooting systematically. First, he started weighing doses and discovered he was loading 22g into an 18g basket—overdosing by nearly 25%. He corrected this and immediately noticed less resistance during extraction.
Next, he adopted the WDT method using a needle tool to stir the grounds before tamping. This eliminated visible clumps and created a more uniform surface. He also replaced his old, oil-caked basket with a new one.
Finally, he adjusted his grind setting slightly coarser. Within five attempts, his shot time stabilized at 27 seconds for 1:2 ratio output. The resulting puck was firm, dry, and intact—exactly what he’d been aiming for.
Mark now maintains a log of dose, yield, time, and puck observations. This simple practice has helped him maintain consistency and quickly identify deviations.
Frequently Asked Questions
Can water quality affect puck texture?
Absolutely. Hard water leaves mineral deposits in group heads and baskets, reducing permeability. Softened or poorly filtered water lacks essential minerals needed for proper extraction balance. Use third-wave water (around 150 ppm total dissolved solids) for optimal results.
Is a soupy puck always a sign of bad espresso?
Not necessarily, but it’s a strong indicator of problems. You might still produce a palatable shot if flavor is balanced, but long-term machine health and extraction efficiency suffer. A dry puck reflects better control and evenness.
Should I change my tamp based on puck appearance?
No—tamping should remain consistent in pressure and angle. Instead, adjust upstream variables: distribution, grind size, dose, or machine maintenance. Changing tamp strength shot-to-shot introduces unnecessary variability.
Conclusion: Master the Details, Elevate Your Espresso
A soupy espresso puck isn’t just an aesthetic issue—it’s a diagnostic signal. It reveals gaps in technique, equipment care, or process discipline. By addressing grind consistency, distribution, tamping, and machine hygiene, you regain control over extraction and unlock cleaner, richer flavors.
The path to a perfect puck lies in repetition, observation, and incremental refinement. Track your variables, clean your tools religiously, and trust the feedback your pucks provide. Every moist, collapsed cake is a lesson; every dry, intact disc is progress.


 浙公网安备
33010002000092号
浙公网安备
33010002000092号 浙B2-20120091-4
Comments
No comments yet. Why don't you start the discussion?