
Handmade soap crafting blends artistry and chemistry. When separation occurs during the curing phase, it can be disheartening—especially after hours of careful work. Unlike surface-level issues like cracking or frosting, separation indicates a deeper instability in the emulsion or saponification process. Understanding why this happens and how to fix it isn't just about salvaging one batch—it's about refining your technique for consistent, professional-quality results every time.
Separation in soap refers to layers forming within the bar, often visible as oil pooling on top, distinct color bands, or even split textures that crumble when handled. While some minor settling is normal, true separation suggests an imbalance in formulation, temperature control, or mixing method. The good news? Most causes are preventable—and many can be corrected before the soap becomes unusable.
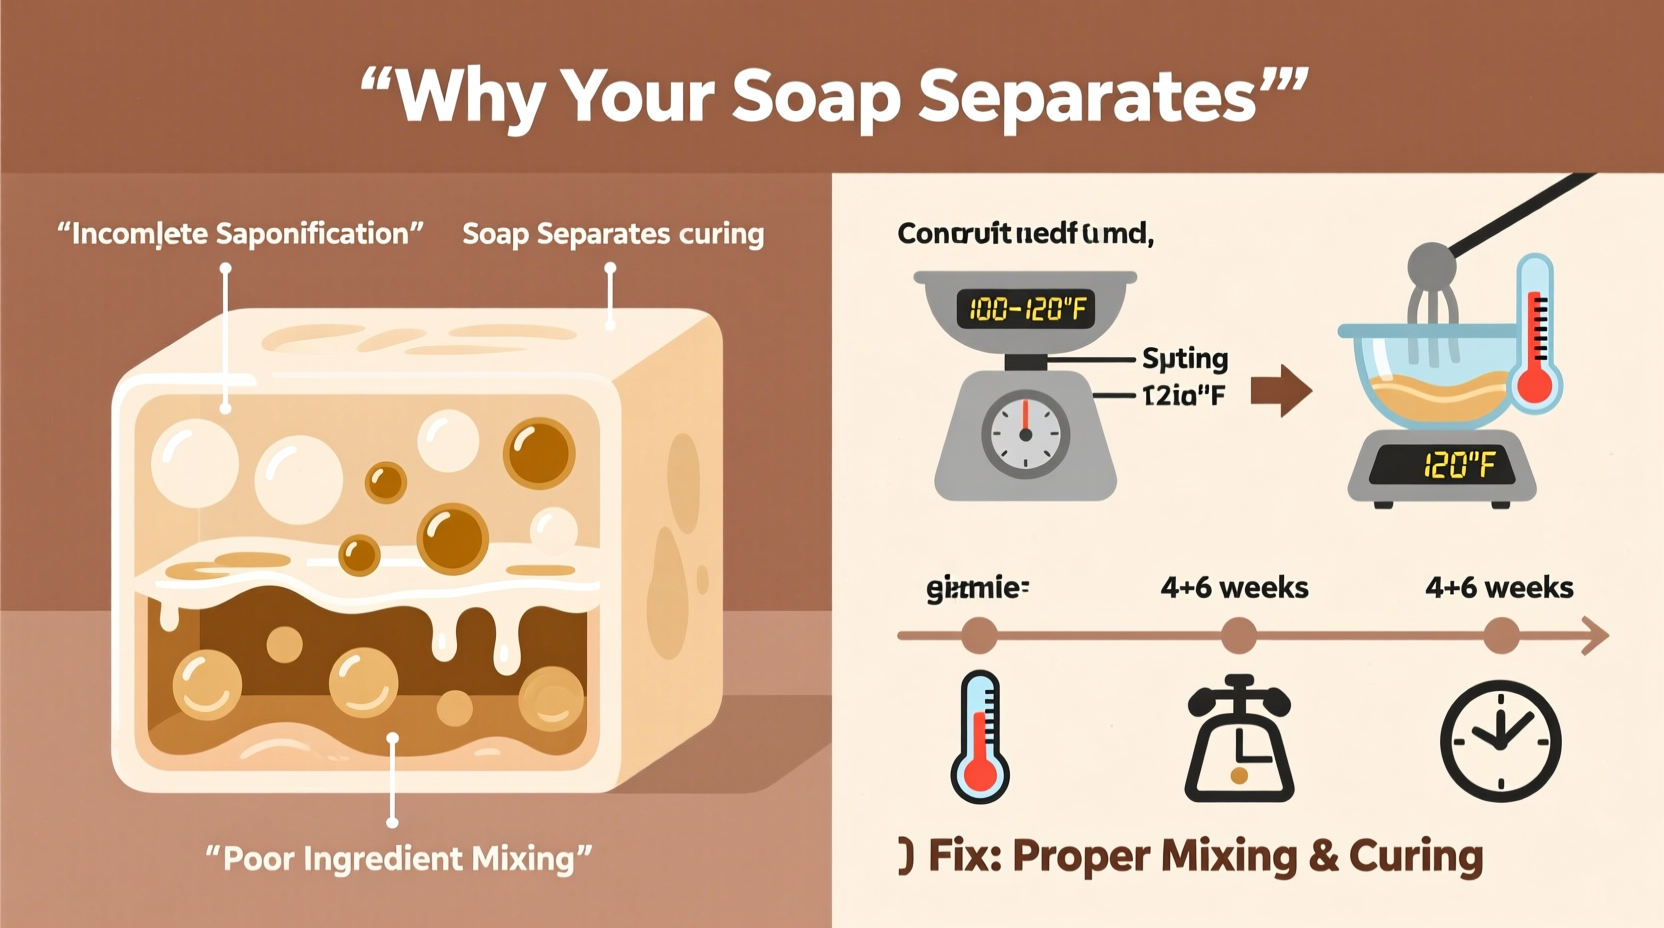
Understanding Soap Emulsion and Why It Fails
At its core, cold process soapmaking relies on emulsification: blending oils and lye water into a stable mixture that will fully saponify over time. This emulsion must remain intact from trace through pouring and into the early stages of curing. If it breaks, the oils and aqueous phases separate, leading to inconsistent texture, soft spots, and potential rancidity.
Emulsification failure typically occurs due to:
- Insufficient mixing: Not reaching true emulsion before pouring.
- Temperature shock: Large differences between oil and lye temperatures destabilizing the mix.
- Incompatible additives: Fragrances, butters, or clays disrupting the balance.
- Premature gel phase disruption: Insulation issues causing uneven heat distribution.
Unlike commercial soaps stabilized with synthetic emulsifiers, handmade soap depends entirely on the natural reaction between fats and sodium hydroxide. Once saponification begins, the mixture should thicken and stabilize. But if conditions aren’t ideal, the chemical dance falters—and separation follows.
Top 5 Causes of Soap Separation During Curing (and How to Fix Them)
1. Incomplete Emulsification at Trace
The most common cause of separation is under-mixing. Many beginners pour soap too early, mistaking light ribbons for full trace. True emulsion requires thorough blending until the mixture holds its shape briefly when drizzled on the surface.
If your soap separates due to poor emulsification, consider using an immersion blender consistently throughout mixing. Avoid stopping too soon—even if the batter appears thick initially, let it blend another 30–60 seconds to ensure homogeneity.
2. Temperature Imbalance Between Oils and Lye Water
Ideal soapmaking occurs when both lye solution and oils are between 100°F and 120°F (38°C–49°C). A difference greater than 15°F can cause rapid cooling or shocking, leading to separation.
To fix this, always measure temperatures before combining. Let both components equilibrate near room temperature if necessary. For tropical climates, aim slightly lower; in colder environments, use a warm water bath to maintain consistency.
3. High Concentrations of Volatile Fragrance Oils
Certain fragrance oils—especially those high in vanillin or citrus compounds—can accelerate trace or destabilize the emulsion. Some fragrances cause “accelerated seize,” where the soap hardens suddenly, trapping pockets of unincorporated oils that later rise to the surface.
A real-world example: A crafter added 1 oz of vanilla-heavy FO to a 2 lb batch without adjusting usage rate. Within minutes, the soap thickened abnormally. After pouring, oil pooled on top during the first 24 hours. Despite curing, the bars remained greasy and soft.
“Fragrance oils are the wild card in soapmaking. Always test new scents at reduced rates and monitor behavior.” — Dr. Lydia Chen, Cosmetic Chemist & Handcrafted Soap Advocate
4. Excessive Additives That Disrupt Saponification
Milk, purees, herbal infusions, and certain clays introduce variables that affect pH and reactivity. Fresh fruit purees, for instance, contain sugars that caramelize rapidly and may interfere with even saponification. Similarly, undiluted herbal infusions can carry particulates that act as separation nuclei.
Solution: Pre-dissolve powders in a small amount of oil or distilled water. For milk soaps, freeze the liquid before adding lye to reduce scorching. Use only tested infusion methods and strain thoroughly.
5. Poor Insulation or Uneven Cooling
After pouring, soap undergoes a gel phase where internal heat promotes complete saponification. If one side cools faster than another, thermal gradients form, encouraging oil migration and layering.
Ensure molds are insulated evenly. Avoid placing soap near drafts or vents. Use wool blankets or cardboard boxes—not plastic covers, which trap moisture and promote sweating.
Step-by-Step Guide to Preventing Soap Separation
Follow this timeline-based protocol to minimize risk and improve batch stability:
- Preparation (Day Before): Measure all ingredients precisely. Pre-melt butters and heat oils only as needed. Prepare lye solution in a well-ventilated area and allow it to cool uncovered to target range.
- Temperature Check (Before Mixing): Confirm both oils and lye water are within 100–120°F (±5°F tolerance).
- Mixing Phase: Begin blending immediately upon combining. Use an immersion blender in short bursts, stirring constantly. Stop every 30 seconds to check consistency.
- Trace Assessment: Drizzle batter across the surface. If it leaves a faint trail that slowly sinks, continue blending. Aim for medium-thick trace—like cake batter.
- Add Fragrance Gradually: Add FO slowly while blending. Watch for sudden thickening or thinning. If separation begins, blend harder and faster to recover emulsion.
- Pouring Technique: Pour steadily into the mold center. Tap gently to release air bubbles. Avoid over-stirring post-pour.
- Insulation Protocol: Cover mold with parchment paper, then wrap in towels. Keep in a quiet, draft-free space for 24–48 hours.
- Unmolding & Cutting: Wait until soap reaches firmness (usually 24–72 hrs). Cut cleanly with a wire cutter or knife.
- Curing Environment: Store cut bars on wax paper in a cool, dry, ventilated area. Rotate occasionally for even airflow.
Do’s and Don’ts: Best Practices Table
| Do’s | Don’ts |
|---|---|
| Use a digital thermometer for precise readings | Guess temperatures by touch |
| Weigh all ingredients with a calibrated scale | Measure oils or lye by volume |
| Blend to consistent medium trace | Pour at thin or false trace |
| Test new fragrances at 0.5 oz per pound of oils first | Use maximum FO load blindly |
| Insulate molds uniformly | Leave soap exposed to cold air currents |
| Cure bars on breathable surfaces (parchment, racks) | Stack uncured soaps directly on each other |
Can You Salvage Separated Soap?
Yes—depending on severity. Minor oil separation on the surface can often be wiped off and the batch rebatched. Here’s how:
- Grate the affected soap finely.
- Add 1–2 tbsp of distilled water per pound of soap.
- Heat gently in a slow cooker or double boiler, stirring frequently.
- Once melted and homogeneous, stir in additional fragrance or herbs if desired. Re-pour into a mold and allow to set.
Note: Rebatched soap may have a rustic appearance but remains safe and functional. It often has a higher glycerin content, making it more moisturizing.
However, if separation occurred due to rancid oils or contamination, discard the batch. Trust your senses—if it smells sour, looks moldy, or feels excessively greasy after weeks of curing, it won’t improve.
Mini Case Study: Recovering a Split Batch
Jamila, a home soapmaker in Oregon, noticed her lavender-oatmeal batch had separated after 36 hours. Oil formed a slick on top, and the bottom third felt dense while the upper layer crumbled.
She reviewed her process: she’d mixed at 130°F (oil) and 105°F (lye), creating a 25°F differential. She also used a new fragrance oil at full recommended usage (0.7 oz/lb), which accelerated trace dramatically.
Jamila decided to rebatch. She grated the entire loaf, added 3 tablespoons of water, and heated slowly over two hours. The second time, she poured into individual molds and insulated carefully. The resulting bars were uniform, mild, and performed excellently in use.
Her takeaway: “I learned that temperature control matters more than I thought. Now I never mix outside a 10-degree window.”
Frequently Asked Questions
Why does oil rise to the top of my soap after pouring?
This usually means the emulsion broke before setting. Common causes include under-mixing, large temperature gaps, or fragrance-induced acceleration. The free oils weren’t fully incorporated and migrate upward as the soap sets.
Is separated soap safe to use?
If the separation happened early and the oils used were fresh, yes—once rebatched or cured properly. However, if the oils have gone rancid (indicated by a sour or cheesy smell), the soap should not be used, as it could irritate skin.
How long should I cure soap before assuming it’s failed?
Wait at least four weeks. Some batches appear unstable early on but stabilize during extended curing. Monitor hardness, odor, and texture weekly. True failure shows no improvement over time.
Expert Checklist: Prevent Soap Separation
- ✅ Weigh all ingredients accurately using a digital scale
- ✅ Match oil and lye temperatures within 10°F
- ✅ Blend to medium-thick trace before adding fragrance
- ✅ Test new fragrance oils at reduced usage rates
- ✅ Insulate molds evenly for consistent gel phase
- ✅ Avoid overloading with botanicals or liquids
- ✅ Cure in a dry, ventilated space away from sunlight
- ✅ Keep detailed batch notes for troubleshooting
Final Thoughts: Turning Failure Into Mastery
Every soapmaker experiences separation at some point. What separates hobbyists from skilled artisans is not perfection—but persistence in diagnosing and correcting mistakes. By understanding the science behind emulsion stability and respecting the delicate balance of temperatures, timing, and additives, you gain control over your craft.
Don’t view separation as a loss. See it as feedback—an invitation to refine your process. With each adjusted batch, you build intuition and confidence. The next time you see signs of instability, you’ll know exactly what to do.


 浙公网安备
33010002000092号
浙公网安备
33010002000092号 浙B2-20120091-4
Comments
No comments yet. Why don't you start the discussion?