
Making yogurt at home is a rewarding process that allows you to control ingredients, avoid additives, and enjoy a fresher, creamier product than most store-bought versions. But nothing is more frustrating than opening your jar after hours of careful incubation only to find a thin, soupy mess instead of thick, luscious yogurt. If you've ever asked, \"Why is my homemade yogurt too runny?\" you're not alone. Runny yogurt is one of the most common issues in DIY fermentation, but it’s usually preventable—and often fixable—with the right knowledge.
The texture of homemade yogurt depends on a delicate balance of temperature, time, bacterial activity, milk composition, and handling. When any part of this equation goes off track, the result can be disappointing. The good news? Most causes of runny yogurt are correctable once you understand what went wrong. This guide breaks down the science behind yogurt fermentation, identifies the most frequent culprits, and gives you practical steps to achieve consistently creamy results every time.
Understanding Yogurt Fermentation: The Science Behind Thickening
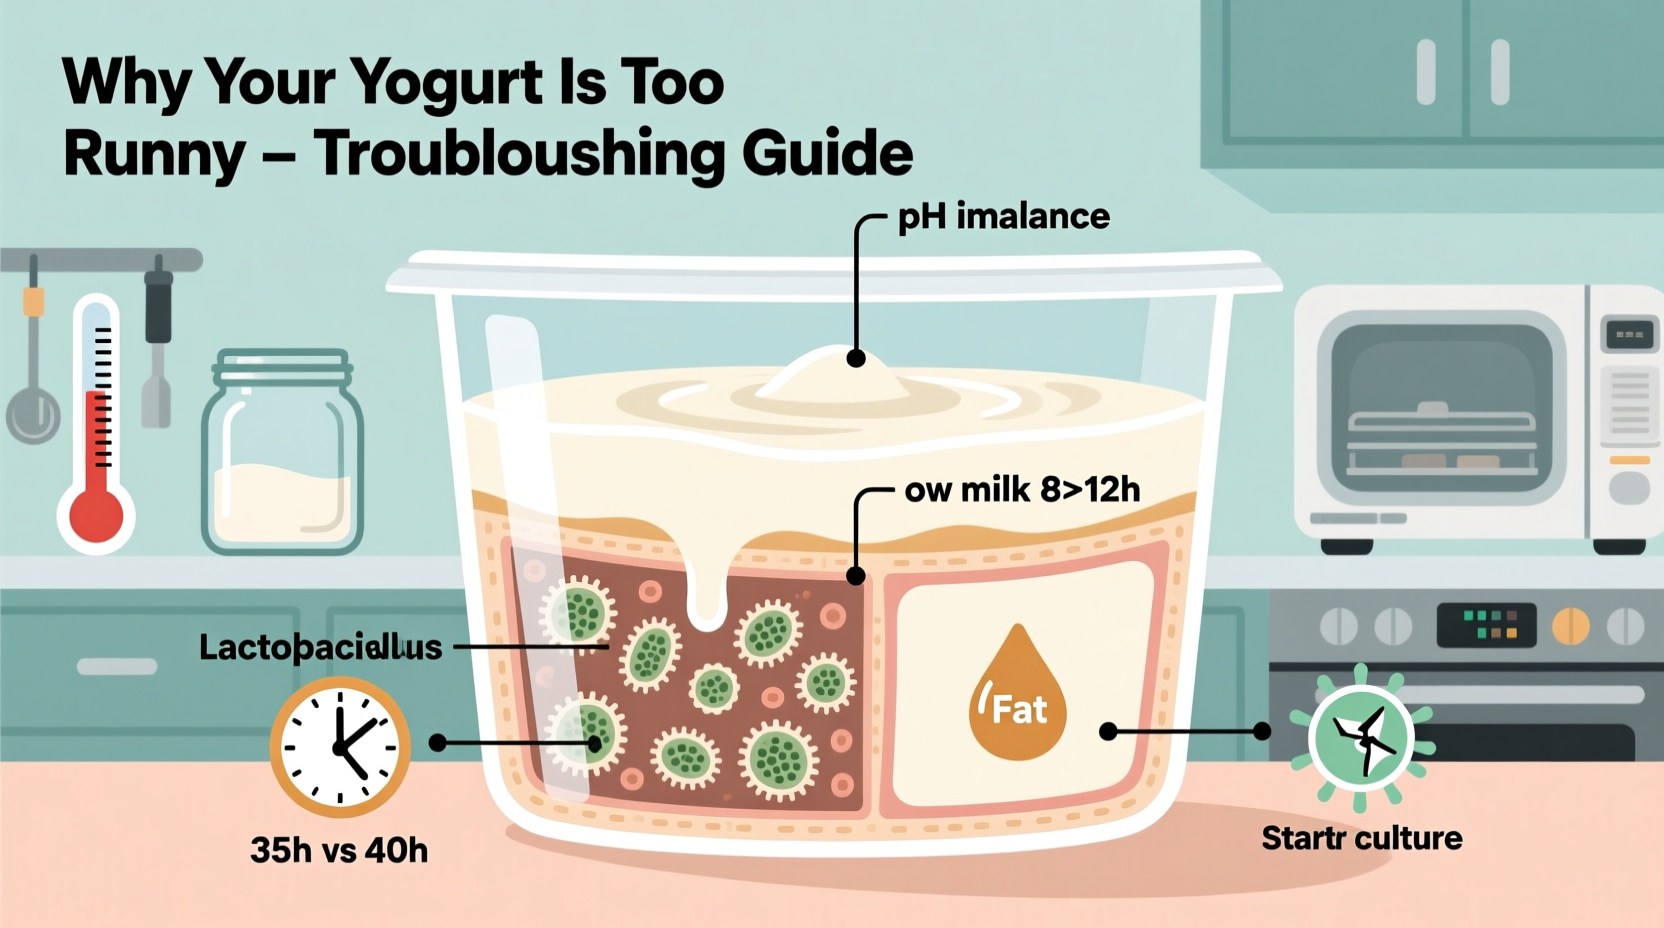
Yogurt forms when live bacterial cultures—typically *Lactobacillus bulgaricus* and *Streptococcus thermophilus*—ferment lactose (milk sugar) into lactic acid. As lactic acid accumulates, the pH of the milk drops, causing the milk proteins (mainly casein) to coagulate and form a gel-like network. This transformation is what gives yogurt its characteristic tang and thickness.
For proper gel formation, several conditions must be met:
- Optimal temperature: Between 108°F and 112°F (42°C–44°C). Too cold, and bacteria won’t activate; too hot, and they’ll die.
- Sufficient incubation time: Usually 6–12 hours. Shorter times may not allow full protein coagulation.
- Adequate protein content: Higher protein = thicker yogurt. Whole milk yields better results than skim.
- Active starter culture: Old or weak cultures may fail to produce enough acid for proper setting.
When one or more of these elements falls short, the protein structure doesn’t set properly, leading to a runny consistency—even if the flavor seems fine.
Common Causes of Runny Homemade Yogurt
1. Incorrect Incubation Temperature
Temperature is the single most critical factor in yogurt fermentation. If the environment is too cool, bacterial activity slows or stops, resulting in incomplete fermentation. If it’s too hot, the cultures die, halting acid production altogether.
Many home setups—like ovens with only the light on, cool kitchen counters, or poorly insulated yogurt makers—fail to maintain a steady 110°F (43°C). Fluctuations of even 5–10 degrees can significantly impact texture.
2. Insufficient Incubation Time
Some recipes suggest 6 hours, but many milks and cultures need 8–12 hours to fully coagulate. Cutting incubation short may yield yogurt that’s safe to eat but still thin. Longer fermentation increases acidity, which strengthens the protein gel.
“Patience is key. I’ve found that letting my goat milk yogurt ferment for 10–12 hours makes all the difference in texture.” — Dr. Lena Patel, Food Microbiologist and Home Fermenter
3. Low-Protein Milk
The type of milk used directly affects thickness. Skim milk produces thinner yogurt because it lacks fat and has less total solids. Even some organic or non-homogenized milks may have lower protein content.
Plant-based milks like almond or oat rarely set without added thickeners (e.g., agar, tapioca starch) because they lack casein, the primary protein responsible for gel formation.
4. Weak or Inactive Starter Culture
If your starter yogurt is old, improperly stored, or from a batch that didn’t ferment well, it may contain insufficient live cultures. Each generation of homemade yogurt loses some potency, so it's best to refresh your starter every few batches with store-bought plain yogurt containing live active cultures—or use freeze-dried starter packets.
5. Disturbing the Yogurt During Fermentation
Even gentle shaking or stirring during incubation can disrupt the developing protein matrix. Avoid moving the jars or checking texture until fermentation is complete.
6. Overheating the Milk
While heating milk to 180°F (82°C) helps denature proteins for better thickening, overheating or scorching can damage proteins and reduce their ability to form a stable gel. Rapid cooling afterward is also essential to prevent skin formation and ensure even inoculation.
Troubleshooting Checklist: How to Fix Runny Yogurt
Use this step-by-step checklist to identify and correct the issue in your next batch:
- ✅ Heat milk to 180°F (82°C), stirring frequently to prevent scorching.
- ✅ Cool milk rapidly to 110°F (43°C) using an ice bath or cold water bath.
- ✅ Use a fresh, high-quality starter with live active cultures (check expiration date).
- ✅ Maintain a consistent incubation temperature between 108°F and 112°F for 8–12 hours.
- ✅ Use whole milk or add dry milk powder (¼ cup per quart) to boost protein and solids.
- ✅ Avoid disturbing the jars during fermentation.
- ✅ Refrigerate for at least 6 hours after incubation to allow further thickening.
What to Do If Your Yogurt Is Already Runny
If you’ve opened your batch and found it too thin, don’t discard it. There are several ways to salvage runny yogurt:
Option 1: Re-incubate
If the yogurt smells sour but isn’t moldy, return it to the incubator for another 2–4 hours. Sometimes, extra time allows the cultures to catch up and strengthen the gel.
Option 2: Strain It Into Greek-Style Yogurt
Straining removes whey, concentrating the protein and fat. Line a colander with cheesecloth or a coffee filter, pour in the yogurt, and let it drain in the refrigerator for 2–6 hours, depending on desired thickness.
Option 3: Use It Creatively
Runny yogurt works perfectly in smoothies, salad dressings, marinades, or as a buttermilk substitute in baking. Its tangy flavor and probiotic content remain intact—even if the texture isn’t ideal for eating with a spoon.
Best Practices for Consistently Thick Yogurt
To avoid runny yogurt in the future, adopt these proven techniques:
Use High-Quality Ingredients
Fresh, pasteurized (not ultra-pasteurized or UHT) milk performs best. Ultra-pasteurized milk has been heated so high that its proteins are partially damaged, making it harder to set. If you can only find UHT milk, adding dry milk powder improves results.
Standardize Your Process
Keep notes on each batch: milk type, starter source, incubation time and temperature, and final texture. Over time, you’ll identify patterns and refine your method.
Invest in Reliable Equipment
An insulated cooler with warm water, a dedicated yogurt maker, or a sous-vide setup offers superior temperature control. An oven with a pilot light or a heating pad wrapped around a cooler can also work—but monitor with a thermometer.
| Milk Type | Protein Content (per cup) | Expected Thickness | Notes |
|---|---|---|---|
| Whole Cow Milk | 8g | Thick | Best for beginners; rich and creamy |
| Skim Milk | 8.5g | Thin | Lacks fat; add dry milk powder |
| Goat Milk | 7g | Moderate | Naturally slightly thinner; longer incubation helps |
| Ultra-Pasteurized Milk | 8g | Thin to Moderate | Proteins damaged by heat; not ideal |
| Milk + Dry Milk Powder | ~12g | Very Thick | Recommended for reliable results |
Real Example: From Runny to Rich in Three Batches
Sarah, a home cook in Vermont, struggled for weeks with runny yogurt. Her first batch used skim organic milk and a 6-hour incubation in a turned-off oven with just the light on. The result was drinkable but unappealingly thin. She tried again with whole milk but skipped heating it to 180°F, assuming it wasn’t necessary since the milk was already pasteurized. That batch was slightly better but still wept whey quickly.
On her third attempt, Sarah followed a strict protocol: she heated whole milk to 180°F, cooled it to 110°F, added a fresh starter from a trusted brand, and incubated it for 10 hours in a cooler with warm water (maintained at 110°F with periodic checks). The result was thick, creamy, and held its shape when scooped. She now makes yogurt weekly and shares her success with friends who faced similar issues.
Frequently Asked Questions
Can I use homemade yogurt as a starter forever?
No. After 5–7 generations, the bacterial balance shifts, and cultures weaken. Always refresh your starter every few batches with store-bought yogurt containing live active cultures or use a freeze-dried starter.
Why does my yogurt separate liquid on top?
The clear liquid is whey, a natural byproduct of fermentation. A small amount is normal, especially in thinner yogurts. Excessive separation suggests under-fermentation, temperature fluctuations, or low protein. Stirring it back in is safe and common.
Does longer fermentation make yogurt healthier?
Longer fermentation increases probiotic count and reduces lactose, making it easier to digest. However, beyond 12 hours, the yogurt may become overly tart or grainy. Most benefits plateau around 8–10 hours.
Final Tips for Success
Consistency in yogurt-making comes from precision and repetition. Small variables—like milk source, room temperature, and starter vitality—can change outcomes. By controlling what you can and learning from each batch, you’ll soon develop intuition for the process.
Remember: even “failed” yogurt is nutritious and usable. The bacteria are likely still active, and the lactic acid provides preservation. Don’t throw it out—repurpose it into sauces, baked goods, or smoothies.
“The best yogurt makers aren’t those with fancy equipment, but those who observe, adjust, and keep trying.” — Rafael Torres, Artisan Dairy Fermentation Instructor
Conclusion
Runny homemade yogurt doesn’t mean failure—it means there’s room to learn and improve. Whether it’s adjusting your incubation temperature, extending fermentation time, or boosting milk solids, every variable you master brings you closer to perfect, spoonable yogurt. The process is as much about patience and attention as it is about science.
Start applying these fixes today. Take notes, use quality starters, and don’t rush the fermentation. With a few adjustments, you’ll turn thin batches into thick, tangy success stories. And once you do, you’ll never go back to store-bought.


 浙公网安备
33010002000092号
浙公网安备
33010002000092号 浙B2-20120091-4
Comments
No comments yet. Why don't you start the discussion?