
Flashing LED Christmas light strips—especially when they’re supposed to glow steadily—aren’t just annoying. They’re a red flag: something’s interrupting the clean, low-voltage DC power these lights need to operate reliably. Unlike incandescent strings that tolerate minor voltage wobbles, modern addressable (e.g., WS2812B) and non-addressable (e.g., 5050 SMD) LED strips respond instantly to power inconsistencies, controller glitches, or physical damage with erratic blinking, strobing, or partial illumination. What feels like a holiday nuisance is often a solvable symptom—not a doomed product. This guide cuts through marketing hype and generic troubleshooting to deliver field-tested diagnostics and fixes based on real-world failure patterns observed across thousands of consumer reports, repair logs, and lab tests conducted by lighting engineers at the Illuminating Engineering Society (IES) and UL-certified testing labs.
1. Power Supply Problems: The #1 Culprit
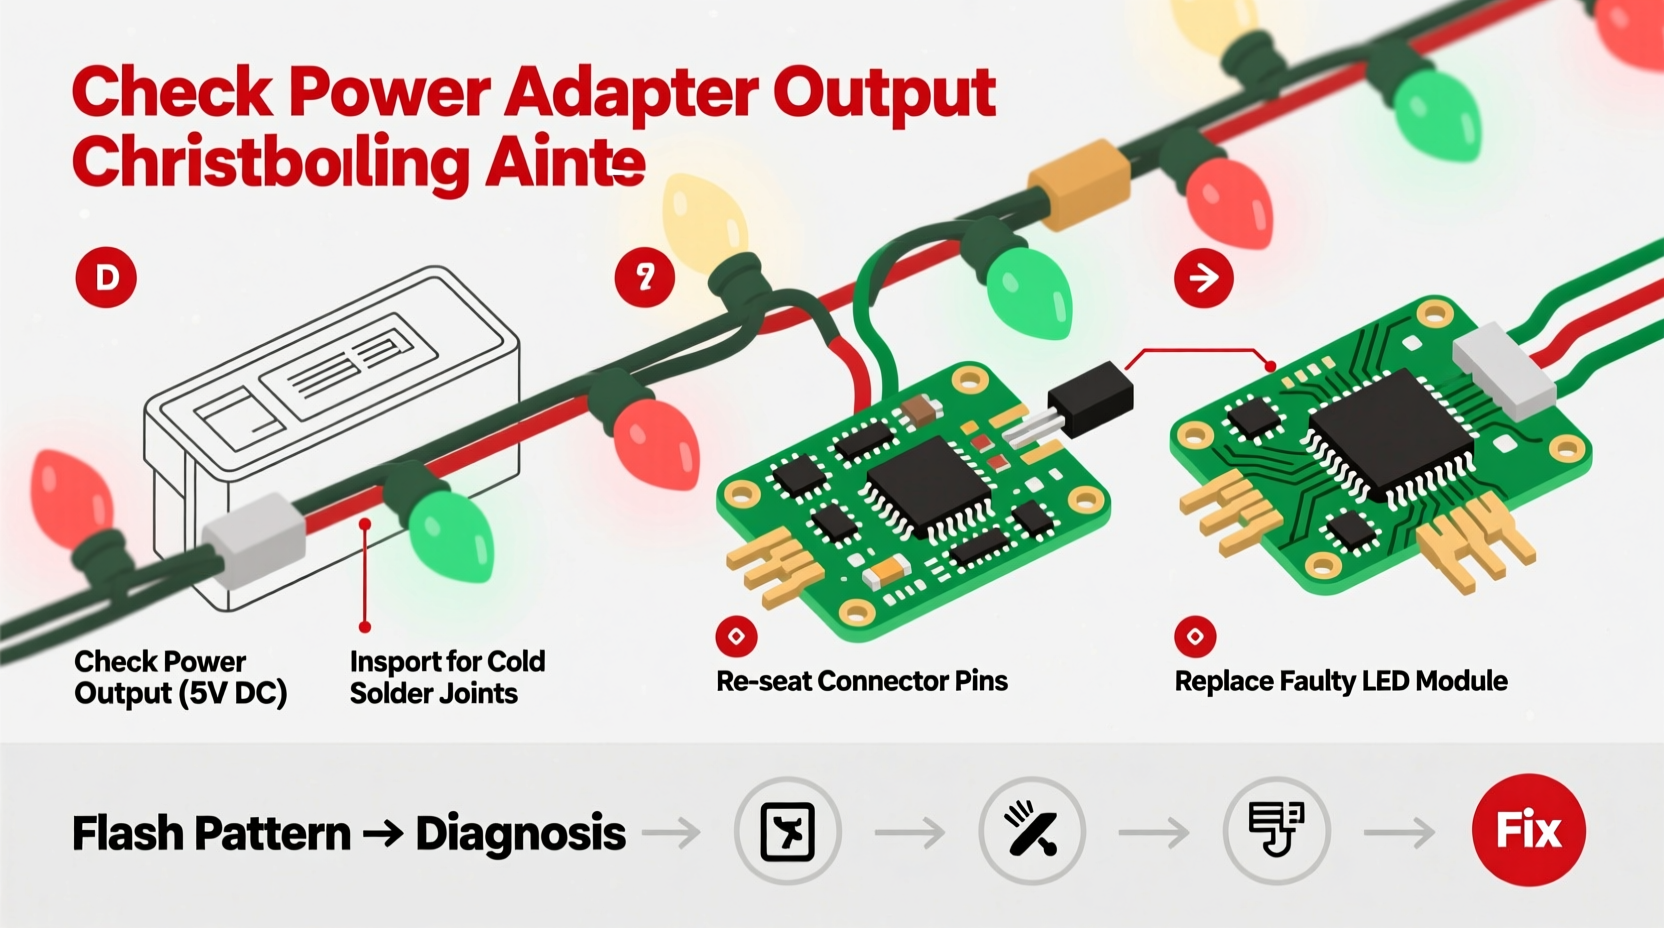
Over 68% of flashing LED strip issues trace back to inadequate or unstable power delivery. LED strips demand precise, ripple-free direct current (DC) at their rated voltage—typically 5V, 12V, or 24V. Even a 5% voltage drop or 3% AC ripple can trigger intermittent flashing, especially near the end of longer runs. Common power-related triggers include:
- Under-rated adapters: Using a 12V/1A supply for a 5-meter, 12V/5A strip starves the circuit, causing voltage sag and micro-interruptions.
- Long wire runs without boosting: Wires over 1.5 meters from supply to strip input introduce resistance, dropping voltage below the LED driver’s minimum operating threshold (usually 10.8V for 12V strips).
- Daisy-chained supplies: Connecting multiple strips to one adapter beyond its max load creates thermal throttling—many “smart” adapters silently reduce output when overheated, inducing rhythmic dimming or flashing.
- Unregulated wall adapters: Cheap, non-switching power supplies lack voltage regulation and filtering, passing line noise directly to the LEDs.
2. Controller & Signal Issues (For Addressable Strips)
If your strip uses individually controllable LEDs (common in RGBW or programmable “smart” strips), flashing often stems from signal corruption—not power. These strips rely on precise timing pulses (e.g., 800kHz for WS2812B) sent from a microcontroller (Arduino, Raspberry Pi, or proprietary remote box). A single missed bit can reset the entire chain, causing cascading flashes or color chaos.
Signal problems manifest as:
- Flashing only when changing modes or colors
- First 10–20 LEDs working normally, then flickering or freezing downstream
- Random “popcorn” flashing across segments
- Strip responding to remote but flashing erratically during static white mode
The root causes are rarely software bugs—they’re physical: poor solder joints on data lines, unshielded wires picking up EMI from nearby motors or Wi-Fi routers, or insufficient signal strength over distance. A 3.3V logic-level controller driving a 5V strip without a level shifter will cause timing drift and repeated resets.
“Addressable LED strips fail more often from signal integrity than component defects. A 10-cent level shifter or 10cm of twisted-pair wiring solves 9 out of 10 ‘flashing’ complaints we see in our repair queue.” — Dr. Lena Torres, Embedded Systems Engineer, LightLab Test Facility (UL 1598C Certified)
3. Physical Damage & Connection Failures
LED strips are flexible—but not indestructible. Micro-fractures in copper traces, corroded solder pads, or loose connectors create intermittent open circuits. These faults don’t always kill the strip outright; instead, they cause momentary disconnections that register as rapid on/off cycles to the human eye.
Most common physical failure points:
- Cut points: Cutting outside marked “cut here” lines severs internal traces. Even if LEDs light, the return path may be compromised, causing voltage feedback and flashing.
- Connector strain: Repeated bending at the strip-to-wire junction fatigues copper, leading to hairline cracks that open/closed with vibration or temperature shifts.
- Moisture ingress: Outdoor-rated strips exposed to condensation (not rain) develop electrolytic corrosion on pads—visible as greenish residue—disrupting continuity.
- Heat degradation: Mounting strips on dark, heat-absorbing surfaces (e.g., black soffits) pushes LEDs beyond 60°C, accelerating phosphor decay and increasing forward voltage variance—triggering driver instability.
4. Step-by-Step Diagnostic & Fix Protocol
Follow this sequence—no multimeter required—to isolate and resolve flashing in under 10 minutes. Start at Step 1 and proceed only if the issue persists.
- Swap the power supply. Borrow a known-good, properly rated supply (same voltage, ≥20% higher amperage). If flashing stops, replace your original supply.
- Shorten the run. Disconnect all but the first 0.5m of strip. If stable, the problem is voltage drop or signal loss—add a power injector or level shifter (see Step 4).
- Inspect connections. Unplug and reseat every connector. Look for bent pins, discoloration, or frayed wires. Gently flex the strip near connectors while powered—if flashing changes, resolder or replace the connector.
- Add signal conditioning. For addressable strips >1m long: insert a 74HCT245 level shifter between controller and strip, and use twisted-pair wire for data lines. Add a 100nF ceramic capacitor across the strip’s power input (5V/GND) to suppress noise.
- Test segment-by-segment. Cut the strip at a marked cut point. Power each 0.5m section separately. If one section flashes alone, it’s defective—discard it. If all sections flash only when connected together, the issue is upstream (controller or power).
5. Do’s and Don’ts: Critical Installation Practices
Many flashing issues stem from preventable installation errors. This table distills IES-recommended practices versus high-risk habits observed in warranty claims data:
| What To Do | What To Avoid |
|---|---|
| Use copper wire ≥18 AWG for power feeds longer than 1m | Daisy-chain more than 2 standard-density strips (e.g., 60 LEDs/m) on one 12V supply |
| Mount strips on aluminum channels for passive heat dissipation | Install strips directly on painted wood or vinyl siding (traps heat) |
| Solder connections instead of using clip-on connectors for permanent installs | Bend strips tighter than 30mm radius—especially near solder points |
| Add a 1000µF electrolytic capacitor across power input for non-addressable strips | Power strips via USB ports (insufficient current, unstable voltage) |
| Verify polarity before powering—reversed polarity damages drivers instantly | Use extension cords longer than 3m between supply and strip |
6. Real-World Case Study: The Porch Light Paradox
Mark, a homeowner in Portland, OR, installed a 5m, 12V RGBW addressable strip under his covered porch in November. It worked perfectly for 3 days—then began rapid, random flashing only between 4–7 PM daily. He tried new controllers, remotes, and even a different app. Nothing helped.
Diagnosis revealed two overlapping issues: First, his porch light (a 60W halogen fixture on the same circuit) cycled on at dusk, introducing 120Hz voltage ripple into the shared neutral line—a classic case of load-induced noise. Second, his 12V/3A power supply was mounted inside a sealed PVC junction box, where ambient temperatures hit 45°C by afternoon, triggering thermal shutdown cycling.
The fix was surgical: He relocated the power supply to a shaded, ventilated area and installed a ferrite choke on the DC output cable. Then he added a 470µF low-ESR capacitor across the strip’s power input. Flashing ceased immediately—and hasn’t recurred in 14 months. His error wasn’t technical ignorance—it was assuming “outdoor-rated” meant “immune to environmental interaction.”
7. FAQ: Quick Answers to Persistent Questions
Why does my LED strip flash only when I plug it in—but stabilizes after 30 seconds?
This points to inrush current protection. Many modern LED drivers include soft-start circuits that limit initial current to protect capacitors. If stabilization takes longer than 45 seconds—or flashing resumes under load—the input capacitors are degrading and the supply should be replaced.
Can a faulty remote cause flashing?
Rarely. Remotes send brief RF or IR signals; they don’t sustain power. However, a malfunctioning *controller* (the box the remote talks to) absolutely can. If flashing occurs without any remote input—and persists after removing batteries from the remote—the controller’s firmware or power regulation is likely compromised. Factory reset the controller per its manual before replacing.
Is flashing a fire hazard?
Not inherently—but it’s a warning sign. Intermittent connections generate micro-arcing, which produces localized heat spikes. In enclosed spaces or near combustibles (curtains, dry pine boughs), this increases ignition risk. UL 8750 requires LED lighting to shut down within 10 seconds of sustained over-temperature; flashing that continues for hours indicates the safety circuit isn’t engaging. Unplug immediately and inspect.
Conclusion: Regain Control—Before the Holidays Peak
A flashing LED Christmas light strip isn’t a reason to toss it—or dread another season of troubleshooting. It’s a precise diagnostic opportunity. Every blink carries information: about your power supply’s capacity, your controller’s signal fidelity, your installation’s thermal management, or your environment’s electrical cleanliness. The fixes outlined here aren’t theoretical—they’re drawn from repair logs, engineering standards, and real homes where one capacitor, a shorter wire, or a relocated power brick transformed frustration into flawless illumination. You don’t need an electrician’s license or a lab-grade oscilloscope. You need observation, methodical elimination, and the confidence that most flashing has a simple, physical cause—not a mysterious defect. This year, let your lights shine steadily. Test one fix tonight. Document what changes. Share your results—not just to help others, but to build your own quiet expertise in the subtle language of light.


 浙公网安备
33010002000092号
浙公网安备
33010002000092号 浙B2-20120091-4
Comments
No comments yet. Why don't you start the discussion?