
Faded printouts can be frustrating—especially when you're preparing an important report, printing photos, or sending professional documents. Instead of immediately replacing cartridges or calling a technician, it's worth understanding the root causes behind faint, streaky, or uneven printing. More often than not, the solution doesn't require expensive hardware upgrades. With some simple troubleshooting and low-cost interventions, you can restore crisp, clear output from your existing printer. This guide breaks down the most common reasons for faded printing and provides practical, budget-friendly fixes anyone can apply at home.
Common Causes of Faded Printer Output
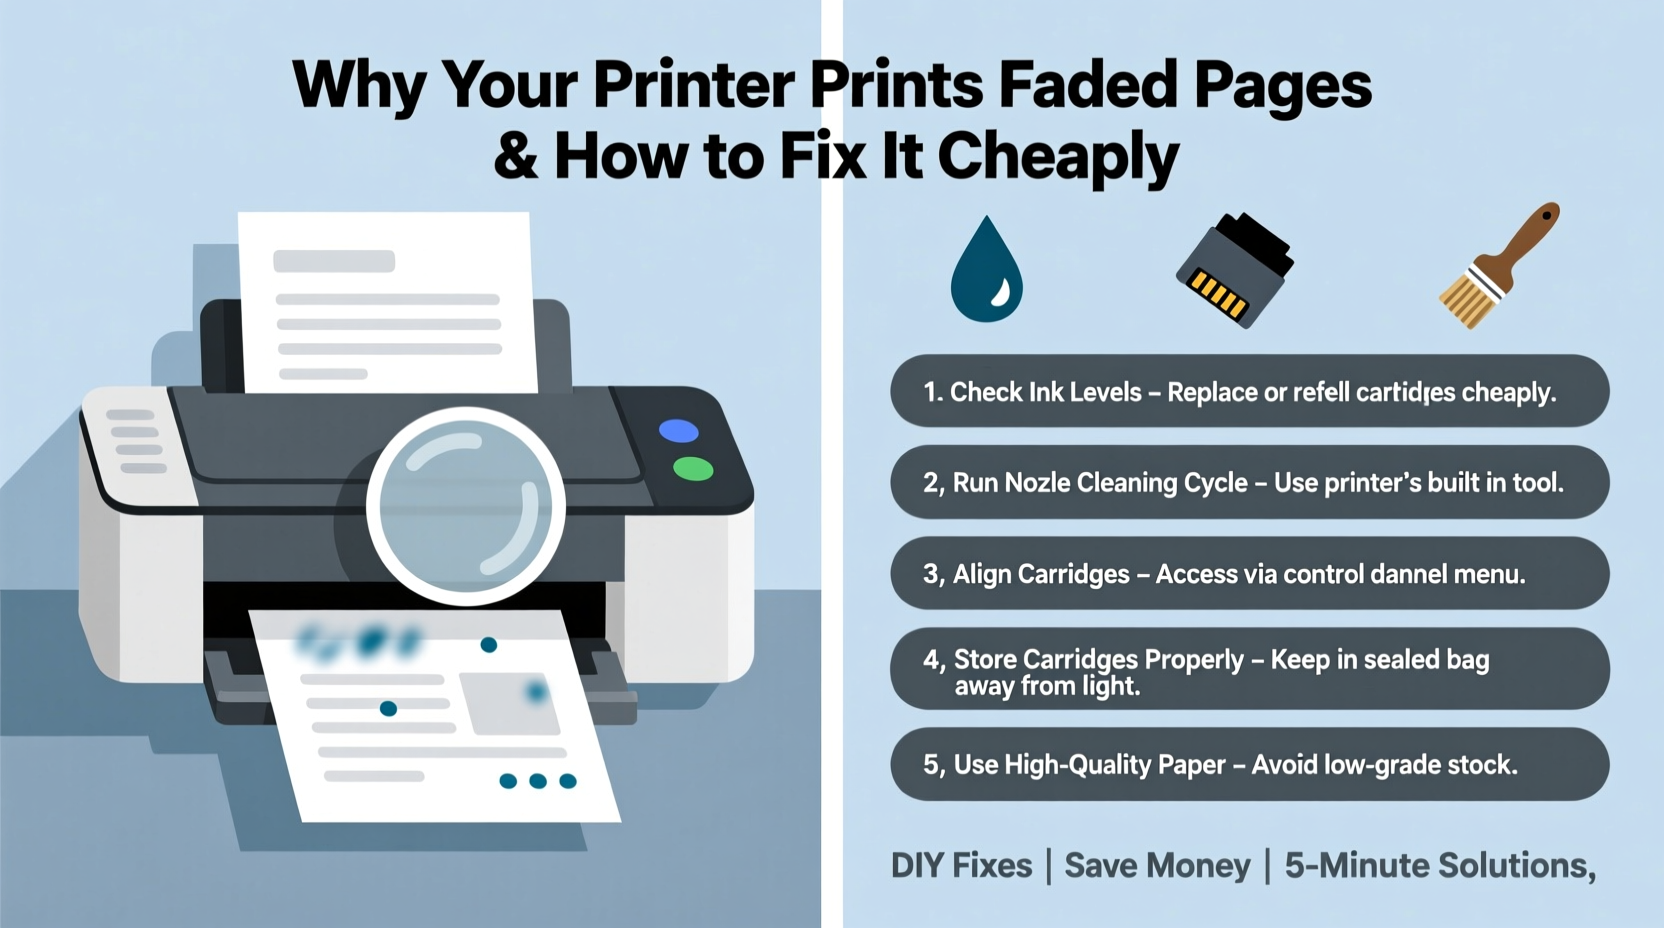
Before diving into solutions, it’s essential to diagnose what’s actually causing the issue. Printers are complex devices that rely on mechanical precision, chemical balance (in ink), and software coordination. A breakdown in any one area can result in poor print quality. The most frequent culprits include:
- Dried or clogged print heads: Ink residue can dry inside nozzles, especially if the printer sits idle for days.
- Low ink levels: Even if your printer shows “ink remaining,” the level might be too low for consistent saturation.
- Poor-quality or third-party ink: Some off-brand cartridges lack proper viscosity or pigment concentration.
- Incorrect paper type settings: Using glossy photo mode on plain paper—or vice versa—can affect ink absorption.
- Outdated or corrupted drivers: Software glitches can miscommunicate with the printer, leading to incomplete prints.
- Environmental factors: High humidity or extreme temperatures impact ink flow and drying time.
Identifying which factor applies to your situation determines the best course of action. Many users jump straight to buying new cartridges, but that may not solve the underlying problem.
Step-by-Step Guide to Diagnose and Fix Faded Printing
Follow this logical sequence to systematically eliminate possible causes and restore full print quality without spending unnecessarily.
- Print a diagnostic page. Access your printer’s control panel or printer software on your computer and select \"Print Test Page\" or \"Nozzle Check.\" This reveals whether all colors and lines appear uniformly.
- Clean the print heads. Use the automatic cleaning cycle found in printer settings. Wait 10–15 minutes between cycles to avoid overheating. Repeat up to three times if needed.
- Check ink levels manually. Don’t rely solely on software indicators. Open the cartridge compartment and visually inspect ink levels, especially for black and color cartridges.
- Replace or refill cartridges only if necessary. If cleaning didn’t help and ink is genuinely low, consider refilling instead of replacing.
- Adjust print settings. Ensure you’re using the correct paper type and print quality setting (e.g., “Best” for photos, “Normal” for drafts).
- Update printer drivers. Visit the manufacturer’s website and download the latest driver compatible with your operating system.
- Inspect for physical obstructions. Look for stuck rollers, debris, or dried ink smears inside the cartridge bay.
If fading persists after these steps, deeper intervention may be required—but still within reach of DIY repair.
Affordable Fixes That Actually Work
You don’t need to spend hundreds on service calls or premium ink. Here are several proven, cost-effective methods to resolve ink-related issues.
Manual Print Head Cleaning (For Stubborn Clogs)
When automatic cleaning fails, a hands-on approach can revive blocked nozzles. This method works best for inkjet printers.
- Turn off the printer and unplug it.
- Remove the ink cartridges carefully.
- Dampen a lint-free cloth or cotton swab with distilled water (for water-based inks) or isopropyl alcohol (for stubborn clogs).
- Gently wipe the copper contacts and underside of the cartridges.
- Use a folded damp cloth to lightly press against the print head inside the printer for 1–2 minutes to loosen dried ink.
- Reinstall cartridges, plug in the printer, and run another nozzle check.
This process dissolves dried ink without damaging sensitive components. Avoid using tap water—it contains minerals that can worsen clogging.
Ink Refilling vs. Replacement: What Saves More?
Original equipment manufacturer (OEM) cartridges are reliable but expensive. Third-party options and refills offer significant savings—if done correctly.
| Option | Avg Cost per Cartridge | Pros | Cons |
|---|---|---|---|
| OEM Cartridge | $30–$60 | Guaranteed compatibility, optimal performance | Expensive long-term; contributes to waste |
| Compatible Third-Party | $15–$25 | Lower price, widely available | Variable quality; may void warranty |
| Refill Kit (DIY) | $8–$12 (per refill) | Cheapest option; eco-friendly | Requires skill; risk of spills or damage |
A refill kit pays for itself after just two uses. However, always use high-quality ink formulated for your printer model to prevent clogs or printhead damage.
Preventive Maintenance Checklist
Prevention is cheaper than repair. Incorporate these habits into your routine to keep your printer running smoothly.
- ✅ Print at least once every 7–10 days to prevent ink from drying in nozzles.
- ✅ Store spare cartridges in a cool, dark place with tips sealed.
- ✅ Use genuine or reputable third-party ink—avoid ultra-cheap unknown brands.
- ✅ Keep firmware and drivers updated through the manufacturer’s website.
- ✅ Clean exterior vents and paper feed rollers monthly with a dry microfiber cloth.
- ✅ Align print heads quarterly via the maintenance menu.
- ✅ Disable deep sleep mode if your printer frequently fails to wake up properly.
These small actions add up to longer cartridge life, fewer jams, and consistently sharp output.
Real-World Example: Sarah’s Home Office Turnaround
Sarah, a freelance graphic designer, relied on her inkjet printer for client proofs and invoices. After two weeks of vacation, she returned to find her prints were patchy and text appeared washed out. Her first instinct was to order new cartridges—nearly $120 in total. Instead, she followed a basic cleaning protocol: ran two nozzle checks, performed an automatic head cleaning, then wiped the contacts with isopropyl alcohol. On the third try, print quality improved dramatically. She later discovered her printer had been set to “Economy Mode” by default after a recent update. Switching back to “High Quality” restored full vibrancy. Total cost: $0. Time invested: 25 minutes.
This case illustrates how easily overlooked settings and minor maintenance oversights can mimic hardware failure.
“Most printer issues aren’t mechanical—they’re operational. Regular use and basic care prevent 80% of common problems.” — James Lin, Certified Printer Technician with 12 years of field experience
Do’s and Don’ts of Ink Management
To avoid recurring issues, follow this quick-reference table outlining best practices and common mistakes.
| Action | Do | Don’t |
|---|---|---|
| Cleaning | Use distilled water or isopropyl alcohol with lint-free cloths | Use abrasive materials or household cleaners |
| Cartridge Handling | Keep nozzles facing down; avoid touching electrical contacts | Leave cartridges exposed to air for extended periods |
| Storage | Seal unused cartridges in original packaging or ziplock bags | Store in direct sunlight or humid areas like bathrooms |
| Troubleshooting | Run diagnostics before replacing parts | Assume low ink is the only cause of poor output |
Frequently Asked Questions
Why is my black ink printing gray or light even though the cartridge isn’t empty?
This usually indicates partial clogging in the black nozzle array. Try running multiple head cleanings spaced 10 minutes apart. Also verify that your document isn’t accidentally set to grayscale or draft mode, which reduces ink usage.
Can I mix OEM and third-party cartridges in the same printer?
Technically yes, but it’s not recommended. Mismatched ink formulations can interact poorly, leading to inconsistent drying, color shifts, or printhead contamination. Stick to one brand per print session if possible.
Is it safe to refill ink cartridges myself?
Yes, as long as you use proper tools and compatible ink. Cheap syringes or incorrect ink types can damage internal sensors or cause leaks. Kits designed for your specific cartridge model reduce risks significantly.
Final Thoughts and Action Plan
Faded printing doesn’t automatically mean your printer is failing or that you need to buy expensive supplies. In most cases, the issue stems from preventable causes like dried ink, outdated settings, or neglected maintenance. By understanding how ink flows through your device and taking proactive steps—like regular cleaning, smart storage, and informed cartridge choices—you maintain professional-quality output at a fraction of the cost.
The key is consistency. Just like changing oil in a car prevents engine wear, routine printer care avoids costly breakdowns. Start today: run a nozzle check, clean the contacts, and schedule a weekly print job to keep things flowing. These small habits save money, reduce waste, and extend your printer’s lifespan far beyond expectations.


 浙公网安备
33010002000092号
浙公网安备
33010002000092号 浙B2-20120091-4
Comments
No comments yet. Why don't you start the discussion?