
You’ve stood in front of a department store mirror and felt confident. Then you walked into a hotel bathroom and barely recognized yourself. One mirror makes your skin glow; another highlights every shadow under your eyes. It’s not your imagination—your reflection really does change from mirror to mirror. But why?
The truth is, mirrors don’t just reflect reality—they interpret it. The differences you see aren’t flaws in your appearance but the result of complex interactions between lighting, mirror quality, viewing angle, and even psychological perception. This article cuts through the confusion, debunks popular myths, and explains exactly what shapes your reflection—and how to find the most accurate version of yourself.
The Science Behind Reflection Variability
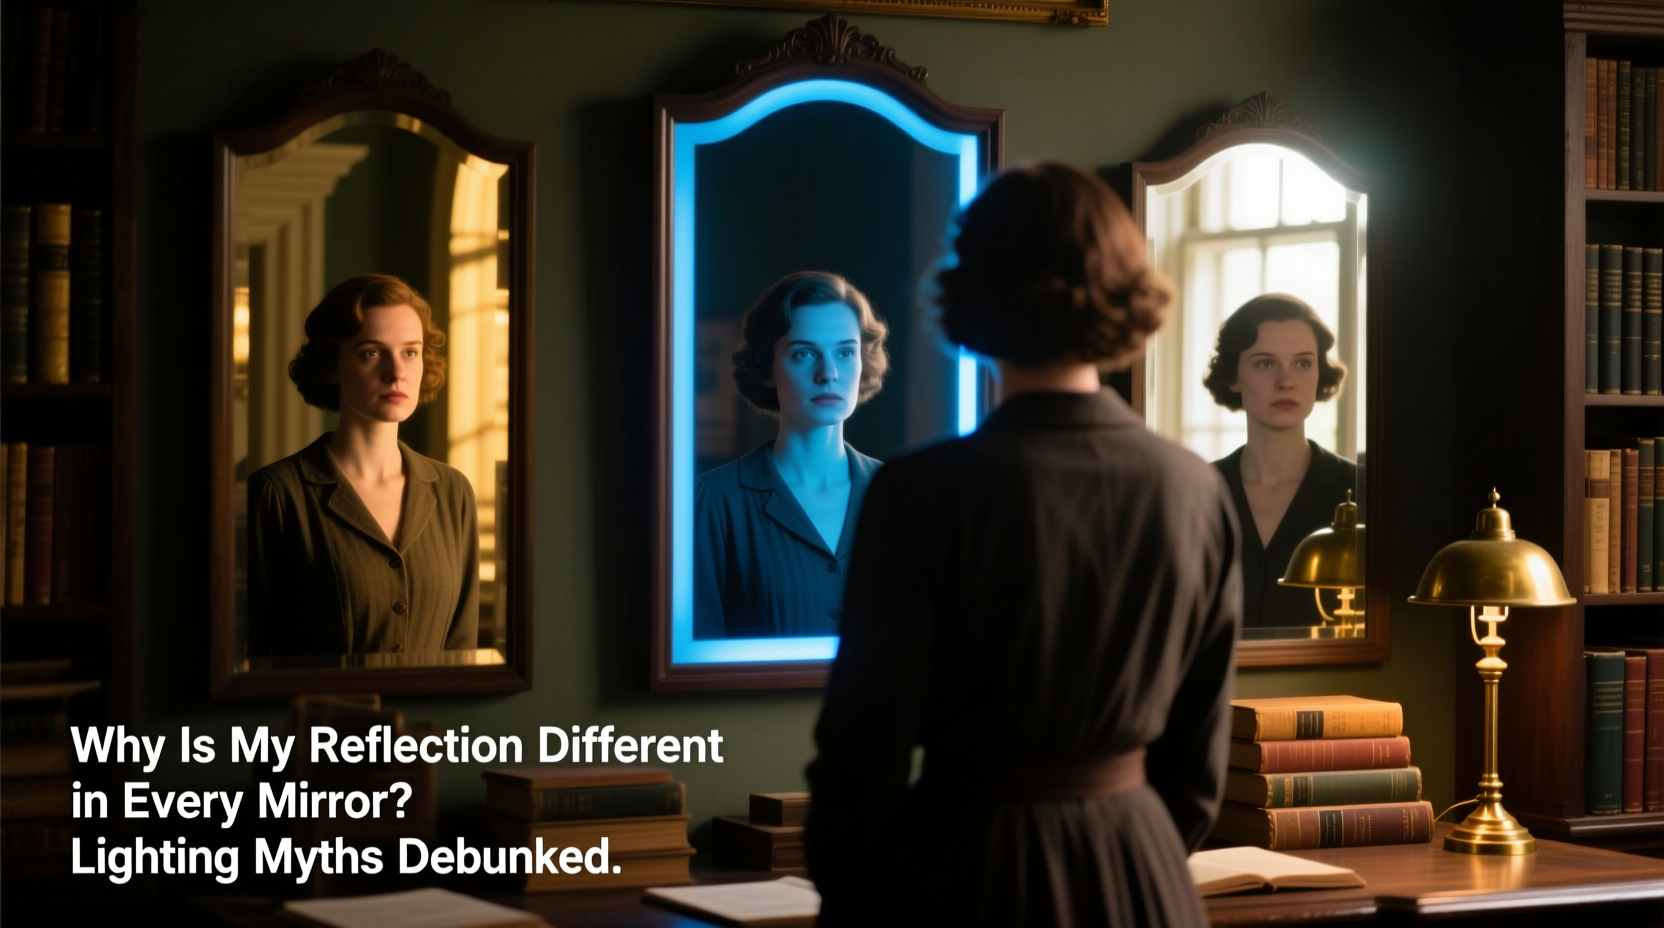
A mirror doesn’t simply “show” you as you are. It captures light bouncing off your body, reflects it back, and delivers an image shaped by multiple physical factors. Two people standing side by side in the same room can appear drastically different in the same mirror based on where the light hits them.
The core components affecting your reflection include:
- Light source type (LED, fluorescent, incandescent)
- Color temperature (measured in Kelvin, affects warmth or coolness)
- Direction of light (overhead, side, front-facing)
- Mirror surface quality (flatness, coating, age)
- Viewing distance and angle
Even slight warping in a mirror—a curve too subtle to notice at first glance—can distort proportions. Older mirrors often develop microscopic imperfections due to silvering degradation, subtly stretching or compressing features over time.
“No mirror shows a perfectly objective image. What we see is always filtered through optics, lighting, and our own perceptual biases.” — Dr. Lena Park, Optical Perception Researcher, MIT Media Lab
Debunking Common Lighting Myths
Many widely accepted beliefs about mirrors and lighting are based more on anecdote than science. Let’s clarify the facts.
Myth 1: “Bathroom lighting always makes you look worse.”
Reality: It’s not the bathroom—it’s the lighting setup. Most bathrooms use overhead fluorescent lights that cast harsh shadows downward, emphasizing eye hollows and jawlines. This creates a “rugged” or “tired” effect, not because the mirror is bad, but because the light direction is unflattering.
Myth 2: “Natural light is always the most accurate.”
Reality: Natural light varies dramatically throughout the day. Morning light is soft and diffused, midday sun is intense and high-contrast, and evening light is warm and low-angle. While natural light is generally more balanced than artificial sources, it’s not consistently “accurate.” A north-facing window provides the most stable daylight without strong color shifts.
Myth 3: “Full-length mirrors show your ‘real’ self.”
Reality: Distance plays a key role in perception. At full-length distances (6+ feet), your brain processes the image more objectively, smoothing out minor flaws. Up close, fine details dominate—pores, hairs, texture—which can make you appear less attractive, even if the mirror is identical.
Myth 4: “Makeup mirrors with lights are the most truthful.”
Reality: Many illuminated vanity mirrors use cool white LEDs (5000K–6500K) designed to mimic daylight, but they often lack diffusion. This creates sharp contrasts and can exaggerate blemishes. Without proper shadow blending, these mirrors may give a hyper-critical view rather than a realistic one.
How Mirror Quality Influences Your Image
Not all mirrors are created equal. The glass flatness, backing material, and frame design all contribute to visual accuracy. Here’s how:
- First-surface vs. second-surface mirrors: Most household mirrors are second-surface, meaning the reflective coating is behind the glass. This can cause a slight double reflection (ghosting) due to light passing through glass twice. First-surface mirrors (used in labs and precision equipment) eliminate this but are fragile and expensive.
- Distortion from mounting: Mirrors mounted on flexible surfaces (like cabinet doors) can warp slightly when opened, bending the reflection. Even wall-mounted mirrors can bow over time if the substrate isn’t rigid.
- Edge warping: Cheaper mirrors often have uneven edges or curved corners, distorting peripheral vision. Stand too close, and your shoulders may appear wider or narrower than they are.
A simple test for mirror distortion: Hold a straight object—like a ruler—against the surface. If the reflection bends or breaks, the mirror isn’t optically flat.
Case Study: Sarah’s Wardrobe Dilemma
Sarah, a fashion consultant, noticed her outfit choices looked great at home but “off” in client meetings. She blamed her taste until she compared reflections. At home, she used a floor-length mirror lit by warm bedside lamps. In offices, she saw herself in fluorescent-lit elevators and entryway mirrors.
She conducted an experiment: wearing the same navy blazer and white shirt, she took photos in five different environments. Results showed the blazer appeared almost black under cool office lighting but rich blue at home. Her face looked pale in overhead light but vibrant in angled lamps.
Her solution? She now evaluates outfits near a north-facing window in daylight hours and uses a portable LED ring light (set to 4000K) when natural light isn’t available. Her confidence—and client feedback—improved immediately.
Choosing the Right Lighting for Accurate Reflections
To minimize distortion and get a consistent, realistic view, focus on lighting quality—not just brightness. Consider these factors:
| Light Type | Color Temp (K) | Best For | Potential Drawbacks |
|---|---|---|---|
| Incandescent | 2700K–3000K | Warm, flattering skin tones | Overemphasizes reds; poor color accuracy |
| Halogen | 3000K–3200K | Natural warmth with better clarity | Generates heat; higher energy use |
| LED (Tunable) | 2700K–5000K | Versatile; mimics daylight | Inexpensive models may flicker or shift hue |
| Fluorescent | 3500K–6500K | Bright task lighting | Harsh shadows; green/cyan tints common |
| Daylight (North Window) | 5500K–6500K | Most balanced spectrum | Unavailable at night; intensity varies |
The ideal setup combines ambient room lighting with front-facing, diffused illumination. Think of how film actors are lit—soft key lights from the front, fill lights to reduce shadows, and no harsh overheads.
Step-by-Step: Create a True-Image Mirror Zone
Follow these steps to set up a reliable space for viewing your reflection accurately:
- Choose the right mirror: Select a full-length or wall-mounted mirror with minimal frame distortion. Ensure it’s mounted on a solid wall.
- Position lighting at face level: Install two soft-white bulbs (4000K) on either side of the mirror, at eye height. Avoid ceiling-only lighting.
- Add diffusion: Use fabric shades, frosted covers, or a sheer panel to soften the light and prevent glare.
- Test for consistency: View your reflection at different times of day. If your skin tone or outfit colors shift dramatically, adjust the bulb temperature.
- Check movement: Walk toward and away from the mirror. If your proportions seem to change (e.g., head shrinking), the mirror may be warped.
FAQ: Your Mirror & Lighting Questions Answered
Why do I look better in some store mirrors?
Retailers often use strategically angled mirrors and warm, front-facing lighting to enhance appearance. Some dressing rooms even use convex mirrors that subtly slim the figure. These are designed to boost confidence and sales—not provide realism.
Can lighting affect how thin or heavy I look?
Yes. Side lighting sculpts facial contours, potentially accentuating cheekbones or jawlines. Overhead light elongates the face, while upward light (like from a phone) creates unnatural shadows that can add perceived weight. Horizontal lighting from both sides minimizes distortion and offers the most balanced view.
Is there a “most accurate” mirror setup?
The closest to objective accuracy is a large, flat, first-surface mirror under uniform 4000K LED lighting, diffused and positioned at 45-degree angles from the viewer. However, for everyday use, a well-lit bathroom or closet with neutral-toned light and no visible warping will suffice.
Final Checklist: Achieve Consistent, Honest Reflections
Use this checklist to evaluate and improve your daily mirror experience:
- ✅ Mirror is clean, scratch-free, and securely mounted
- ✅ No visible distortion when checking straight lines
- ✅ Lighting comes from the front, not above or below
- ✅ Bulbs are 3500K–4500K (neutral white)
- ✅ Light is diffused (no direct glare on face)
- ✅ You view yourself at arm’s length (3–5 feet)
- ✅ You check appearance in multiple settings before important events
Conclusion: See Yourself Clearly—And Confidently
Your reflection isn’t a fixed image. It’s a dynamic interplay of light, optics, and perception. Understanding that no single mirror holds the “truth” frees you from chasing perfection in flawed conditions. Instead, you can create environments that offer consistency, fairness, and clarity.
Stop blaming yourself for looking “off” in certain mirrors. Start optimizing the conditions. Choose better lighting, inspect mirror quality, and trust a routine—not a random glance. When you know how the system works, you’re no longer at the mercy of misleading reflections.


 浙公网安备
33010002000092号
浙公网安备
33010002000092号 浙B2-20120091-4
Comments
No comments yet. Why don't you start the discussion?