
A dripping sink may seem like a minor annoyance, but over time, it can waste hundreds of gallons of water and increase your utility bills. More importantly, persistent leaks can lead to mold growth, water damage, and costly repairs. The good news? Most sink drips are caused by straightforward issues that homeowners can diagnose and fix without calling a plumber.
Understanding the root cause of a leak helps determine whether it's a quick repair or something requiring professional attention. This guide breaks down the most common reasons behind a dripping sink, offers step-by-step solutions, and provides practical advice to prevent future leaks.
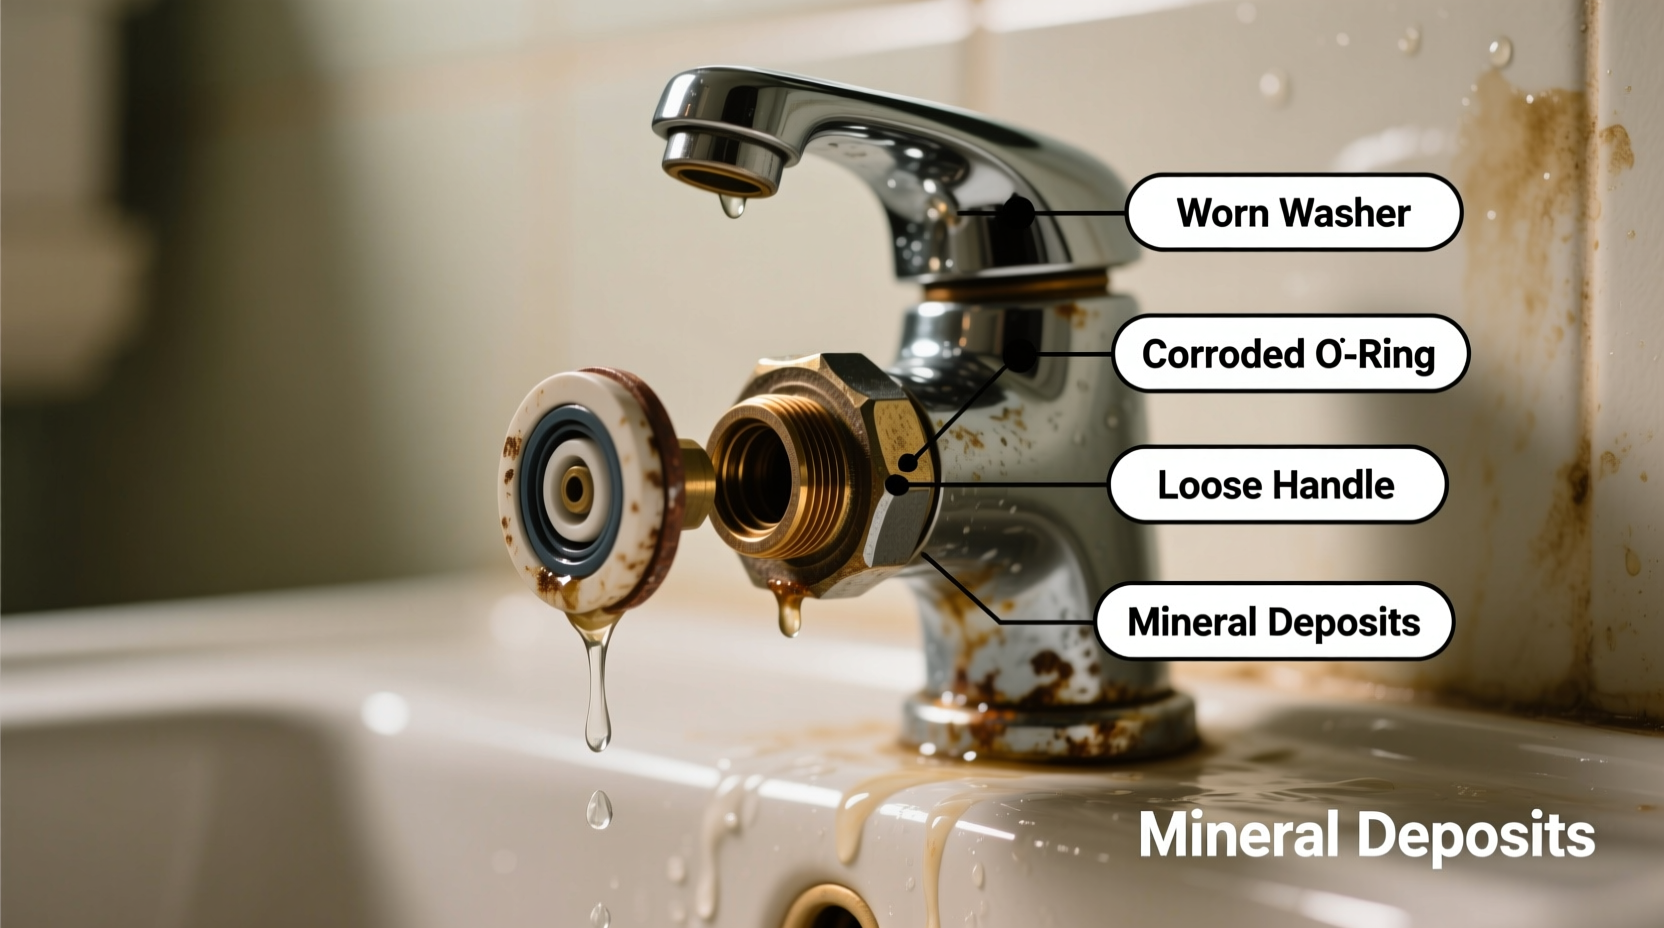
Common Causes of a Dripping Sink
Sink leaks typically originate from internal components that wear out over time. The faucet type—compression, ball, cartridge, or ceramic disk—determines the specific parts involved, but several failure points appear across all designs.
- Worn-out washers: In compression faucets, rubber washers press against a valve seat to stop water flow. Over time, constant use causes them to degrade, leading to drips.
- Faulty O-rings: These small rubber rings seal moving parts in the faucet stem. When they dry out or crack, water seeps from the handle or spout base.
- Corroded valve seats: Located beneath the washer, the valve seat can erode due to mineral buildup, preventing a tight seal even with a new washer.
- Damaged cartridges or disks: In newer faucet models, cartridges or ceramic disks control water flow. Cracks or sediment buildup can impair their function.
- Loose connections: Sometimes, the issue isn’t internal. Loose supply lines, connectors, or mounting nuts can allow water to escape at joints.
“Over 80% of faucet leaks stem from failed seals or worn washers—both easily replaceable with basic tools.” — James Holloway, Master Plumber with 25 years of residential experience
Step-by-Step Guide to Fixing a Dripping Sink
Before beginning any repair, shut off the water supply under the sink. Turn on the faucet to release pressure and drain remaining water. Follow these steps based on your faucet type.
- Remove the faucet handle: Use a screwdriver or Allen wrench to remove the decorative cap and set screw. Gently pull off the handle.
- Inspect the stem or cartridge: For compression faucets, unscrew the packing nut and pull out the stem. Check the washer at the bottom for signs of wear, tearing, or flattening.
- Replace the washer: Take the old washer to a hardware store to match the size and type. Install a new rubber or neoprene washer, ensuring it fits snugly.
- Check the O-ring: On the stem itself, locate the O-ring near the top. If cracked or brittle, slide it off and replace it with an identical one.
- Clean the valve seat: Use a valve seat wrench or a small file to smooth any pitting or corrosion. A smooth surface ensures a proper seal.
- Reassemble the faucet: Reinsert the stem, tighten the packing nut, and reattach the handle. Turn the water back on and test for leaks.
Tips and Best Practices for Long-Term Leak Prevention
Even after fixing a drip, proactive maintenance extends your faucet’s life and reduces future issues.
- Turn faucets off gently. Forcing them can damage internal seals.
- Install water softeners if you live in a hard water area to reduce mineral buildup.
- Clean aerators every few months to prevent sediment from affecting seals.
- Use plumber’s grease on O-rings and moving parts during reassembly to maintain flexibility and improve sealing.
| Issue | Signs | Solution |
|---|---|---|
| Worn Washer | Drip from spout when faucet is off | Replace washer and inspect valve seat |
| Bad O-Ring | Leak around base or handle | Replace O-ring; apply plumber’s grease |
| Loose Supply Line | Puddles under sink | Tighten fittings or replace hoses |
| Cracked Cartridge | Irregular flow or continued drip | Replace entire cartridge |
Real Example: A Kitchen Faucet That Wouldn’t Stop Dripping
Sarah, a homeowner in Portland, noticed her kitchen faucet developed a steady drip after six months of no issues. She placed a cup under the spout overnight and collected nearly half a liter of water. Rather than call a plumber immediately, she turned off the water, removed the handle, and found a mushy, deteriorated washer inside the stem. After replacing it with a $2 rubber part from the local hardware store, the drip stopped completely. She later realized that aggressive tightening of the faucet had accelerated the wear. Now, she turns handles gently and checks seals annually.
This case illustrates how a small component can cause significant waste—and how a simple fix can resolve it permanently.
DIY Repair Checklist
Follow this checklist to ensure a successful repair:
- ✅ Shut off water supply valves under the sink
- ✅ Place a towel in the basin to avoid dropping small parts
- ✅ Remove handle and trim carefully
- ✅ Inspect washer, O-ring, and valve seat
- ✅ Replace damaged parts with correct sizes
- ✅ Reassemble slowly and test for leaks
- ✅ Tighten connections moderately—over-tightening causes damage
Frequently Asked Questions
How much water does a dripping sink waste?
A single drip per second adds up to over 3,000 gallons per year. That’s enough to fill a small swimming pool. Fixing leaks early conserves water and lowers utility costs.
Can I fix a dripping sink without turning off the water?
No. Attempting repairs with water still flowing risks flooding, losing small parts down the drain, and making accurate diagnosis impossible. Always shut off the supply first.
What if the drip continues after I replaced the washer?
The problem may lie elsewhere—such as a damaged valve seat, faulty cartridge, or leaking connection under the sink. Double-check all seals and consider replacing the cartridge or consulting a plumber if the issue persists.
Conclusion: Stop the Drip Before It Becomes a Flood
A dripping sink is more than just noise—it’s a signal that a small part needs attention. With basic tools and a bit of patience, most leaks can be resolved in under an hour. Ignoring the drip only increases water waste and the risk of bigger problems down the line.
By understanding common causes, following systematic repair steps, and applying preventive care, you gain control over your home’s plumbing health. Don’t wait for the drip to turn into a stream. Address it now, save resources, and enjoy a quiet, efficient kitchen or bathroom sink.


 浙公网安备
33010002000092号
浙公网安备
33010002000092号 浙B2-20120091-4
Comments
No comments yet. Why don't you start the discussion?