
Sourdough bread is celebrated for its tangy flavor, crisp crust, and open, airy crumb. But when the loaf emerges from the oven heavy, compact, and unpleasantly gummy in the center, it’s more frustrating than fulfilling. This common issue affects both novice bakers and seasoned ones who may have overlooked subtle shifts in technique or environment. A dense, gummy interior isn’t just disappointing—it suggests something went wrong during fermentation, shaping, or baking. The good news? Most causes are correctable with precise adjustments. Understanding the science behind gluten development, hydration, proofing, and heat management unlocks the path to consistently excellent sourdough.
Understanding the Science of Sourdough Texture
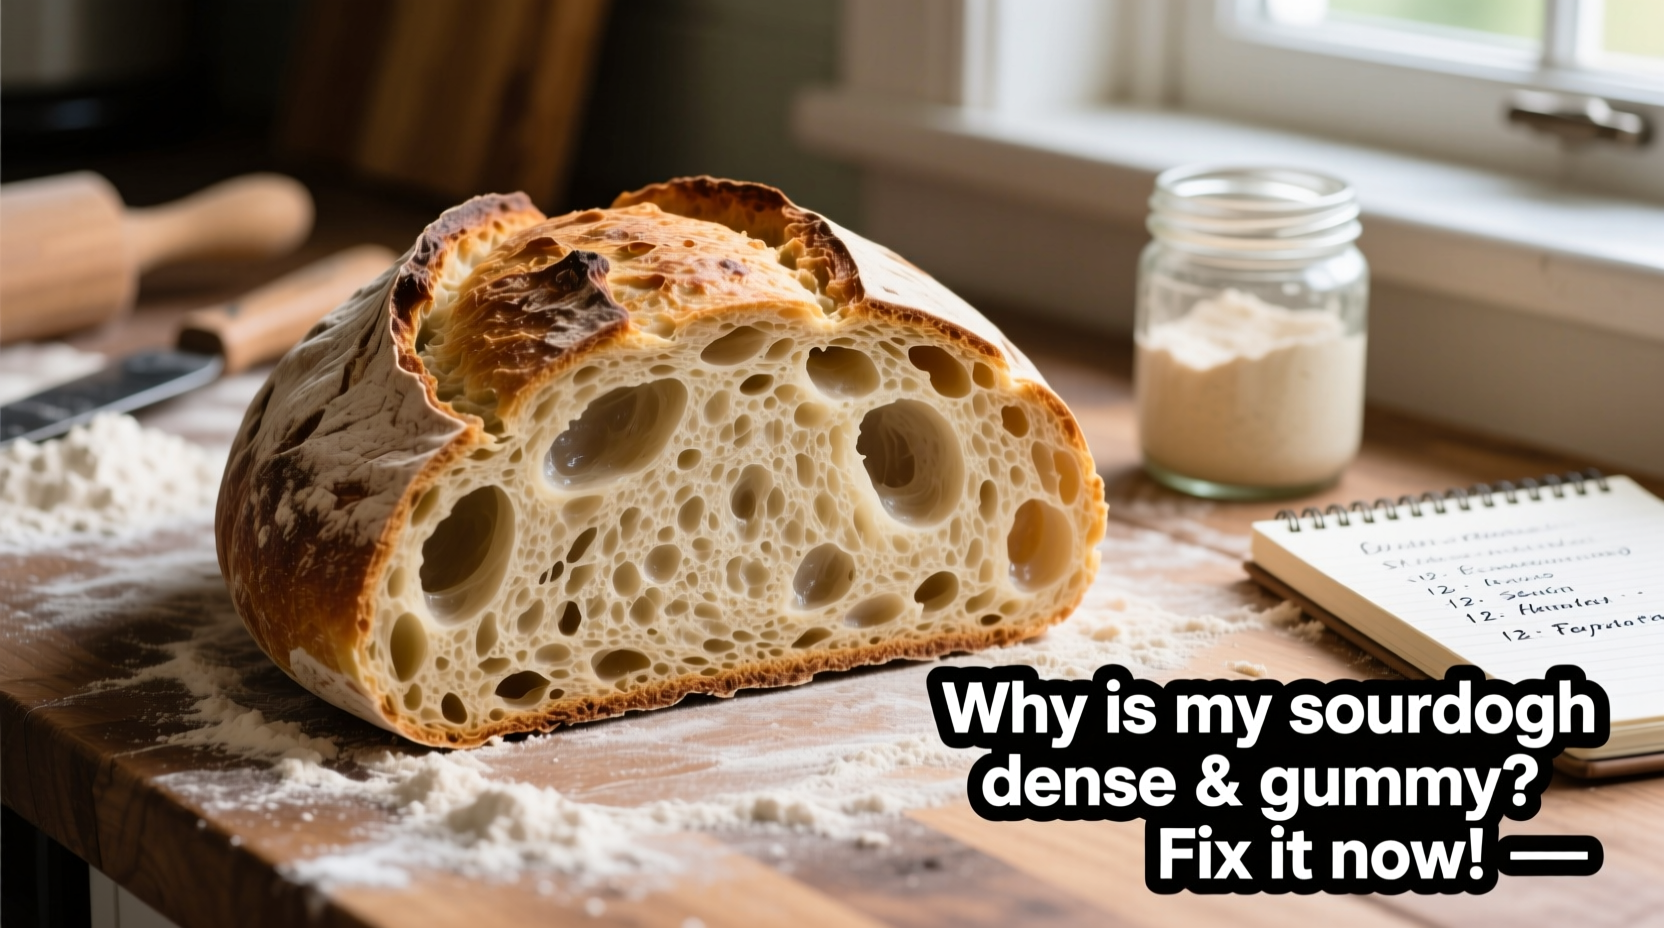
The ideal sourdough crumb is characterized by an even network of irregular holes, resilience to the touch, and a tender yet structured bite. Achieving this depends on three core processes: gluten development, gas retention, and proper starch gelatinization during baking. When any of these fail, the result is often a loaf that feels wet, sticky, or doughy inside—even when fully baked.
Density occurs when the dough lacks sufficient gas production or cannot hold the gas generated by the sourdough culture. Gummy textures, on the other hand, typically stem from underbaking, excessive hydration, or incomplete starch conversion. Unlike commercial yeast breads, sourdough relies entirely on wild yeast and lactic acid bacteria, which work more slowly and require careful attention to timing and temperature.
“Many home bakers mistake under-proofed sourdough for over-hydrated dough. The real culprit is often insufficient fermentation time.” — Dr. Emily Tran, Food Scientist & Artisan Bread Researcher
Common Causes of Dense and Gummy Sourdough
Several interrelated factors can lead to poor crumb structure. Identifying which one(s) apply to your process is essential for correction.
1. Under-Proofed Dough
If your dough hasn’t fermented long enough, the gluten matrix won’t have developed adequately to trap carbon dioxide. The result is minimal oven spring and a tight, dense crumb. Under-proofing also means enzymes haven’t had time to break down complex starches into fermentable sugars, reducing gas production.
2. Over-Proofed Dough
Conversely, leaving dough to rise too long weakens the gluten structure. While it may appear puffy, the dough collapses easily during transfer or baking, leading to poor volume and uneven texture. Over-proofed loaves often bake up flat and gummy because the structure can’t support expansion in the oven.
3. Inactive or Weak Starter
Your sourdough starter is the engine of fermentation. If it’s sluggish—failing to double within 4–6 hours after feeding—it won’t produce enough gas to leaven the bread properly. Using a starter at its peak activity (usually 4–8 hours post-feeding, depending on temperature) is critical.
4. Incorrect Hydration Levels
High hydration (75% and above) creates a more open crumb but demands advanced handling. Too much water without sufficient gluten development leads to a batter-like consistency that traps moisture and bakes up gummy. Beginners should start with hydration levels between 65–70%.
5. Inadequate Gluten Development
Gluten forms the elastic network that captures gas bubbles. Without proper kneading, stretching, or folding during bulk fermentation, the dough remains fragile and unable to expand. Autolyse (resting flour and water before adding salt and starter) helps jumpstart gluten formation.
6. Poor Oven Spring Due to Low Baking Temperature
Sourdough needs intense initial heat—ideally 450°F (230°C) or higher—to trigger rapid steam expansion and oven spring. Baking at lower temperatures prevents full starch gelatinization and sets the crust too early, trapping moisture inside.
7. Insufficient Baking Time or Lack of Steam
Steam delays crust formation, allowing the loaf to expand freely. Without it, the bread cracks unpredictably and fails to open up. Additionally, removing the bread too soon leaves uncooked starches and excess moisture, causing gumminess.
Baking Fixes: Step-by-Step Guide to Lighter Sourdough
Correcting dense, gummy results requires systematic troubleshooting. Follow this sequence to refine your process.
- Verify Your Starter’s Strength: Feed your starter 8–12 hours before baking using equal parts flour and water by weight. It should be bubbly, risen, and pass the float test. Discard half before each feeding to maintain balance.
- Use Accurate Weights: Always measure ingredients with a digital scale. Volume measurements vary widely and compromise consistency.
- Autolyse for 30–60 Minutes: Mix only flour and water first; let rest. This hydrates the flour and begins gluten formation before introducing salt and starter.
- Perform Coil Folds During Bulk Fermentation: Every 30 minutes for the first 2 hours, gently lift and fold the dough over itself. This builds strength without overworking.
- Monitor Bulk Fermentation Duration: At room temperature (74–78°F), expect 3.5–5 hours. The dough should rise 30–50%, feel aerated, and jiggle slightly when shaken.
- Shape Tightly for Surface Tension: Pre-shape into a round, rest 20 minutes, then final shape with tension on the surface. This helps the loaf retain gas during proofing.
- Proof Appropriately: Use the “poke test”—gently press the dough. If it springs back slowly and leaves a slight indentation, it’s ready. Overnight proofing in the fridge (retarding) enhances flavor and control.
- Preheat Thoroughly: Heat your Dutch oven or baking stone for at least 45 minutes at 450°F (230°C).
- Bake with Steam and Full Duration: Bake covered for 20 minutes to trap steam, then uncover and bake another 20–25 minutes until internal temperature reaches 205–210°F (96–99°C).
- Cool Completely Before Slicing: Wait at least 2 hours. Cutting too soon releases trapped steam and collapses the crumb.
Do’s and Don’ts: Quick Reference Table
| Do’s | Don’ts |
|---|---|
| Feed starter 4–8 hours before use | Use starter straight from the fridge without feeding |
| Weigh all ingredients | Measure flour by volume (cups) |
| Autolyse flour and water | Mix everything at once |
| Fold dough every 30 min during bulk ferment | Knead aggressively like sandwich bread |
| Preheat Dutch oven for 45+ minutes | Put dough into a cold or warm oven |
| Bake to internal temp ≥205°F | Remove bread when golden but cool inside |
| Cool loaf completely before slicing | Cut into hot bread immediately |
Real Example: From Gummy Loaf to Bakery-Quality Crumb
Sarah, a home baker in Portland, struggled for months with consistently dense sourdough. Her loaves looked promising during shaping but collapsed in the oven, yielding a wet, gluey center. She followed online recipes precisely but didn’t adjust for her cooler kitchen (68°F). After tracking her process, she realized two key issues: her starter wasn’t peaking before mixing, and she was baking after only 3 hours of bulk fermentation.
She began feeding her starter earlier in the day and extended bulk fermentation to 5 hours with four sets of coil folds. She also started baking uncovered for the last 25 minutes instead of 15. The difference was immediate—her next loaf rose higher, cracked beautifully, and revealed a light, honeycombed crumb. The internal temperature reached 208°F, and after cooling, the texture was springy and dry, not sticky. Sarah now shares her success with a local baking group, emphasizing patience and temperature awareness.
Essential Checklist for Perfect Sourdough Every Time
- ✅ Starter is fed and active (doubled, bubbly, passes float test)
- ✅ All ingredients weighed accurately
- ✅ Autolyse completed (30–60 min, flour + water only)
- ✅ Salt added after autolyse
- ✅ 3–4 sets of coil folds during bulk fermentation
- ✅ Bulk fermentation lasts 4–5 hours at 75°F or adjusted for temp
- ✅ Final proof passes the poke test (slow rebound)
- ✅ Dutch oven preheated for 45+ minutes
- ✅ Baked covered 20 min, uncovered 20–25 min
- ✅ Internal temperature ≥205°F before removing
- ✅ Loaf cooled completely (2+ hours) before slicing
Frequently Asked Questions
Why is my sourdough gummy even though I baked it longer?
Gumminess despite extended baking usually points to under-proofing or inadequate gluten development. Even with long baking, if the dough lacked structure, moisture gets trapped. Ensure proper fermentation and folding before assuming baking time is the issue.
Can high hydration cause gumminess?
Yes, especially if you're new to handling wet dough. High hydration (above 75%) requires stronger gluten development through folding and longer fermentation. Start at 68% hydration and gradually increase as skill improves.
Is a cold kitchen ruining my sourdough?
Cool environments slow fermentation significantly. At 65–68°F, bulk fermentation may take 6–8 hours. To speed it up safely, place dough in a turned-off oven with the light on, or use a proofing box. Never rush with warm water unless adjusting starter feedings.
Final Thoughts: Mastering the Details Makes All the Difference
Dense, gummy sourdough isn’t a dead end—it’s feedback. Each failed loaf reveals where your process can improve. The journey to perfect sourdough isn’t about perfection from the start, but persistence through learning. Small changes—like extending fermentation, improving folds, or ensuring full bake—compound into dramatic improvements. Trust the process, respect the timeline, and let time do the work that machines cannot replicate.


 浙公网安备
33010002000092号
浙公网安备
33010002000092号 浙B2-20120091-4
Comments
No comments yet. Why don't you start the discussion?