
Sourdough baking is as much a science as it is an art. When your loaf emerges from the oven with a beautiful crust but a heavy, sticky crumb, it’s disheartening—especially after hours of effort. A dense, gummy interior isn’t just unappetizing; it suggests something went wrong in the fermentation, structure, or baking process. The good news? This issue is almost always fixable. By understanding the root causes, you can adjust your technique and consistently produce sourdough with an open, airy crumb and satisfying chew.
The Science Behind Sourdough Texture
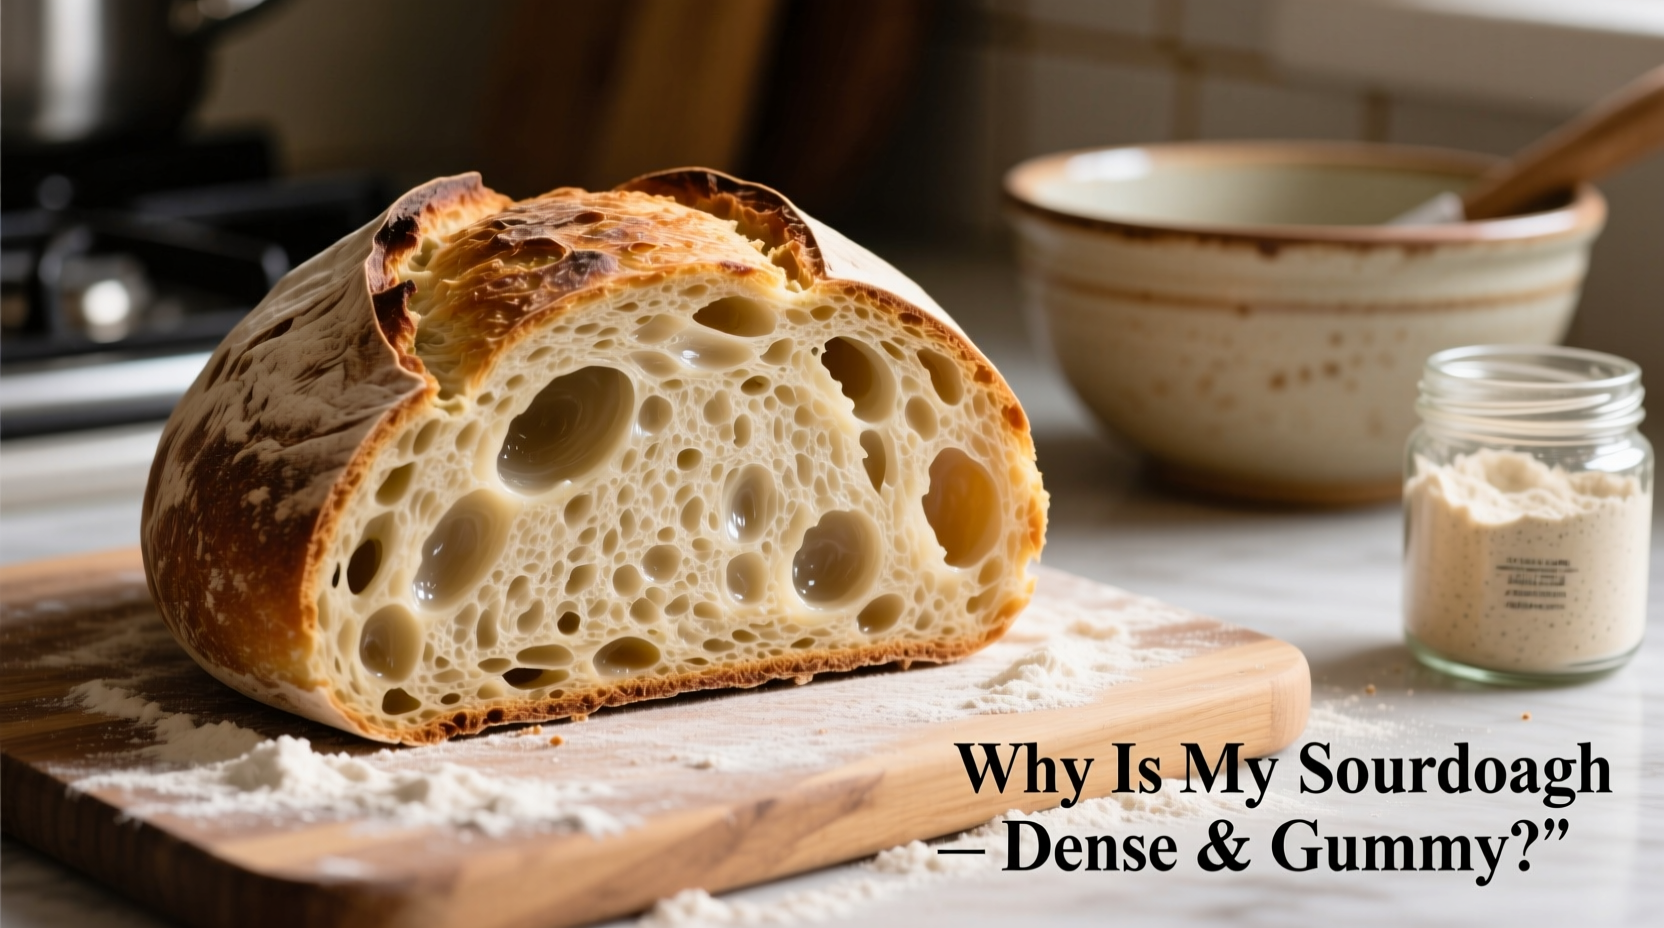
The texture of sourdough bread depends on three key factors: gluten development, gas retention, and starch gelatinization. During fermentation, wild yeast and lactic acid bacteria consume flour sugars, producing carbon dioxide and organic acids. The CO₂ gets trapped in the elastic gluten network, causing the dough to rise. When baked, the heat sets the structure, evaporates moisture, and transforms starch into a stable matrix.
A gummy crumb typically means that starch hasn’t fully set or that excess moisture remains trapped. Density often points to insufficient gas production or poor oven spring. Both issues stem from imbalances in hydration, fermentation, temperature, or handling.
“Texture problems in sourdough are rarely about one single mistake. They’re usually the result of small missteps compounding through the entire process.” — Dr. Karl Mersch, Food Scientist & Artisan Baker
Common Causes of Dense and Gummy Sourdough
Several interrelated factors can lead to a disappointing loaf. Understanding each helps pinpoint where adjustments are needed.
1. Underfermentation
If your starter isn’t active enough or bulk fermentation is too short, the dough won’t produce sufficient gas. Underproofed dough lacks volume and collapses slightly during baking, leading to tight, dense crumbs. You may also notice a lack of sour aroma and minimal expansion in the oven.
2. Overhydration Without Proper Structure
High hydration (above 75%) creates a more open crumb but demands strong gluten development. If your flour lacks protein (e.g., all-purpose instead of bread flour) or you skip stretch-and-folds, the dough can’t hold water effectively. Excess moisture turns into steam, which later condenses and gums up the crumb.
3. Inadequate Gluten Development
Gluten forms when flour and water hydrate and are agitated (mixed, kneaded, or folded). Without sufficient strength, the dough can’t trap gas or support its own weight. Signs include sagging loaves, tearing during shaping, and flat tops.
4. Baking at Too Low a Temperature or for Too Short a Time
Sourdough needs high heat—typically 450–475°F (230–245°C)—to achieve proper oven spring and complete starch gelatinization. Baking at lower temperatures or removing the bread too early leaves the center underbaked. The wet, sticky texture isn't due to undercooking alone but incomplete starch transformation.
5. Cutting the Bread Too Soon
This is one of the most common mistakes. Slicing into a hot loaf releases trapped steam that should gradually escape during cooling. Premature cutting disrupts the final setting of the crumb, resulting in a gummy feel—even if the bread was perfectly baked.
Step-by-Step Guide to Fixing Dense and Gummy Sourdough
Follow this timeline to diagnose and correct the issue across your baking cycle.
- Day 1 Evening: Feed Your Starter
Use equal parts flour and water (e.g., 50g each). Let sit at room temperature (72–78°F) for 8–12 hours until bubbly and doubled. Discard half before feeding to maintain balance. - Day 2 Morning: Mix Dough (Autolyse)
Combine 500g bread flour and 350g water (70% hydration). Let rest 30–60 minutes. This allows gluten to form naturally without mechanical mixing. - Add Starter and Salt
Mix in 100g active starter and 10g salt. Perform 4–6 sets of stretch-and-folds over 2 hours (every 30 minutes). This builds strength without overworking. - Bulk Fermentation: 3–5 Hours
Let dough rise at 75°F until it increases by 50–75%, shows bubbles, and jiggles like jelly. Cooler environments may require longer times. - Shape and Final Proof: 1–2 Hours at Room Temp or Overnight in Fridge
Pre-shape, bench rest 20 minutes, then final shape. For best results, cold-proof overnight (12–16 hours) to enhance flavor and control fermentation. - Bake: High Heat with Steam
Preheat Dutch oven at 450°F for 1 hour. Score loaf deeply, transfer to pot, cover, and bake 20 minutes. Uncover and bake another 20–25 minutes until internal temp reaches 205–210°F. - Cool Completely: Minimum 2 Hours
Place on wire rack. Do not cut until fully cooled. This allows starches to set and moisture to redistribute evenly.
Do’s and Don’ts: Sourdough Crumb Troubleshooting Table
| Issue | Do | Don’t |
|---|---|---|
| Dense crumb | Extend bulk fermentation; perform stretch-and-folds; use higher-protein flour | Rush the proof; skip folds; use weak starter |
| Gummy texture | Bake to 208°F internal temp; cool completely; reduce hydration slightly | Remove bread early; slice while warm; use excessive whole grains without adjustment |
| Flat loaf | Improve shaping tension; use banneton; score properly | Overproof; handle dough roughly; skip pre-shaping |
| Tight, closed crumb | Increase hydration gradually; extend autolyse; ensure starter peak activity | Add too much flour; underferment; neglect gluten development |
Tips for Consistent Results
- Use a kitchen scale for precise measurements—volume cups vary significantly.
- Track room temperature and adjust fermentation times accordingly. Cooler = slower.
- Invest in a digital thermometer to check dough and internal loaf temps.
- Rotate flours: Strong bread flour (12–14% protein) supports structure better than all-purpose.
- Keep a baking journal noting variables like starter maturity, proof time, and oven temp.
Real Example: From Gummy Loaf to Bakery-Quality Bread
Sarah, a home baker in Portland, struggled for months with dense sourdough. Her loaves looked promising—well-risen and beautifully scored—but slicing revealed a sticky, paste-like center. She followed recipes exactly but ignored ambient temperature. Living in a basement apartment at 66°F, her bulk fermentation took nearly 6 hours, yet she assumed 4 hours was sufficient. The starter appeared active but didn’t peak in sync with mixing.
After tracking her process, she adjusted: feeding her starter earlier in the day, extending bulk fermentation to 5.5 hours, and baking uncovered for 28 minutes instead of 20. She also started cooling bread fully before cutting. The result? A dramatic improvement: even, open holes and a springy, non-gummy crumb. “I realized I was following the clock instead of the dough,” she said. “Once I started watching for visual cues, everything changed.”
Essential Checklist Before Baking
Use this checklist to avoid common pitfalls:
- ✅ Is my starter bubbly, domed, and able to double within 6–8 hours after feeding?
- ✅ Did I perform adequate stretch-and-folds during bulk fermentation?
- ✅ Has the dough increased by at least 50% and show visible bubbles?
- ✅ Was the loaf shaped with surface tension and placed seam-side up in the banneton?
- ✅ Is my Dutch oven preheated for at least 45–60 minutes?
- ✅ Will I bake covered for 20 min, then uncovered until internal temp hits 208°F?
- ✅ Am I committed to waiting at least 2 hours before slicing?
Frequently Asked Questions
Can I fix a gummy loaf after baking?
No, once cooled, a gummy crumb cannot be reversed. However, you can repurpose it: toast thick slices, make breadcrumbs, or use in strata or bread pudding. Prevention lies in proper baking and cooling.
Does using whole wheat flour cause gumminess?
Yes, partially. Whole wheat absorbs more water and contains bran that cuts gluten strands. If substituting, start with 20–30% whole grain and increase hydration slightly while boosting fermentation time. Always allow full cooling.
Why does my bread look fine but taste raw inside?
This is a classic sign of underbaking. Even if the crust is dark, the center may not have reached 205°F. Use an instant-read thermometer. If needed, return the loaf to the oven (without the lid) for 5–10 minutes.
Conclusion: Master Your Crumb, One Loaf at a Time
Dense, gummy sourdough isn’t a dead end—it’s feedback. Each loaf teaches you something about your environment, ingredients, and timing. The solution rarely lies in one magic trick but in consistent attention to detail: a healthy starter, developed gluten, proper fermentation, thorough baking, and patient cooling. These elements work together to transform simple flour and water into bread with character and soul.
Don’t be discouraged by a few failed attempts. Some of the best bakers started with bricks. Refine your process, trust the science, and celebrate small improvements. With practice, you’ll pull out loaves that are not only beautiful on the outside but light, airy, and perfectly textured within.


 浙公网安备
33010002000092号
浙公网安备
33010002000092号 浙B2-20120091-4
Comments
No comments yet. Why don't you start the discussion?