
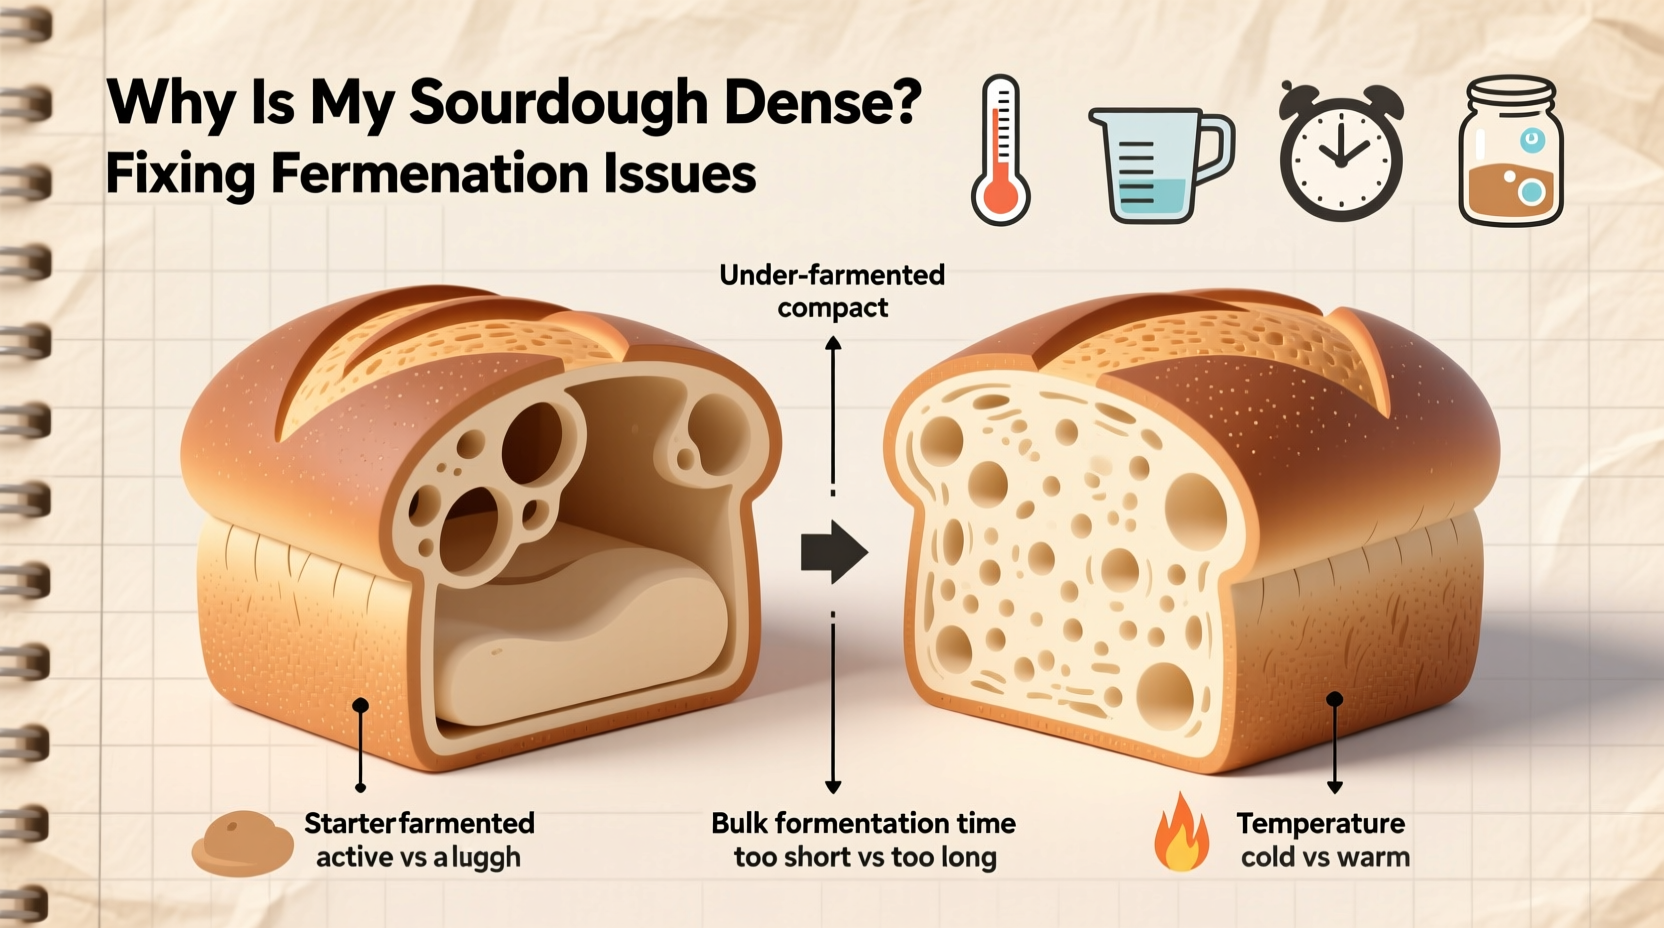
Sourdough bread should be airy, tangy, and full of life—its open crumb structure a hallmark of well-executed fermentation. Yet many home bakers struggle with loaves that are heavy, compact, and disappointingly dense. While the problem may seem mysterious, it almost always traces back to fermentation: either insufficient activity, improper timing, or flawed technique. Understanding the science behind sourdough fermentation allows you to diagnose and correct these issues systematically.
Density in sourdough isn’t just about using too much flour or not kneading enough—it’s fundamentally about gas production and retention. Yeast and bacteria in your starter produce carbon dioxide during fermentation, which inflates the gluten network. If that process is disrupted, the loaf collapses or never rises properly. This guide breaks down the most common causes of dense sourdough and provides actionable solutions rooted in real baking science.
The Role of Fermentation in Sourdough Texture
Fermentation is the heart of sourdough baking. Unlike commercial yeast breads, sourdough relies on a living culture—your starter—to leaven the dough. This natural fermentation involves two key microorganisms: wild yeast (mainly Saccharomyces exiguus) and lactic acid bacteria (LAB). Together, they break down starches into sugars, producing carbon dioxide (CO₂) and organic acids like lactic and acetic acid.
The CO₂ gets trapped in the elastic gluten matrix formed during mixing and folding, causing the dough to expand. Simultaneously, the acids contribute flavor and strengthen gluten by lowering pH. When fermentation is balanced, the result is a light, springy crumb with irregular holes. But when fermentation fails, the gas production is inadequate, uneven, or poorly retained—leading directly to a dense loaf.
“Fermentation isn’t just about time—it’s about microbial health, temperature control, and dough maturity.” — Dr. Karl DeSaulniers, Artisan Bread Researcher and Author of *The Science of Sourdough*
Common Causes of Dense Sourdough and How to Fix Them
1. Underactive or Immature Starter
Your starter is the engine of your sourdough. If it's weak, sluggish, or fed inconsistently, it won’t generate enough gas to lift the dough. A common mistake is assuming any bubbly mixture qualifies as “ready.” True readiness means peaking activity—usually 4–8 hours after feeding at room temperature—when the starter has doubled in volume and passes the float test.
If your starter doesn’t double within 6–8 hours of feeding with equal parts flour and water at 75°F (24°C), it may need revitalization. Try feeding it twice daily for 2–3 days, discarding half each time and refreshing with fresh flour and filtered water. Whole grain flours like rye or whole wheat can boost microbial diversity and activity.
2. Inadequate Bulk Fermentation Time
Bulk fermentation—the first rise after mixing—is where most of the flavor and structure develop. Rushing this phase leads to underdeveloped gluten and poor gas retention. Many bakers follow clock-based schedules, but sourdough responds to conditions, not calendars.
Look for visual cues: the dough should increase by 50–75%, feel aerated and jiggly, and show visible bubbles beneath the surface. It should hold an indentation briefly when poked (the \"jelly test\"). If it springs back quickly, it needs more time; if it collapses, it’s overfermented.
Cooler environments slow fermentation significantly. At 68°F (20°C), bulk fermentation might take 6–8 hours; at 78°F (26°C), it could finish in 4–5. Adjust expectations based on ambient temperature.
3. Overproofing or Underproofing
Both extremes cause density. Underproofed dough hasn’t produced enough gas. Overproofed dough has weakened gluten from prolonged acid exposure, causing it to collapse during shaping or baking.
To avoid overproofing, don’t rely solely on volume. Check dough strength: gently shake the bowl. A healthy, ready dough will wobble like jelly with visible bubbles. If it’s flat or deflated, it’s over.
| Proofing Issue | Signs | Solution |
|---|---|---|
| Underproofed | Tight surface, minimal bubbles, springs back fast when poked | Extend bulk fermentation by 1–2 hours in warm spot |
| Overproofed | Deflated, sticky, tears easily, no elasticity | Reshape gently and reduce final proof time next bake |
| Properly Proofed | 50–75% rise, bubbly interior, holds slow poke indent | Proceed to shaping or cold proof |
4. Poor Gluten Development
No matter how active your starter, without strong gluten, gas escapes instead of being trapped. Gluten forms when flour hydrates and is aligned through mechanical action—mixing, stretching, and folding.
Hand mixers or brief kneading often don’t provide enough development. Instead, use a series of coil folds every 30 minutes during the first 2 hours of bulk fermentation. These folds strengthen the network gradually without overheating the dough.
Additionally, ensure proper hydration. Dough that’s too dry (<70% hydration) restricts gluten mobility and limits expansion. Conversely, very wet dough (>80%) requires advanced handling but yields more openness. Start with 75% hydration for balance.
5. Inconsistent Temperature Control
Temperature governs fermentation speed and microbial balance. Too cold (<65°F / 18°C), and yeast stalls. Too hot (>85°F / 29°C), and bacteria dominate, weakening structure and creating off-flavors.
For consistent results, aim for a stable environment between 75–78°F (24–26°C). Use a proofing box, oven with light on, or a heating mat if needed. Cold fermentation (retarding in the fridge) can enhance flavor but must follow sufficient room-temperature bulk fermentation to build strength first.
Step-by-Step Guide to Diagnosing and Correcting Density Issues
Follow this timeline to troubleshoot your next bake:
- Day 1 Evening – Feed Your Starter
Feed equal parts (by weight) whole rye or whole wheat flour and water. Let sit uncovered at room temperature (75°F). - Day 2 Morning – Assess Starter Readiness
Check if it has doubled in 6–8 hours and passes the float test (a spoonful floats in water). If not, repeat feeding. - Mix Dough (Mid-Morning)
Use 20–25% starter by flour weight. Mix until fully hydrated. Autolyse (rest) for 30 minutes before adding salt. - Bulk Fermentation (4–6 Hours)
Perform 3–4 sets of coil folds spaced 30 minutes apart during the first 2 hours. Monitor dough volume and texture. - Shape & Final Proof (Room Temp or Cold)
If proofing at room temp, aim for 1–2 hours until slightly puffy. For cold retardation, refrigerate for 8–16 hours after tight pre-shaping and final shaping. - Bake with Steam
Preheat oven and Dutch oven to 450°F (230°C). Score deeply and bake covered for 20 minutes, then uncovered for 20–25 minutes until deep golden brown. - Cool Completely
Wait at least 2 hours before slicing. Cutting too early releases trapped steam and collapses the crumb.
Real Example: From Brick to Boule
Jessica, a home baker in Portland, struggled for months with dense sourdough. Her starter looked active, but her loaves barely rose and had a gummy center. She followed recipes exactly but ignored environmental factors.
After tracking her process, she discovered two issues: her kitchen was only 66°F (19°C), slowing fermentation, and she was using her starter too early—only 4 hours post-feed, when it hadn’t peaked yet.
She began feeding her starter earlier in the day, letting it peak by evening. She also moved her dough to a warmer spot near the oven. Within one week, her loaf volume improved dramatically. By adjusting fold frequency and extending bulk fermentation to 6 hours, she achieved her first open-crumbed sourdough—light, airy, and full of flavor.
Troubleshooting Checklist
- ✅ Is my starter doubling within 8 hours of feeding?
- ✅ Am I using the starter at peak activity (not right after feeding)?
- ✅ Did I perform stretch-and-folds during bulk fermentation?
- ✅ Is my dough rising 50–75% during bulk fermentation?
- ✅ Is my kitchen temperature above 70°F (21°C)?
- ✅ Did I allow the loaf to cool completely before slicing?
- ✅ Am I scoring deeply enough before baking?
- ✅ Am I baking with steam to enable oven spring?
Frequently Asked Questions
Can I use my starter if it doesn’t pass the float test?
The float test is a helpful indicator but not foolproof. Some healthy starters sink due to high acidity or mineral content in water. More reliable signs are doubling in volume and presence of bubbles throughout. If your starter doubles and smells pleasantly sour, it’s likely ready—even if it sinks.
Why does my sourdough rise in the oven but collapse as it cools?
This usually indicates overproofing. The dough expands rapidly in heat (oven spring) but lacks structural integrity to maintain it. As gases escape and moisture redistributes, the crumb collapses. Try reducing final proof time by 30–60 minutes or starting with a firmer dough.
Does flour type affect sourdough density?
Absolutely. All-purpose flour works but has lower protein than bread flour, limiting gluten strength. High-protein bread flour (12–13%) enhances gas retention. Adding 10–15% whole rye or whole wheat can boost fermentation activity due to higher enzyme and nutrient content, but too much whole grain absorbs more water and weighs down the crumb. Balance is key.
Conclusion: Mastering Fermentation for Lighter Loaves
Dense sourdough isn’t a failure—it’s feedback. Each loaf tells you something about your starter, your environment, and your technique. The path to a lighter crumb lies not in rigid timelines but in observation, consistency, and patience. Fermentation is a biological process, not a mechanical one. By tuning into your dough’s behavior—its puff, jiggle, and aroma—you gain the intuition needed to adjust on the fly.
Start with a healthy starter, prioritize gluten development through folding, respect temperature, and let time do its work. Small adjustments compound into dramatic improvements. Don’t aim for perfection on the first try. Aim for understanding.


 浙公网安备
33010002000092号
浙公网安备
33010002000092号 浙B2-20120091-4
Comments
No comments yet. Why don't you start the discussion?