
Sourdough baking is as much a science as it is an art. When your loaf comes out of the oven looking golden and promising, only to reveal a gummy, dense interior upon slicing, it can be deeply frustrating. This texture issue—common among both beginners and experienced bakers—often stems from subtle missteps in fermentation, hydration, or baking technique. The good news? Most causes are fixable with small, precise adjustments. Understanding why your sourdough turns out gummy allows you to refine your process and consistently achieve that open crumb and chewy, well-baked interior you’re aiming for.
Understanding Gummy Sourdough: What’s Really Happening?
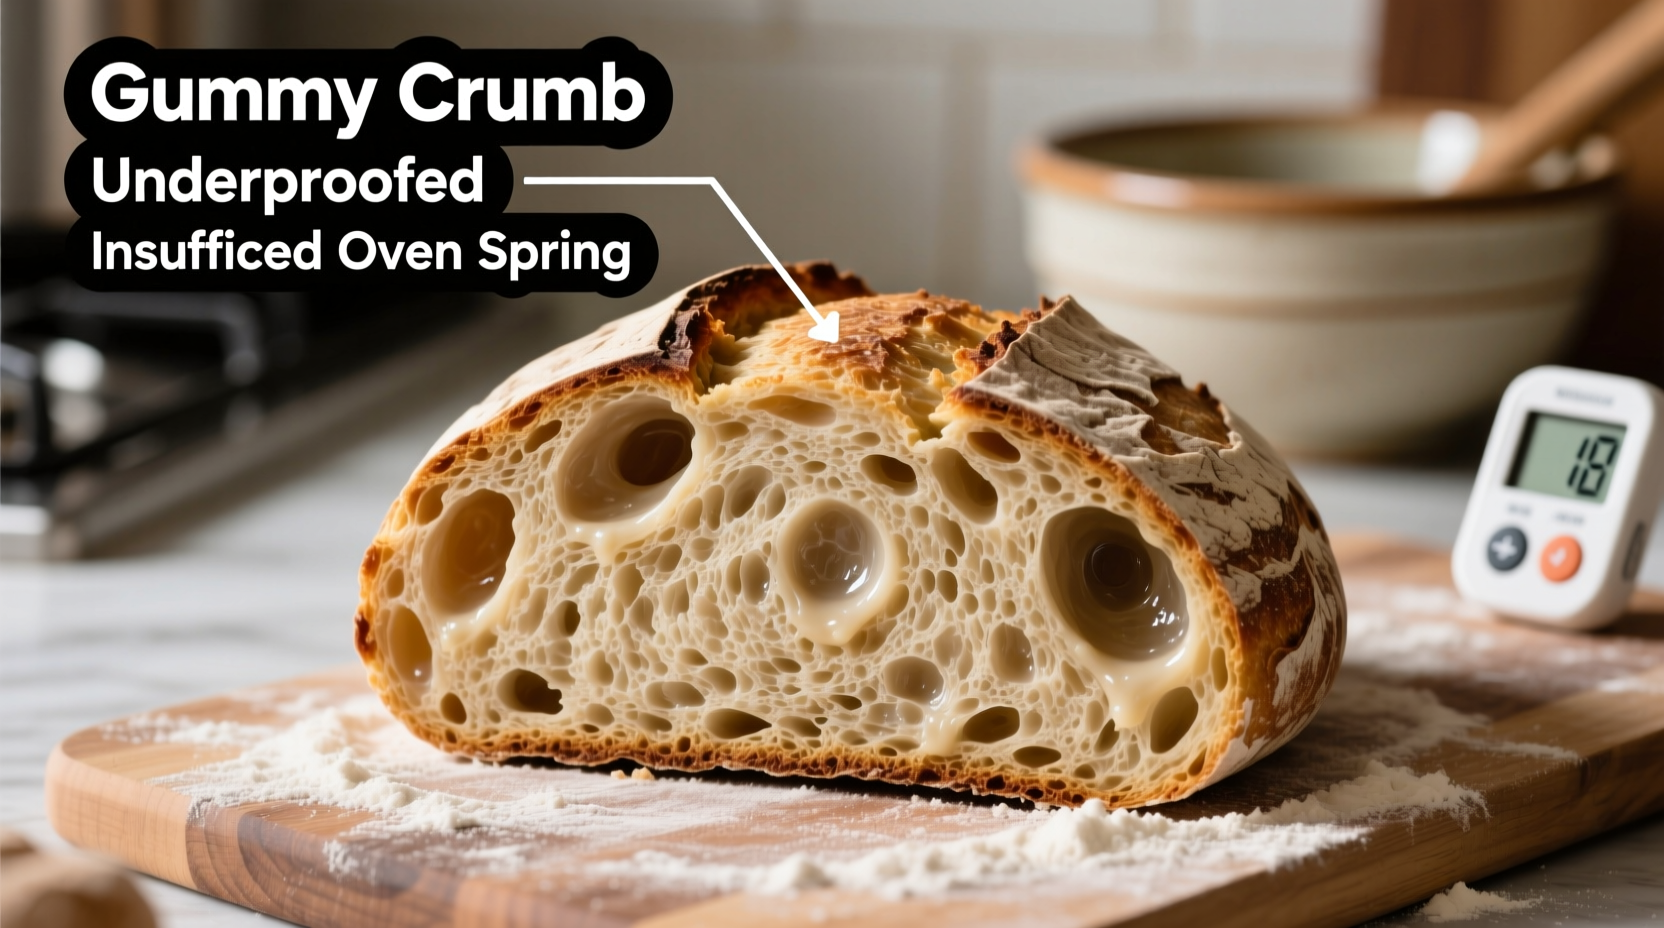
A gummy crumb in sourdough means the starches in the flour haven’t fully gelatinized or set during baking. Instead of forming a stable structure, the interior remains moist, sticky, and undercooked—even if the crust appears perfectly baked. This can happen even when the loaf seems to rise well and passes the “tap test” on the bottom. The problem lies not in one single mistake but usually in a combination of factors related to dough development, proofing, and heat application.
Gumminess often mimics under-proofing, but the root cause may actually be over-proofing, insufficient oven spring, or inadequate internal temperature. Unlike cakey or crumbly textures, which point to formulation issues, gumminess is primarily a result of improper moisture management and thermal dynamics during baking.
“Many bakers assume their sourdough failed because of weak starter or poor shaping, but more often than not, the real culprit is undereffective heat transfer during the bake.” — Dr. Emily Tran, Food Scientist & Artisan Bread Researcher
Common Causes of Gummy and Dense Sourdough
The journey from flour and water to a beautifully airy sourdough loaf involves multiple stages where things can go wrong. Here are the most frequent causes of gummy interiors:
1. Underbaking or Inaccurate Internal Temperature
The most direct reason for a gummy crumb is insufficient baking time. Even if the crust looks dark and sounds hollow, the core may not have reached the necessary temperature for full starch gelatinization. Sourdough must reach an internal temperature of at least 205–210°F (96–99°C) to ensure the crumb sets properly.
2. Over-Hydration Without Proper Gluten Development
High hydration doughs (75% and above) are popular for their open crumb, but they require strong gluten structure to support the water content. If your dough lacks strength due to under-mixing, short bulk fermentation, or weak starter, excess moisture remains trapped, leading to gumminess after baking.
3. Under-Proofed or Over-Proofed Dough
Both extremes disrupt gas retention and oven spring. Under-proofed dough lacks sufficient carbon dioxide, resulting in poor expansion and dense texture. Over-proofed dough collapses easily, losing its ability to trap steam and expand in the oven—leading to compact, sticky centers.
4. Inadequate Oven Spring
Oven spring—the rapid rise during the first 15 minutes of baking—relies on residual yeast activity and steam. If your oven isn’t hot enough, lacks steam, or the dough is too cold going in, the loaf fails to expand quickly, trapping moisture inside and creating a dense, gummy core.
5. Cutting the Loaf Too Soon
This is one of the most overlooked mistakes. Sourdough continues to cook internally through carryover heat after removal from the oven. Slicing within 30 minutes interrupts the cooling and setting process, releasing trapped steam and leaving the crumb wet and gummy.
Troubleshooting Checklist: Fix Your Gummy Loaf
Use this checklist to diagnose and correct the issue step by step. Go through each item after your next bake to identify where things went off track.
- ✅ Did the internal temperature reach at least 205°F (96°C)?
- ✅ Was the starter fully active and peaking when mixed into the dough?
- ✅ Was the gluten fully developed during bulk fermentation? (Windowpane test passed?)
- ✅ Was the dough properly shaped to create surface tension?
- ✅ Was the final proof timed correctly? (Dent test: gently press—should spring back slowly.)
- ✅ Was the oven fully preheated with Dutch oven inside for at least 45 minutes?
- ✅ Was steam created effectively during the first 20 minutes of baking?
- ✅ Was the loaf allowed to cool completely before slicing?
- ✅ Was the flour appropriate? (High-protein bread flour recommended for beginners.)
- ✅ Was the hydration level suitable for your skill and environment?
Step-by-Step Guide to Baking a Non-Gummy Sourdough
Follow this optimized process to minimize the risk of gumminess and maximize crumb quality.
- Feed your starter 8–12 hours before mixing. It should be bubbly, doubled in size, and pass the float test.
- Mix dough with proper hydration. Start with 70% hydration if you're new. Adjust later based on results.
- Perform stretch and folds every 30 minutes during the first 2 hours of bulk fermentation. This builds gluten without overworking the dough.
- Bulk ferment until dough has risen 30–50%, shows bubbles, and jiggles like jelly. Time varies (3–6 hours) based on room temperature.
- Pre-shape, rest 20–30 minutes, then final shape with tight surface tension. This helps retain gas during proofing.
- Final proof: 1–2 hours at room temp or overnight in the fridge. Cold proofing reduces over-fermentation risk.
- Preheat oven and Dutch oven to 475°F (245°C) for at least 45 minutes. Use oven thermometer for accuracy.
- Bake covered for 20 minutes to trap steam, then uncover and bake 20–25 minutes more. Rotate halfway for even heat.
- Check internal temperature: aim for 208–210°F (98–99°C). If below, continue baking in 5-minute increments.
- Cool on wire rack for at least 2 hours before slicing. Patience ensures proper crumb set.
Do’s and Don’ts: A Quick Reference Table
| Do’s | Don’ts |
|---|---|
| Use a digital thermometer to verify doneness | Assume the loaf is done based on color alone |
| Preheat Dutch oven thoroughly | Put dough into a cold or insufficiently heated oven |
| Let bread cool completely before slicing | Cut into the loaf while still warm |
| Adjust hydration gradually as skills improve | Jump straight to 80%+ hydration without experience |
| Use high-protein bread flour for better structure | Rely solely on all-purpose flour for high-hydration loaves |
| Proof in the fridge for better control | Leave dough to over-proof at room temperature |
Real Example: Sarah’s Sourdough Struggle
Sarah, an enthusiastic home baker, had been making sourdough weekly for three months. Her loaves looked impressive—deep slashes, crackling crust—but every slice revealed a sticky, glue-like center. She assumed her starter was weak, so she fed it twice daily and even bought a new jar. Still, no improvement.
After reviewing her process, she realized she was pulling the loaf from the oven when it hit 195°F (90°C), believing that was sufficient. She also sliced it after just 45 minutes of cooling. By adjusting her target temperature to 208°F (98°C) and waiting three full hours before cutting, her next loaf had a dry, airy crumb with no gumminess. The transformation was immediate. “I couldn’t believe I’d been undoing all my hard work with impatience,” she said. “Now I wait, and the results speak for themselves.”
Frequently Asked Questions
Can I rebake a gummy sourdough loaf to fix it?
Yes, but only if caught early. If the loaf is underbaked but structurally sound, return it to a 350°F (175°C) oven (uncovered) for 10–15 minutes, checking internal temperature frequently. However, if the gumminess is due to over-proofing or poor gluten development, rebaking won’t help and may dry out the crust excessively.
Does using whole wheat flour make sourdough gummier?
Potentially, yes. Whole wheat absorbs more water and contains less gluten-forming protein than white flour. When used in high proportions without adjustments, it can lead to denser, moister crumb. To avoid this, increase pre-fermentation (soaker or autolyse), extend bulk fermentation slightly, and consider blending with bread flour. Also, ensure longer baking times to drive off extra moisture.
Why does my sourdough taste sour but still have a gummy texture?
Acidity and texture are separate outcomes. A strong sour flavor comes from lactic and acetic acid produced during long fermentation, especially in cold proofing. However, acidity doesn’t guarantee proper structure. You can have a very sour but under-baked loaf if the internal temperature wasn’t high enough or if the gluten network broke down from over-fermentation. Flavor doesn’t compensate for technical flaws in baking.
Expert Tips for Long-Term Success
Consistency in sourdough comes from tracking variables, not guessing. Keep a simple baking journal noting starter condition, room temperature, fermentation times, dough feel, and final results. Over time, patterns will emerge that help you anticipate issues before they happen.
One often-overlooked factor is oven calibration. Home ovens frequently run cooler than indicated. Using an independent oven thermometer ensures you’re truly baking at 475°F, not 425°F. Similarly, Dutch ovens vary in heat retention—cast iron performs better than ceramic or thin steel.
Conclusion: From Gummy to Glorious
A gummy sourdough loaf isn’t a failure—it’s feedback. Each bake teaches you more about temperature, timing, and technique. The path to perfect crumb structure isn’t about perfection on the first try, but about understanding the signals your dough gives and responding with precision. By focusing on full baking, proper proofing, and patient cooling, you’ll transform dense, sticky interiors into light, springy masterpieces.


 浙公网安备
33010002000092号
浙公网安备
33010002000092号 浙B2-20120091-4
Comments
No comments yet. Why don't you start the discussion?