
Sourdough bread should be a celebration of texture and flavor—crusty on the outside, open and airy within, with a subtle tang that lingers pleasantly. But if your loaf emerges from the oven heavy, compact, and more like a doorstop than a delicacy, you're not alone. Many beginners struggle with dense sourdough, often due to small but critical missteps in the process. The good news? Most of these issues are fixable with simple adjustments. Understanding where things go wrong—and how to correct them—is the key to transforming your baking from frustrating to fulfilling.
Understanding Sourdough Structure: Why Airiness Matters
The hallmark of great sourdough is an open crumb—those irregular holes formed by carbon dioxide bubbles trapped in a strong gluten network during fermentation and baking. Achieving this structure depends on three pillars: active fermentation, proper gluten development, and precise heat application.
Fermentation creates gas. Gluten holds it. Heat sets it. When one of these elements fails, the result is density. Unlike commercial yeast breads, sourdough relies on wild yeast and bacteria, which work more slowly and require greater attention to timing, temperature, and technique. This natural leavening is both its charm and its challenge.
“A dense sourdough isn’t a failed loaf—it’s a diagnostic tool. It tells you exactly where in the process something went off track.” — Clara Nguyen, Artisan Baker & Fermentation Educator
Common Beginner Mistakes That Cause Dense Sourdough
Density rarely comes from a single error. More often, it's the accumulation of several small oversights. Here are the most frequent culprits among new sourdough bakers:
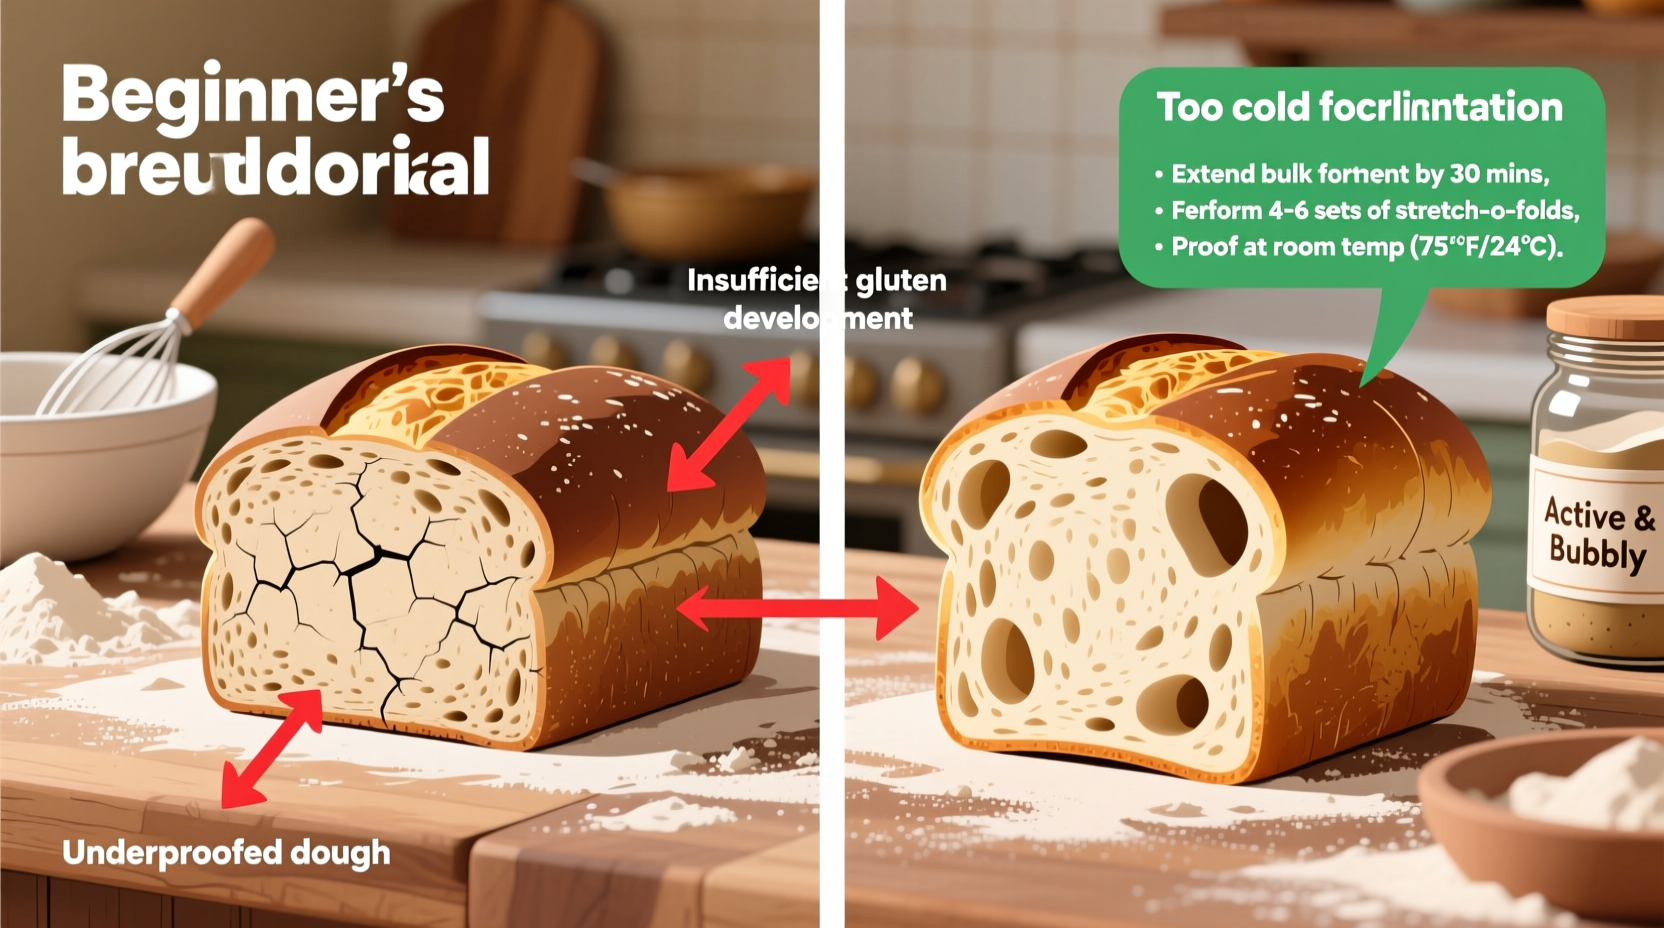
1. Underdeveloped or Inactive Starter
Your starter is the engine of your bread. If it’s sluggish or underripe, it won’t produce enough gas to lift the dough. A healthy starter should double in size within 4–8 hours of feeding and pass the float test (a spoonful placed in water floats when ready).
2. Inadequate Gluten Development
Gluten forms the elastic net that traps gas. Without sufficient strength, the dough collapses instead of expanding. Beginners often under-knead or skip stretch-and-folds, assuming bulk fermentation will do the work. However, physical manipulation during early stages is crucial.
3. Over-Fermentation or Under-Fermentation
Timing is everything. Under-fermented dough lacks gas production; over-fermented dough breaks down its gluten structure, causing collapse. Both lead to density. Bulk fermentation typically takes 3–5 hours at 75°F, depending on starter strength and hydration.
4. Low Hydration Dough
Many beginners start with stiff, low-hydration doughs (below 65%) because they’re easier to handle. But lower hydration limits gas expansion and results in tighter crumbs. Most artisan sourdough ranges from 70% to 80% hydration.
5. Poor Shaping Technique
Shaping isn't just about appearance—it creates surface tension that helps the loaf hold its shape and rise upward, not outward. A loose or uneven shape allows gas to escape during proofing and baking.
6. Insufficient Oven Spring
Oven spring—the final burst of expansion in the first 15 minutes of baking—requires high heat, steam, and proper scoring. Baking in a cold oven, skipping preheating the Dutch oven, or failing to score deeply can all stifle this critical phase.
Step-by-Step Guide to Fixing Dense Sourdough
Follow this timeline-based approach to diagnose and correct common issues. Use it as a checklist for your next bake.
- Day 1 – Evening: Refresh Your Starter
Feed equal parts (by weight) of mature starter, water, and flour (e.g., 50g each). Let sit at room temperature for 6–8 hours until bubbly and doubled. Perform the float test before use. - Day 2 – Morning: Mix and Autolyse
Combine 500g bread flour, 350g water (70% hydration), and optional 100g whole wheat for flavor. Mix and rest for 30 minutes. This hydrates the flour and jumpstarts gluten formation without kneading. - Add Starter and Salt
Add 100g active starter and 10g salt. Mix thoroughly. Begin stretch-and-folds: every 30 minutes for 2–3 hours (4 sets total). Each set includes 4–6 folds, lifting and stretching the dough from all sides. - Bulk Fermentation: Monitor Closely
Let dough rise at 75°F for 3.5–4.5 hours. It should increase by ~50%, feel airy, and show visible bubbles. Use the \"jiggle test\"—wobble the bowl; if the surface jiggles like jelly, it’s ready. - Pre-Shape and Bench Rest
Turn dough onto floured surface. Pre-shape into a round, let rest uncovered for 20–30 minutes. This relaxes the gluten for final shaping. - Final Shape and Proof
Shape tightly into a boule or batard, creating surface tension. Place seam-side up in a floured banneton. Refrigerate for 8–12 hours (cold proof) or proof at room temperature for 1.5–2 hours if using immediately. - Bake for Maximum Oven Spring
Preheat Dutch oven at 450°F for 1 hour. Transfer dough to pot, score deeply with a razor, cover, and bake 20 minutes. Uncover, reduce to 425°F, bake another 20–25 minutes until deep golden.
Do’s and Don’ts: Quick Reference Table
| Do | Don’t |
|---|---|
| Use a fully active, ripe starter (passed float test) | Use a starter straight from the fridge without feeding |
| Perform 4–6 sets of stretch-and-folds during bulk fermentation | Rely solely on mixing for gluten development |
| Proof in the refrigerator overnight for better flavor and control | Leave dough to proof at room temperature for 12+ hours unattended |
| Score your loaf deeply (½ inch) with a sharp blade | Make shallow or hesitant cuts that won’t release properly |
| Preheat your baking vessel for at least 60 minutes | Bake in a cold or inadequately heated pot |
| Wait until internal temperature reaches 208–210°F before removing | Remove bread too early, risking gummy crumb |
Real Example: From Brick to Bakery-Quality Loaf
Sophie, a home baker in Portland, struggled for weeks with dense sourdough. Her first attempts were flat, heavy, and barely rose. She followed recipes closely but overlooked her starter’s health. After keeping a baking journal, she noticed her starter wasn’t peaking until 10 hours post-feed—too late for morning bakes.
She adjusted by feeding her starter the night before and baking in the evening. She also introduced stretch-and-folds and increased hydration from 65% to 75%. Her fourth loaf had a dramatically improved crumb, with visible holes and a crisp crust. “I realized I was rushing the process,” she said. “Once I slowed down and paid attention to signs, not just times, everything changed.”
Essential Checklist for Lighter Sourdough
- ✅ Confirm starter is active and passes the float test
- ✅ Use a kitchen scale for accurate measurements
- ✅ Perform 4–6 sets of stretch-and-folds during bulk fermentation
- ✅ Maintain dough temperature between 74–78°F during bulk rise
- ✅ Shape with tight surface tension to support vertical rise
- ✅ Cold-proof overnight for predictable timing and enhanced flavor
- ✅ Preheat Dutch oven for full hour before baking
- ✅ Score deeply and confidently before baking
- ✅ Bake to internal temp of at least 208°F
- ✅ Cool completely (2+ hours) before slicing to prevent gumminess
Frequently Asked Questions
Can I still eat dense sourdough bread?
Absolutely. While texture may not be ideal, dense sourdough is safe and nutritious. Toast it, slice thin for crostini, or repurpose into breadcrumbs or bread pudding. Flavor often remains excellent even if structure fails.
Why does my dough rise fine but collapse when I score it?
This usually indicates over-fermentation. The gluten network has weakened from prolonged fermentation, so releasing pressure via scoring causes collapse. Next time, shorten bulk fermentation by 30–60 minutes and check earlier using the jiggle and poke tests.
Does flour type affect density?
Yes. All-purpose flour has less protein than bread flour, resulting in weaker gluten. For better structure, use high-protein bread flour (12–13% protein) or blend in 10–20% whole rye or whole wheat for enzymatic activity that supports fermentation.
Mastering the Process: Patience Over Perfection
Sourdough is as much about rhythm as it is about recipe. Every variable—temperature, flour, starter maturity, handling—affects the outcome. The journey from dense loaves to open-crumbed success isn’t linear, but it is learnable. Each bake offers feedback. A dense center might mean under-proofing; a flat top could signal weak shaping; a gummy texture often points to premature slicing.
The most successful sourdough bakers aren’t those who never fail—they’re the ones who observe, adjust, and persist. Keep a baking log noting times, temperatures, and observations. Within a few weeks, patterns will emerge, and your confidence will grow alongside your loaves.


 浙公网安备
33010002000092号
浙公网安备
33010002000092号 浙B2-20120091-4
Comments
No comments yet. Why don't you start the discussion?