
A dense sourdough loaf can be frustrating—especially after hours of effort, only to slice into a brick instead of the open-crumbed, airy bread you envisioned. While sourdough baking is both an art and a science, one truth remains: density usually stems from two core variables—hydration and proofing. Understanding how these factors interact gives you control over your final bake. This guide dives deep into the mechanics behind a heavy loaf, offering practical fixes rooted in real baking experience.
The Role of Hydration in Sourdough Structure
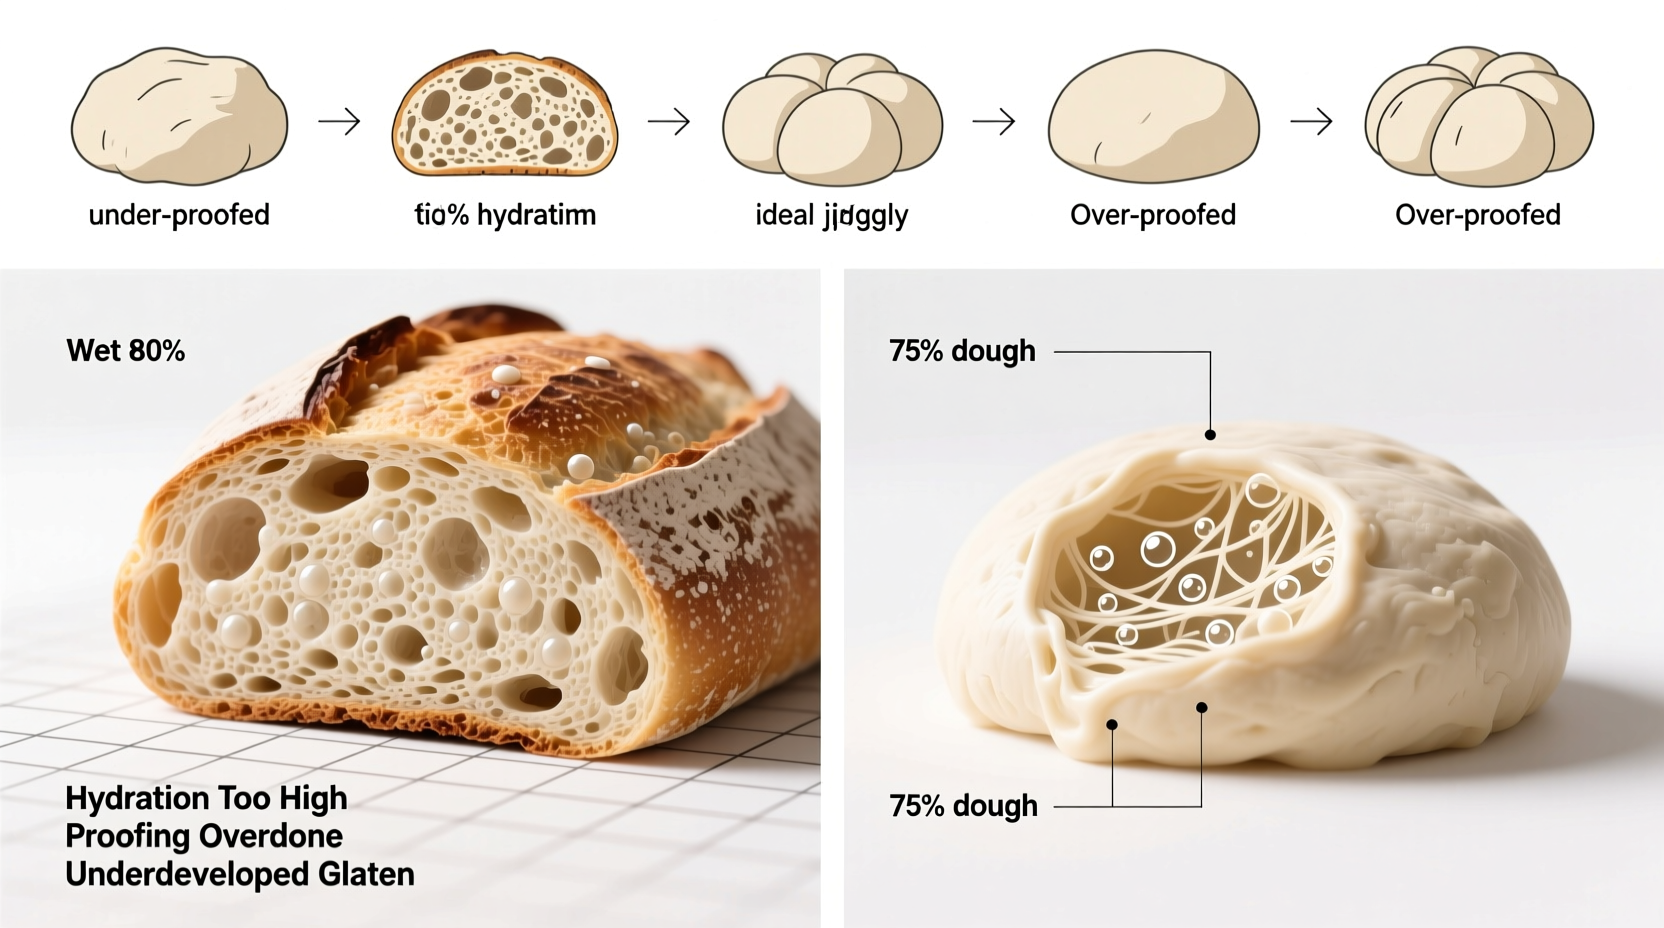
Hydration refers to the ratio of water to flour in your dough, expressed as a percentage. A dough with 300g of water and 500g of flour has a hydration level of 60%. Higher hydration (70% and above) generally produces more open crumb and better oven spring, but it also demands greater skill in handling. Too little water leads to tight gluten networks that restrict expansion, resulting in a compact, dense interior.
Many home bakers err on the side of lower hydration, believing wetter doughs are unmanageable. However, under-hydrated dough lacks extensibility—the ability to stretch without tearing—which limits gas retention during fermentation. Without sufficient gas pockets, the bread cannot rise properly in the oven.
Flour type also affects perceived hydration. Whole grain flours absorb more water than all-purpose or bread flour. If you’re using whole wheat, rye, or spelt, you may need to increase water by 5–10% to achieve similar workability and rise.
How Proofing Impacts Loaf Volume
Proofing—both bulk fermentation and final proof—is where yeast and bacteria produce carbon dioxide, inflating the dough. Under-proofed dough hasn’t developed enough gas; over-proofed dough collapses because the gluten structure breaks down. In either case, the result is often a dense crumb.
Bulk fermentation (the first rise after mixing) builds strength and flavor. During this phase, the gluten network strengthens through time and folding, while wild yeast generate gases trapped within the matrix. Skipping folds or cutting fermentation short prevents proper gas retention.
The final proof (after shaping) allows the shaped loaf to regain momentum before baking. If this stage is too short, the dough won’t expand fully in the oven. Too long, and the structure sags, losing its ability to hold shape and rise.
“Time isn’t the measure of proofing—dough behavior is. Look for jiggle, puffiness, and resistance when poked.” — Daniel Leader, author of *Local Breads*
Troubleshooting Density: A Step-by-Step Guide
Follow this sequence to diagnose and correct the root causes of a dense loaf:
- Assess your starter’s health. A weak or underactive starter won’t produce enough gas. Feed it 8–12 hours before baking and ensure it doubles in size with lots of bubbles.
- Check hydration levels. Weigh ingredients accurately. If your dough feels stiff and resists stretching, consider increasing water by 5–10% next time.
- Evaluate bulk fermentation duration. The dough should feel aerated, domed, and wobble slightly when jiggled. Use the “finger poke test”: gently press in—if it slowly springs back halfway, it’s ready.
- Observe final proof signs. The loaf should look puffy and expand about 30–50%. It will feel light, not dense. Over-proofed dough feels fragile and deflates easily.
- Ensure proper scoring and oven spring. Deep, confident cuts allow steam to escape upward, encouraging vertical rise. Preheat your Dutch oven for at least 30 minutes.
Common Mistakes and Their Fixes
Even experienced bakers make errors. Here are frequent missteps and how to resolve them:
| Mistake | Effect on Loaf | Solution |
|---|---|---|
| Low hydration (below 60%) | Tight crumb, minimal oven spring | Increase water gradually; use autolyse to improve hydration absorption |
| Under-proofed bulk ferment | Dense, gummy texture | Extend bulk fermentation; use warmer environment (75–78°F) |
| Over-proofed final rise | Loaf flattens, poor volume | Reduce final proof time; refrigerate overnight for controlled rise |
| Inadequate gluten development | Dough spreads, doesn’t hold gas | Add coil folds every 30 minutes during bulk ferment |
| Cool oven or no preheating | Poor oven spring, dense bottom | Preheat Dutch oven for 45–60 minutes at 450°F |
Real Example: From Brick to Boule
Sarah, a home baker in Portland, struggled for months with consistently dense loaves. Her process used 500g all-purpose flour, 300g water (60% hydration), and a refrigerator-stored starter she fed sporadically. She mixed, shaped immediately, and let the loaf rise for two hours at room temperature before baking.
After consulting a local bakery, she adjusted her method: she began feeding her starter daily, increased hydration to 70% (350g water), incorporated four sets of coil folds during a 4-hour bulk ferment, and switched to an overnight cold proof in the fridge. Her next loaf had a dramatic open crumb and rose nearly double in height.
The transformation wasn’t magic—it was precision. By addressing hydration and extending fermentation, Sarah allowed her dough the time and structure needed to trap gas effectively.
Hydration Adjustments by Flour Type
Not all flours behave the same. Adjusting hydration based on flour composition is essential for optimal dough performance.
- All-Purpose Flour: Works well at 65–70% hydration. Predictable and forgiving.
- Bread Flour: Higher protein content allows for 70–78% hydration due to stronger gluten formation.
- Whole Wheat: Absorbs more water; aim for 75–80% hydration. May require longer autolyse (resting flour and water before adding starter).
- Rye Flour: Low gluten, high water retention. Even 80% hydration can feel sticky. Best blended with wheat flour.
Autolyse—resting flour and water for 30–60 minutes before adding starter and salt—improves hydration absorption and gluten development. This simple step reduces mixing time and enhances dough extensibility, directly combating density.
Proofing Environment: Temperature Matters
Temperature governs fermentation speed. At 65°F, bulk fermentation may take 6–8 hours. At 78°F, it might finish in 3–4 hours. Many bakers fail to account for ambient temperature, leading to under-proofed dough in cool kitchens.
To stabilize proofing:
- Use a proofing box or oven with a bowl of warm water to maintain 75–78°F.
- Retard the final proof in the refrigerator for 8–12 hours. Cold slows fermentation, enhancing flavor and preventing over-proofing.
- Monitor dough—not clock. Time is a guideline; visual and tactile cues are definitive.
“The best sourdough bakers aren’t those who follow recipes blindly, but those who watch, touch, and respond to their dough.” — Ken Forkish, *The Elements of Pizza*
Essential Checklist for Light, Airy Sourdough
Use this checklist before your next bake to avoid a dense outcome:
- ✅ Starter is active, bubbly, and peaks 8–12 hours after feeding
- ✅ Hydration matches flour type (65–70% for AP, 70–78% for bread flour)
- ✅ Autolyse performed for 30–60 minutes before mixing
- ✅ Coil folds or stretch-and-folds done every 30 minutes during first 2 hours of bulk ferment
- ✅ Bulk fermentation complete: dough risen ~50%, jiggly, passes finger poke test
- ✅ Final proof is 30–50% larger, not flat or collapsed
- ✅ Dutch oven preheated for at least 30 minutes at 450°F
- ✅ Loaf scored deeply (¼ to ½ inch) before baking
Frequently Asked Questions
Can I fix an under-proofed loaf during baking?
No. Once in the oven, the structure is set. However, if you notice poor oven spring, extend bulk fermentation next time. You can sometimes rescue slight under-proofing with a hotter oven (up to 475°F) and longer covered bake (25 minutes).
Why is my dough sticky even with low hydration?
Stickiness isn’t always about water content. High extraction flours (like whole grain) release starches that feel tacky. Also, during fermentation, enzymes break down proteins and starches, increasing surface stickiness. Focus on dough strength and rise rather than dryness.
Does salt affect density?
Indirectly. Salt strengthens gluten and controls fermentation. Omitting salt leads to slack dough that can’t retain gas, causing collapse and denser texture. Always include 1.8–2% salt by flour weight.
Conclusion: Master Your Variables, Transform Your Bread
A dense sourdough loaf isn’t a failure—it’s feedback. Hydration and proofing are the twin pillars of structure, and small adjustments yield dramatic improvements. By refining your attention to dough feel, fermentation timing, and environmental conditions, you gain the insight needed to produce consistently light, flavorful bread.


 浙公网安备
33010002000092号
浙公网安备
33010002000092号 浙B2-20120091-4
Comments
No comments yet. Why don't you start the discussion?