
Starting a sourdough culture from scratch is both exciting and nerve-wracking. By day 4, many bakers expect to see lively bubbles, a tangy aroma, and signs of vigorous fermentation. When those bubbles don’t appear, it’s easy to assume something has gone wrong. But lack of activity at this stage doesn’t mean failure—it’s often a sign that conditions aren’t quite right yet. Understanding the science behind sourdough fermentation and recognizing common pitfalls can help you revive your starter and set it on the path to success.
Sourdough starters rely on wild yeast and lactic acid bacteria naturally present in flour and the environment. These microorganisms need time, consistency, and favorable conditions to establish dominance over less desirable microbes. Day 4 is typically when the initial bacterial bloom begins to subside and yeast populations should start gaining momentum. If there's no visible bubbling, it’s time to assess what might be holding your culture back.
Understanding the Sourdough Timeline: What Should Happen by Day 4?
Between days 3 and 5 of a new sourdough starter, cultures often go through a “dip” in activity. This phase, sometimes called the “sourdough slump,” occurs as early-colonizing bacteria like Enterobacter decline and more desirable species such as Lactobacillus and wild Saccharomyces begin to take over. During this transition, your starter may appear sluggish, have an unpleasant odor (like acetone or rotten cheese), and show little to no bubbling.
This is normal—but only up to a point. True fermentation should resume within 24–48 hours after this low point if conditions are correct. By day 4, you should observe at least some small bubbles forming around the edges or just beneath the surface, especially 4–8 hours after feeding. A mild sour or yogurt-like smell is also encouraging. Absence of these signs suggests one or more factors are inhibiting microbial growth.
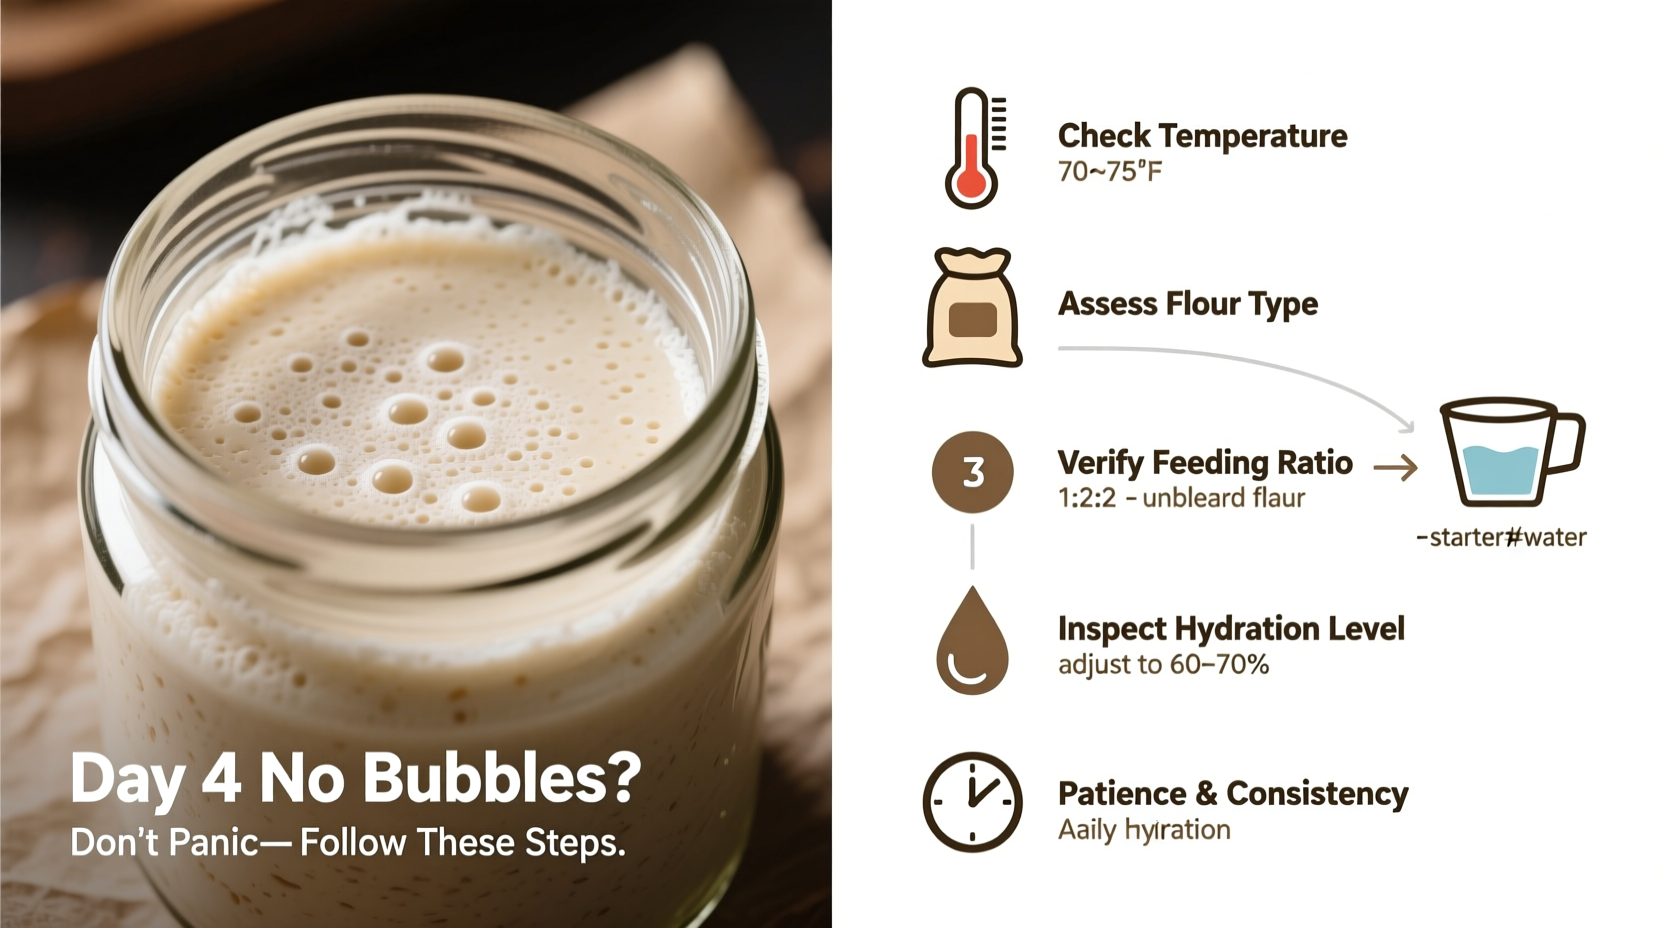
Common Causes of Inactivity in a Day 4 Starter
- Cool temperatures: Yeast and bacteria slow dramatically below 70°F (21°C).
- Inconsistent feeding schedule: Skipping or delaying feedings starves developing microbes.
- Chlorinated water: Tap water with chlorine or chloramine can kill sensitive cultures.
- Wrong flour type: Highly processed flours lack nutrients needed for robust fermentation.
- Covering too tightly: Anaerobic conditions prevent gas exchange necessary for healthy rise.
- Using metal utensils: Reactive metals like aluminum may inhibit microbial activity.
Step-by-Step Revival Plan for a Non-Bubbling Starter
If your starter shows no signs of life by day 4, follow this structured approach to diagnose and correct the issue. Patience and precision are key—many starters recover fully with minor adjustments.
- Discard all but 20g of starter. Keeping too much old mixture dilutes fresh food and prolongs imbalance.
- Feed with 20g whole rye or whole wheat flour and 20g lukewarm filtered water (75–80°F / 24–27°C). Whole grains provide more nutrients and microbes than white flour.
- Place in a warm spot (75–80°F / 24–27°C). Consider using an oven with only the light on, near a radiator, or inside a turned-off microwave with a mug of hot water.
- Cover loosely with a breathable lid or cloth. Oxygen access supports aerobic yeast development.
- Repeat every 12 hours without fail for 3 days. Consistency builds microbial confidence.
- Observe closely 4–6 hours after each feeding. Look for tiny bubbles, expansion (at least 1.5x volume), and a pleasantly sour smell.
If no change occurs after 48 hours of this regimen, consider refreshing twice daily with a higher proportion of whole grain flour. Some bakers report success switching entirely to rye flour for two cycles before transitioning back to all-purpose.
Environmental Factors That Impact Fermentation
Temperature is the single most influential factor in sourdough development. Microbial metabolism slows significantly below 70°F and nearly stops below 65°F. Conversely, above 85°F risks promoting unwanted bacteria and off-flavors. The ideal range for starter development is 75–80°F.
Humidity also plays a role. Dry environments cause crust formation on top of the starter, which traps gases and masks bubbling. To combat this, keep your jar covered with a damp cloth or store it in a slightly sealed container with ventilation.
| Factor | Optimal Range | Pitfalls |
|---|---|---|
| Temperature | 75–80°F (24–27°C) | Below 70°F: Slow fermentation; Above 85°F: Unbalanced microbes |
| Feeding Ratio | 1:1:1 (starter:flour:water) | Too much starter = fast acidification; Too little = weak growth |
| Flour Type | Whole rye or whole wheat (first week) | Bleached white flour lacks nutrients and microbes |
| Water Quality | Filtered, dechlorinated | Chlorine kills beneficial bacteria |
| Container Material | Glass or food-grade plastic | Reactive metals (aluminum, copper) may inhibit growth |
“Many beginners give up too soon. The critical window is days 4 to 6—this is when the culture rebalances. With consistent feeding and warmth, even dormant-looking starters often come back strong.” — Dr. Karl DeSaulniers, Artisan Bread Scientist & Fermentation Researcher
Troubleshooting Checklist: Is Your Starter on the Right Track?
Use this checklist to evaluate whether your starter has a chance of recovery or needs a reset.
- ✅ Fed within the last 12 hours? (No missed feeds)
- ✅ Stored between 75–80°F? (Not on a cold countertop)
- ✅ Using non-chlorinated water? (Filtered or left-out tap water)
- ✅ Smells sour, yeasty, or fruity—not putrid or ammonia-like?
- ✅ Has at least a few bubbles visible upon close inspection?
- ✅ Held in a clean glass jar with loose cover?
- ✅ Fed with whole grain flour at least once in the past 48 hours?
If you answered “no” to three or more items, correcting those factors could revive your starter within 24–48 hours. If your starter smells foul (like rotting eggs or sewage), shows pink or orange streaks, or has developed mold, it’s best to discard it and restart with sterile equipment.
Real Example: Recovering a Stalled Rye Starter
Sophie, a home baker in Portland, OR, began her sourdough journey using all-purpose flour and tap water. By day 4, her starter had darkened slightly and emitted a sharp vinegar scent—but showed zero bubbles. Discouraged, she almost discarded it until reading about temperature’s role in fermentation.
She switched to whole rye flour, used filtered water, and placed her jar in a small insulated cooler with a mason jar of warm water renewed every 12 hours. Within 36 hours, small bubbles appeared. After two full days of twice-daily feedings at 78°F, her starter was doubling in size within 6 hours and had a pleasant tangy aroma. She successfully baked her first loaf on day 9.
Sophie’s experience highlights how multiple small improvements—especially warmth and nutrient-rich flour—can turn a stalled starter into a thriving one.
Frequently Asked Questions
Can I use tap water for my sourdough starter?
It depends. Municipal tap water treated with chlorine may harm developing cultures. Letting tap water sit uncovered for 24 hours allows chlorine to evaporate. However, if your city uses chloramine (a more stable disinfectant), you’ll need a carbon filter or bottled spring water. When in doubt, use filtered water during the first week of starter development.
Should I throw away my starter if it’s not bubbling by day 4?
No—not yet. Lack of bubbles by day 4 is extremely common. As long as it doesn’t smell putrid or show mold, continue feeding consistently with whole grain flour and maintain a warm environment. Most starters rebound between days 5 and 7 with proper care.
How do I know if my starter is dead?
A truly dead starter will show no response to fresh feeding after 3 days of optimal care (warmth, whole grain flour, regular feedings). Signs of life include any bubbles, slight rise, or change in smell. Mold (fuzzy spots in green, pink, or black), slimy texture, or sewage-like odor indicate contamination and require disposal.
When to Reset vs. When to Persist
There’s a fine line between patience and futility. If your starter remains completely inert—no bubbles, no rise, no aroma shift—for 72 hours despite corrected feeding, temperature, and flour choices, consider starting over. But do so with lessons learned: use whole grain flour from day one, maintain warmth, and avoid chlorinated water.
Some bakers find success by “jump-starting” their starter with a small amount (1 tsp) of unpasteurized sauerkraut juice or organic pineapple juice on day 1 or 2. These contain acids that lower pH quickly, discouraging harmful bacteria while favoring lactobacilli. Note: this method is temporary—return to plain water and flour after two feedings.
Conclusion: Trust the Process and Take Action
A sourdough starter that isn’t bubbling after day 4 is not a lost cause—it’s often a signal that simple adjustments are needed. Temperature, flour quality, hydration, and feeding rhythm all influence microbial development. By methodically addressing each factor, most starters regain vitality within 48 to 72 hours.
The journey of sourdough is as much about understanding natural fermentation as it is about baking. Every failed rise or quiet jar teaches you more about the invisible world of wild yeast and bacteria. Don’t abandon your starter at the first sign of trouble. Instead, apply targeted corrections, stay consistent, and give nature the time it needs to thrive.


 浙公网安备
33010002000092号
浙公网安备
33010002000092号 浙B2-20120091-4
Comments
No comments yet. Why don't you start the discussion?